 clipoven
You’ve got a recording worth posting, but the opening drags, the best moment sits behind a long explanation, and the vertical crop cuts off the reaction. Or the video’s already uploaded, and you just need to remove a mistake without rebuilding everything.
Learning how to make edits on YouTube starts with separating those jobs. Use the native tools for straightforward changes, use a full timeline when the story needs rebuilding, and check the result against captions and viewer behavior, not just whether the transitions look polished.
Table of Contents
- Choose the Right YouTube Editor for Each Upload
- How to Trim, Cut and Polish a Video Step by Step
- Edit a Short in the YouTube App
- Make Captions Readable With the Sound Off
- Export Settings That Upload Cleanly
- Confirm the Edit Before You Publish
- Read Retention Data to Plan Your Next Edit
Choose the Right YouTube Editor for Each Upload
YouTube Studio’s Editor suits repairs to an uploaded video. The Shorts editor in the YouTube app suits assembling vertical clips before publication. Neither replaces a full editing timeline when you need to reorder scenes, repair dialogue, or track a moving subject precisely.
YouTube’s origins were much simpler: its first upload, “Me at the Zoo,” appeared on April 23, 2005, according to YouTube’s anniversary retrospective. The useful principle for today’s editor is still straightforward: make the subject understandable before adding production flourishes.
Editing tasks by editor
| Task | Long video (YouTube Studio) | Short (YouTube app) | Best practice |
|---|---|---|---|
| Trim start or end | Yes, in the Editor | Yes, in the timeline | Trim the source first if the file is very long |
| Cut out middle sections | Yes, in the Editor | Split and remove clips where available | Plan cuts from the transcript, not by ear |
| Add captions | Auto-generated, then editable in Subtitles | Automatic captions where available, with styling controls | Review every line before publishing |
| Add music or sound | Audio from the library | Audio and available sound effects | Keep speech above music |
| Vertical framing | Not a horizontal-to-vertical conversion tool | Built for vertical output | Reframe manually for moving subjects |
App controls can differ by version and account. If you can’t find a needed timeline control, prepare that change before importing rather than forcing an awkward workaround.
Choose the moment before choosing effects
A strong long-form segment isn’t automatically a strong Short. A gaming reveal might depend on a challenge explained much earlier; give the extracted moment a short premise instead of preserving all that setup.
Stream recordings need particular care. Remove repeated explanations and private references that a new viewer couldn’t understand, but keep the reaction that makes the moment worth watching.
Selection test: Can a stranger identify the subject immediately and understand why the moment matters?
If the answer requires rearranging footage, compare video editing software options before committing to the native editor.
How to Trim, Cut and Polish a Video Step by Step
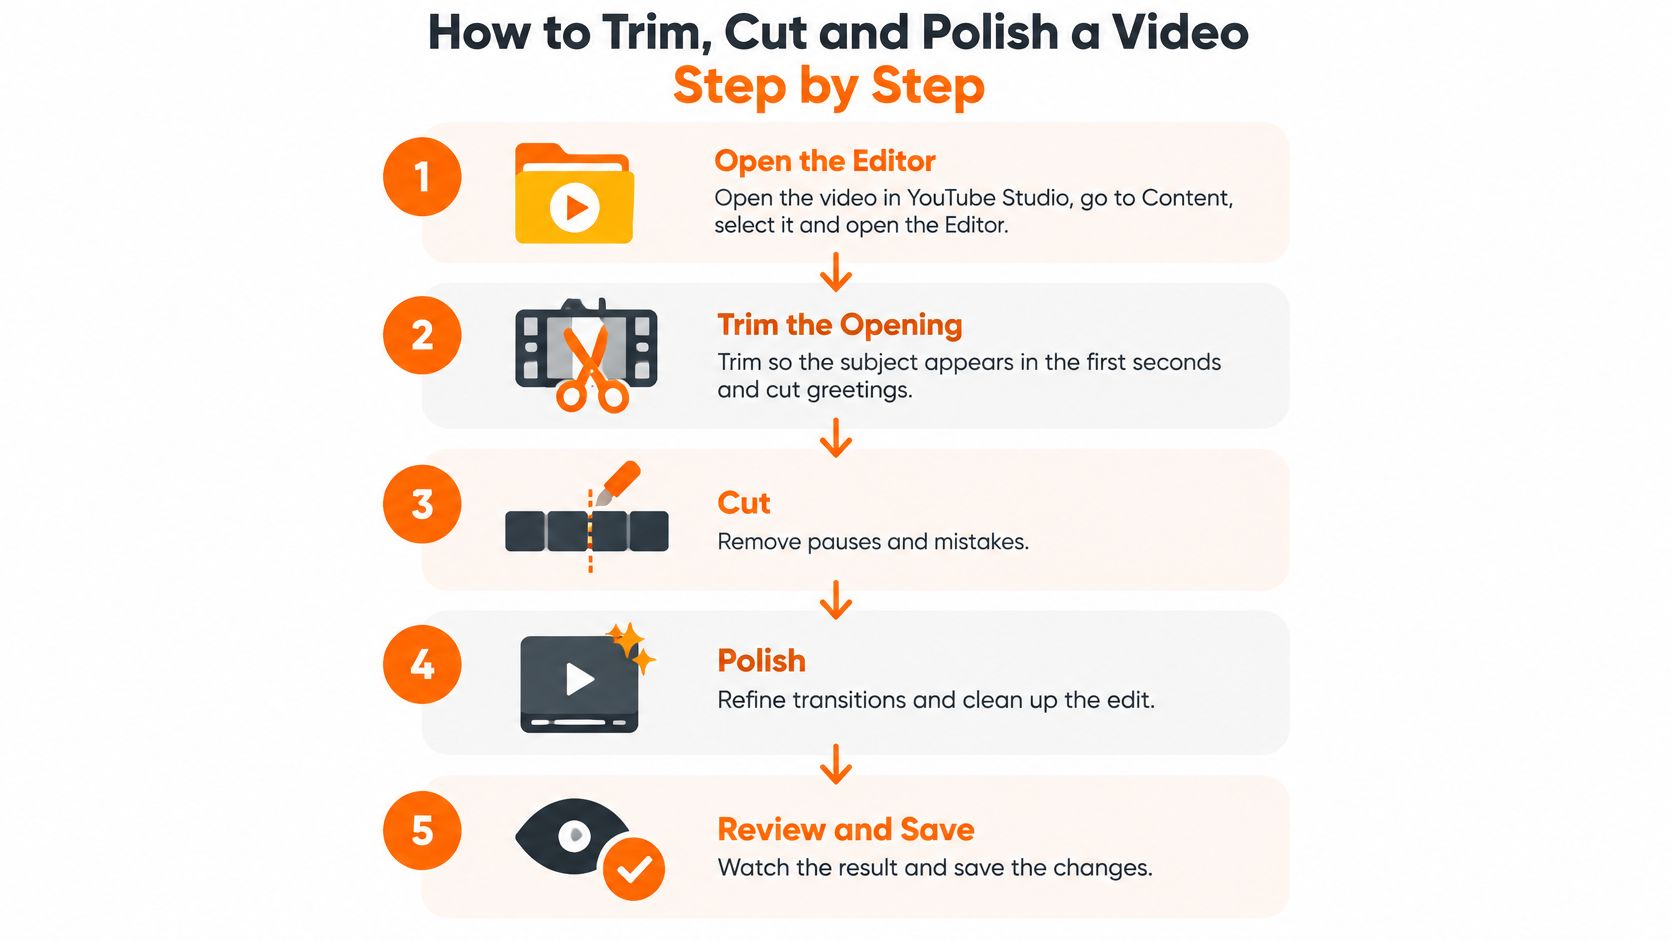
On desktop, open YouTube Studio → Content, select your video, then choose Editor. Keep your original file: the uploaded copy shouldn’t be your only working asset.
The native workflow follows this basic sequence.
Make structural changes first
-
Trim the opening. Choose Trim & cut, then adjust the opening boundary so the viewer reaches the subject without an unnecessary greeting. Preview the boundary rather than trusting the waveform alone, because a tight visual cut can still clip the beginning of a word.
-
Remove dead air and repeated lines. Create a cut around the unwanted passage, adjust its boundaries, and preview the join. Keep a pause when it supports a joke or reaction; removing every breath makes speech uncomfortable to follow.
-
Bring the useful material forward. Studio can remove material, but it isn’t a scene-reordering timeline. If the payoff needs to move ahead of the setup, restructure the source in a full editor and upload that finished version instead.
-
Check sentence boundaries. Listen across each join with your eyes off the screen. A cut that preserves the complete sentence can still sound wrong if the speaker’s pitch or background noise changes abruptly.
Don’t try to solve a structural problem with a transition. If the explanation doesn’t make sense, a dissolve won’t supply the missing context.
Polish only after the cut works
-
Balance speech and music. Use the available audio controls conservatively, keeping dialogue intelligible throughout. If the recording needs detailed noise repair or independent mixing of voices and game audio, fix the source outside Studio.
-
Add supporting visuals where the tool allows. Studio doesn’t offer a general-purpose workflow for adding zooms and arbitrary text overlays to existing footage. Make those additions in your source editor, and leave decorative effects until the cut is settled so you won’t have to retime them.
-
Review the whole video. Check at full playback quality, not only around the sections you changed. Listen for broken phrases, sudden volume changes, and a missing explanation that a later sentence still refers to.
-
Save and verify the processed result. Read any confirmation carefully before committing, then inspect the finished playback on a phone. For an unpublished upload, keep it private or unlisted until that review is complete.
This walkthrough provides a visual reference for the native controls.
The finished cut should move without making viewers feel they’re waiting. It should also leave enough space for every sentence to land.
Edit a Short in the YouTube App
Open the YouTube app, tap the create button, and choose the option to create a Short. Record footage or select a clip from your camera roll, then open the editing controls.
For an eligible video you’ve already published, YouTube also offers a source-video-to-Short workflow. Its Shorts creation guidance describes using the source transcript for automatic captions and customizing their presentation.
Assemble the clip
- Set the boundaries. Drag the trim handles to keep the intended moment. Don’t remove the premise just because the reaction looks more exciting.
- Remove interruptions. Where your app exposes split and delete controls, isolate unwanted sections and remove them. If those controls aren’t available, prepare the cuts in another editor before importing.
- Mix the audio. Add music or sound effects from the available tools, then adjust their level against the original recording. Preview a quiet spoken passage, not just the loudest reaction.
- Time supporting text. Add a premise, label, or caption where it helps comprehension. Keep essential text away from faces and preview when it appears and disappears.
Treat the crop as an editing decision
Horizontal gameplay often contains competing subjects: the player’s camera, the game action, and interface information. Don’t assume a centered crop can preserve all of them.
Adjust the framing with the available crop controls and inspect every change in subject position. If the app can’t maintain the composition you need, import a pre-reframed vertical file rather than accepting a missing face or cropped-out objective.
A clean crop of the wrong subject is still the wrong edit.
Play the complete Short with sound, then mute it and check whether the action remains understandable. Tap Next, complete the available title, visibility, audience, and other upload settings, then publish when the preview is correct.
Make Captions Readable With the Sound Off
Mute the clip before approving its captions. If the text leaves you guessing who spoke, what happened, or why the reaction matters, the edit isn’t ready for silent viewing.
Automatic transcription is a draft, not a finished accessibility pass. YouTube’s automatic-caption guidance tells creators to review and correct captions because recognition errors can misrepresent speech.
Caption review means correcting meaning, not merely selecting a font.
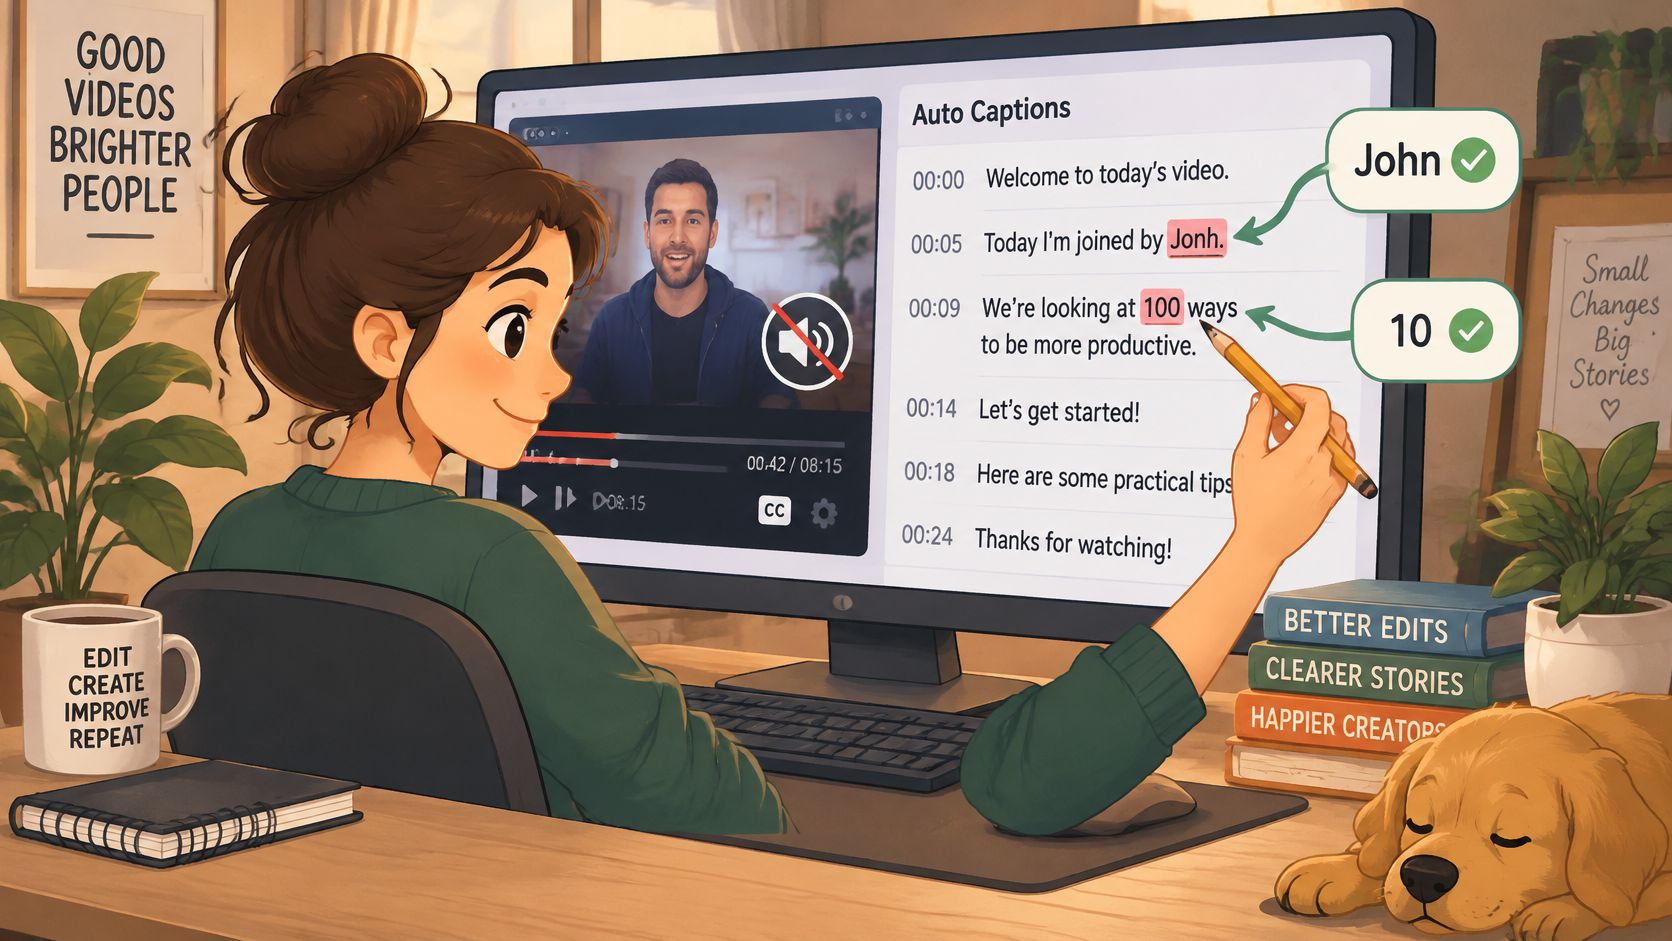
Review the transcript before styling it
- Correct vocabulary. Check player names, game titles, product terms, and spoken numbers against the recording.
- Repair timing. Keep captions aligned with the speaker, and remove text that lingers into an unrelated shot.
- Preserve meaning. Add punctuation and relevant sound cues, such as laughter, when they explain an otherwise confusing reaction.
- Break phrases naturally. Don’t separate a name, a short expression, or a closely connected phrase merely to fill the caption box.
Read on an actual phone. Text that looks restrained on a desktop preview can become cramped once the platform’s controls surround it.
Burned-in captions vs separate subtitle tracks
| Format | Strength | Limit |
|---|---|---|
| Burned-in captions | Stay visible when the clip is reposted to other platforms | Changing or translating the embedded text requires a new render |
| Separate subtitle track | Editable and easy to translate into other languages | Visibility depends on playback settings or the viewer enabling captions |
Use a separate track when localization and future corrections matter. Burned-in text suits a designed social clip, but it shouldn’t prevent you from maintaining an accurate subtitle track too.
Keep animation restrained. Moving every word can compete with gameplay, demonstrations, or facial expressions; use contrast and placement before adding motion. Our guide to on-screen text covers the broader distinction between captions and visual labels.
Finish by reading the complete clip without sound. Correct words aren’t enough if the viewer can’t connect them to the action.
Export Settings That Upload Cleanly
Use these settings for files you render in an external editor. YouTube Studio’s native edits don’t expose an export-settings panel for you to configure.
Export settings for YouTube uploads
| Setting | Recommended value | Why it matters |
|---|---|---|
| Container | MP4 with moov atom at the front | Supports faster processing on upload |
| Video codec | H.264, High Profile | Matches the recommended upload specification |
| Bitrate | Variable bitrate | Allocates data according to image complexity |
| Chroma | 4:2:0 | Matches the recommended color sampling |
| GOP length | About half the frame rate, closed GOP | Matches the recommended encoding structure |
| Audio | AAC-LC at 48 kHz | Matches the recommended audio format |
| Frame rate | Same as the source, without unnecessary resampling | Avoids introducing cadence problems |
| Edit lists | Avoid in the final file | Prevents a known source of processing problems |
The technical values in this table come from YouTube’s recommended upload encoding settings, including H.264, AAC-LC at 48 kHz, and source-matched frame rates.
Test the difficult passage
Create your sequence to match the recorded resolution and frame rate. Deinterlace interlaced material before uploading, and don’t convert frame rates just because another preset looks more familiar.
Export a short passage containing motion, speech, and any dense visual detail. Inspect lip sync, clipped audio, uneven motion, and compression around text or fast gameplay before rendering the master.
Export rule: A successful render confirms that a file exists, not that the file looks and sounds right.
Keep the intended aspect ratio without adding letterbox or pillarbox bars yourself. For vertical delivery, inspect the reframed output on a phone, especially where the subject moves; the Shorts export settings guide provides a focused reference for that workflow.
Confirm the Edit Before You Publish
Run a final check on the actual upload file, not just the editing preview. A correct timeline can still produce an export with missing captions, distorted audio, or an accidental crop.
Use a pre-publish gate
- Silent playback passes. Read the captions and confirm that names, numbers, and relevant sound cues match the intended meaning.
- The opening is clear. Check that viewers can identify the subject without sitting through greetings or branding.
- The export is clean. Confirm synchronization, undistorted sound, steady motion, and acceptable image quality.
- The mobile layout works. Inspect the clip in its destination preview so action buttons and other controls don’t obscure important text or faces.
If something fails, repair that item and repeat the check. Don’t rebuild a working sequence because a caption needs repositioning.
With our workflow, you can keep chatting with Eddie after the first edit or open the full editor to adjust cuts, timing, captions, and effects yourself. Final vertical clips can be exported in 2K, ready for TikTok and YouTube Shorts.
Publish once the checks pass, then schedule an analytics review after the video has gathered useful viewing activity. That review should inform a specific editing decision, not trigger changes merely because the view count feels disappointing.
Read Retention Data to Plan Your Next Edit
An opening drop is a useful place to investigate, but it isn’t proof that every departing viewer disliked the edit. Check whether the opening delivered the subject and promise that the title and thumbnail led viewers to expect.
In YouTube Studio, select the video, open Analytics, and inspect audience retention. YouTube’s audience-retention documentation supports comparison with similarly long videos and specifically recommends experimenting with the first 30 seconds.
Retention patterns and the edit to test
| Retention pattern | Likely cause | Next edit to test |
|---|---|---|
| Sharp opening drop | Slow or branded intro | Open on the payoff or the subject |
| Steady decline after a long setup | Context arrives too late | Add a one-line premise early |
| Dip at a repeated explanation | Redundant line | Cut the repeat and keep the stronger version |
| Replay spike at a joke or reveal | A moment viewers wanted to revisit | Move a comparable moment earlier |
| Long on-screen text with a drop | Reading burden or interrupted pacing | Shorten the text or distribute it across cuts |
| Drop in the final seconds | Viewers reached the ending | Leave it alone if the ending is complete |
These are hypotheses, not diagnoses. A replay spike might indicate delight, but it can also mean viewers needed another look to understand something.
Connect the curve to the timeline
Find the exact passage around a dip and watch what happened immediately before it. Did you repeat an instruction, switch subjects without explanation, or cover an important game event with text?
Choose a single change to test in a comparable future upload. If you shorten the introduction, replace the music, redesign captions, and add zooms simultaneously, you won’t know which decision helped.
For Shorts, check whether viewers continued watching alongside the retention pattern. Don’t assume a heavily decorated opening is effective just because it looks busier.
Keep an edit log
Record the video’s premise, the passage you questioned, the change you tested, and what viewers did afterward. Compare similar formats and lengths rather than treating unrelated uploads as a controlled experiment.
Don’t interpret a normal ending drop as an instruction to remove the ending. Likewise, don’t tighten dialogue until viewers have to work to understand it.
The useful outcome is a repeatable decision: keep a successful opening structure, remove an unnecessary explanation, or give a difficult reveal more context. That’s how editing continues after upload without becoming endless tinkering.
Bring your horizontal footage to clipoven and tell Eddie what kind of vertical short you want to make. Refine the proposed cuts, captions, and effects through chat, then use the full editor to check timing and readability before uploading to YouTube Shorts.