 clipoven
If you share a great moment from a YouTube video, have you created a new video, or just sent someone to the right place in the original? That distinction explains much of the confusion around the YouTube Clip feature, especially when an older tutorial shows a button you can’t find.
YouTube’s sharing tools, creator-side clipping tools, and vertical editing workflows serve different purposes. Choosing the right one starts with what you want viewers to receive: a place to start watching, a republished highlight, or a finished Short.
Table of Contents
- What the YouTube Clip Feature Is and Why It Exists
- Three Clip Workflows Compared and When Each Fits
- How to Share, Republish and Create a Clip Step by Step
- Limits, Rights and Context Risks to Check
- Shorts Reach Versus Long-Form Context
- Who Uses Clips and How Creators Apply Them
- Pick the Right Clip Workflow for Your Goal
What the YouTube Clip Feature Is and Why It Exists
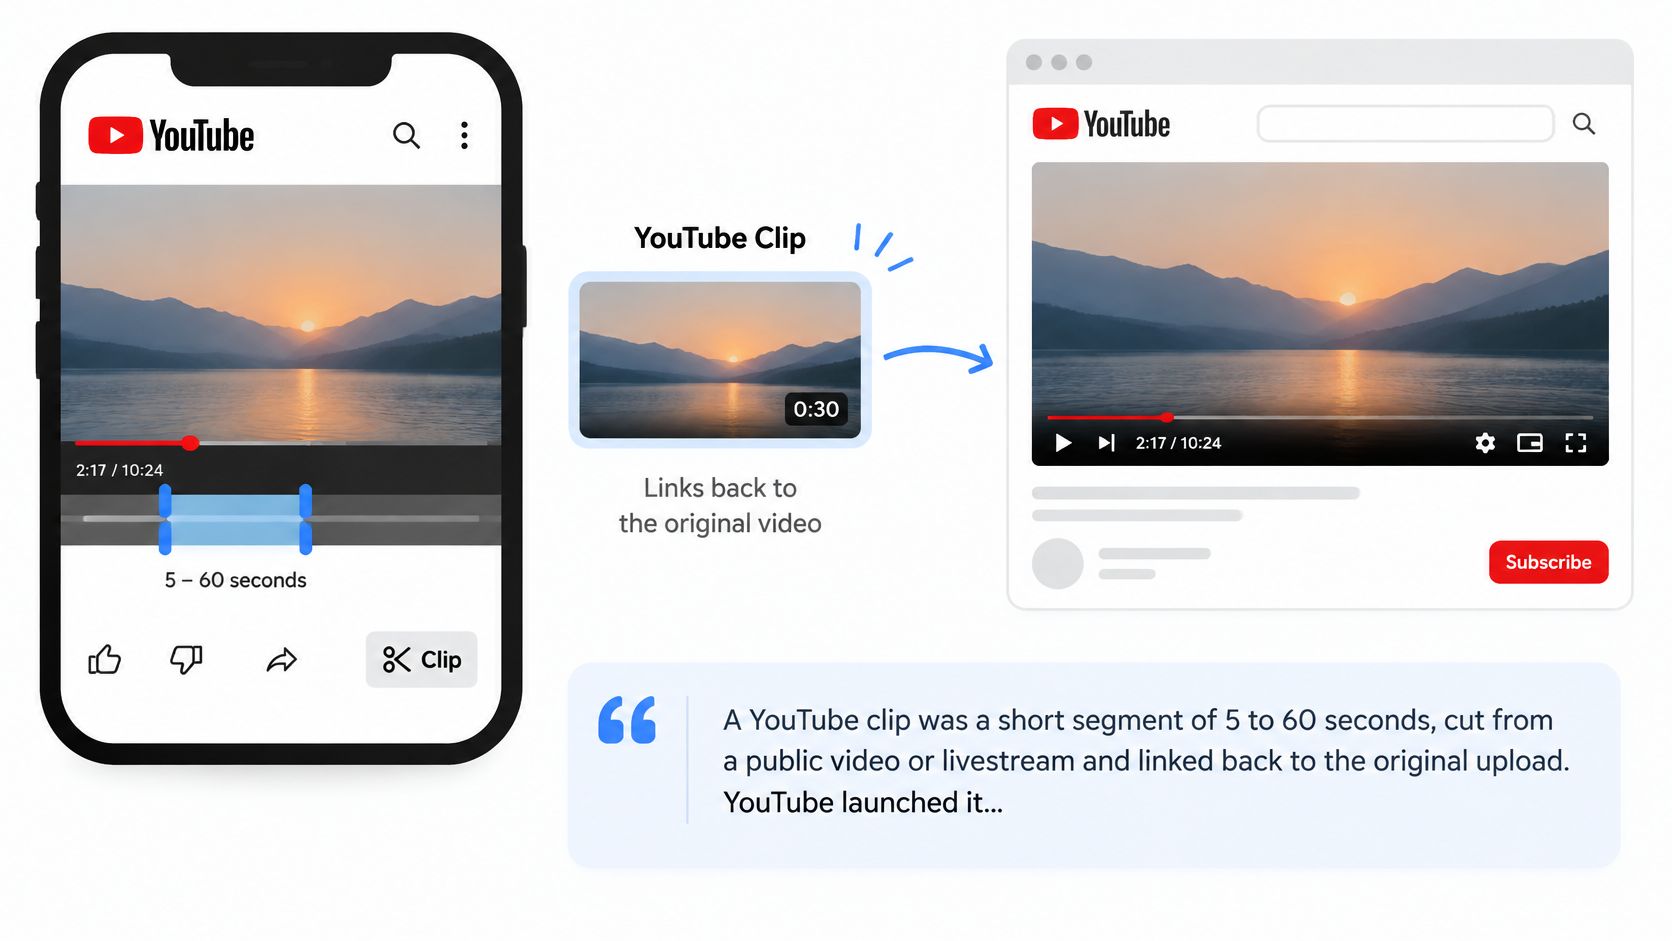
A legacy YouTube Clip was a short, shareable segment of an eligible video or livestream that stayed connected to the original upload, rather than becoming a separate uploaded video.
YouTube introduced Clips as an experiment in January 2021, with segments lasting 5 to 60 seconds, according to YouTube’s Clips documentation. That definition describes the original viewer-facing feature, not every tool now described as clipping.
Think of a Clip as a sticky note inside a library book. The page stays in the book, but the note marks the passage someone else should read. You haven’t copied the book or published a new edition.
A selected passage, not a separate upload
A plain timestamp link identifies where playback should begin. The legacy Clip also defined where the moment ended, creating a bounded segment that could loop on the original watch page.
That was particularly useful for livestreams. Say a gaming broadcast contains a surprising comeback surrounded by lengthy matchmaking and conversation. A viewer could share the comeback without downloading the broadcast or learning a video editor.
The connection to the source mattered just as much as the selection. Viewers could identify the original channel and continue into the full video, rather than encounter an anonymous excerpt detached from its creator.
The viewer-facing Clip has since been superseded as the main sharing route. Don’t use its old controls as instructions for making a new vertical upload. The useful distinction is whether you’re directing someone into existing content or preparing a separate video that must make sense on its own.
Three Clip Workflows Compared and When Each Fits
YouTube clip workflows compared
| Workflow | Source video | Length | Output |
|---|---|---|---|
| Share at Timestamp | Another creator’s public video | Starts at chosen time, no custom end | Timestamped link to the original |
| Viewer Clip (legacy) | Eligible public video or livestream | Existing segment’s saved start and end points | Looping segment with description, still viewable |
| Studio Video Clips | Your own long-form video or archived stream | Segment selected within the source video | Republished clip on your channel |
| YouTube Shorts | Your own footage, uploaded or edited | Must meet YouTube’s current Shorts upload requirements | Separate vertical upload for the feed |
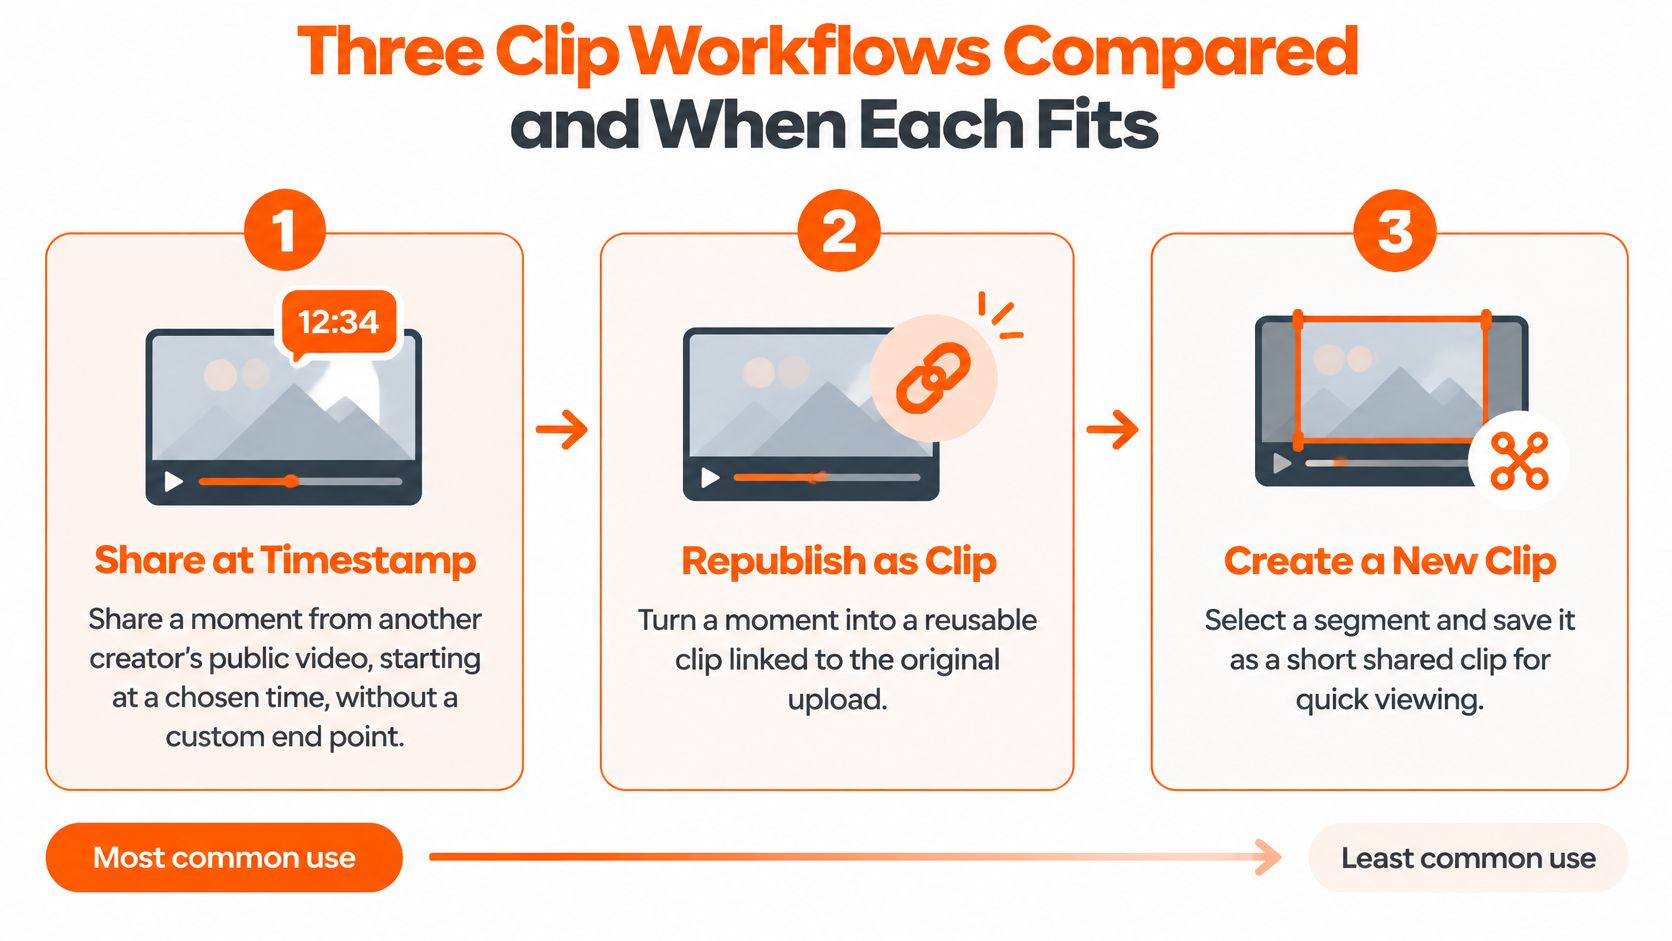
Share at Timestamp fits audience sharing: you want someone to hear an answer or see a play inside another creator’s video.
Viewer Clip describes an existing legacy object, not the workflow to build around when making something new.
Studio Video Clips fits owned-content republishing: you want a highlight to become a separate video on your channel.
YouTube Shorts fits edited vertical publishing: you need deliberate framing, captions, pacing, and an independent opening.
According to YouTube’s sharing and Clips guidance, Share at Timestamp is replacing viewer-created Clips as the primary way to share moments, without the old custom end point or description, while existing Clips remain viewable. The same guidance distinguishes creator-side Video Clips and describes planned extensions involving Shorts and suggested clippable moments. Treat planned capabilities as plans, not controls you can assume are available.
Choose by the result you need
A timestamp link and a Studio clip aren’t interchangeable. The former sends someone into an existing video; the latter republishes selected owned material as another video.
A Short requires another editorial decision: what should viewers see when the original wide frame won’t fit their screen? A streamer’s face, gameplay interface, and reaction may all matter, so trimming the source isn’t enough.
Use timestamp sharing for someone else’s moment, Studio clips for owned-content republishing, and a separate vertical edit when mobile-feed discovery is the objective. Before choosing, ask whether your audience needs the surrounding video or a self-contained explanation.
How to Share, Republish and Create a Clip Step by Step
Start by finding the complete moment, including whatever setup makes it understandable. Menu names and availability can change, so follow the labels in your account rather than hunting for an old tutorial’s exact button.
Share a moment with a timestamp
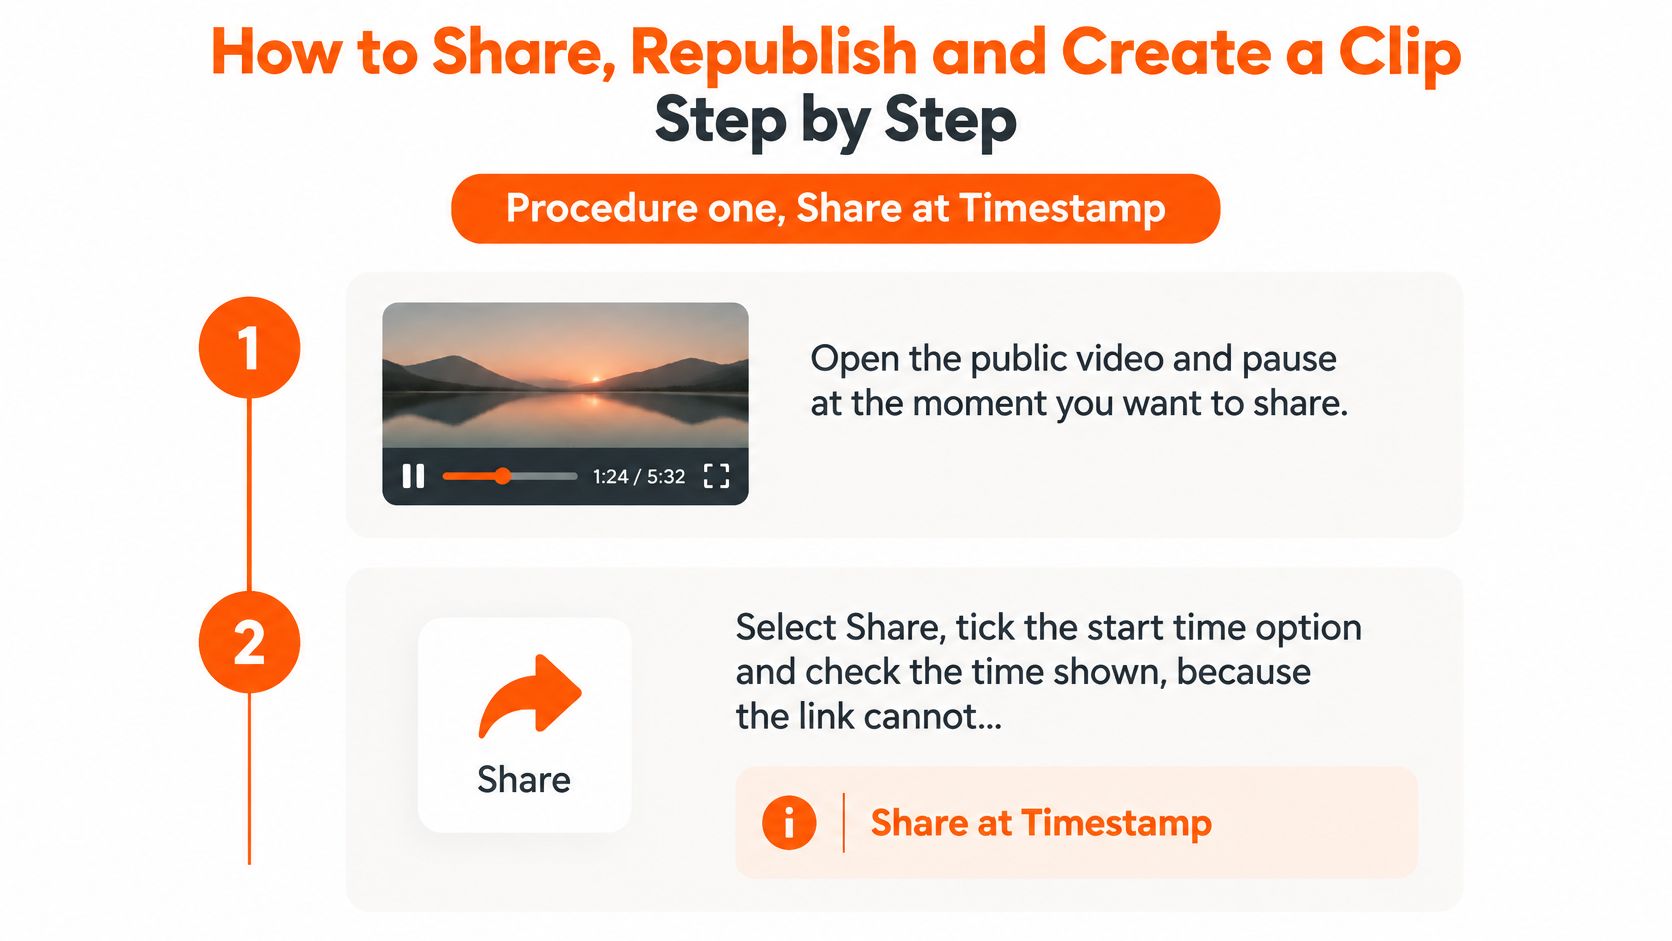
- Open and pause the video. Stop where the useful setup begins, so the recipient doesn’t arrive after the explanation has already started.
- Select Share and enable the start-time option where available. Check the displayed position because the link controls the beginning, not the ending.
- Copy and test the link. Open it before posting to confirm that it lands on the intended sentence or action.
- Add a short viewing note. Explain why the moment matters and what follows, since your post supplies context the link itself doesn’t contain.
Republish owned material through Studio
- Open YouTube Studio and select your source video. Use an owned long-form upload or archived stream so you’re working from the correct asset.
- Find the Video Clips option if it’s available. Set the beginning and ending around a complete idea, rather than cutting solely at the loudest reaction.
- Preview the selection. Listen for unfinished sentences, missing questions, or references that require earlier footage.
- Prepare the title and description. Describe what the highlight contains and identify the full source so viewers know where to continue.
- Publish and verify the result. Check the public video and its source reference instead of assuming the editor preview matches the viewer experience.
If your account doesn’t show this workflow, don’t substitute instructions for the retired viewer Clip. Use your original footage in an editor instead.
Create an edited vertical Short
- Import footage you own or have permission to republish. Starting with an authorized original gives you a clear editing and publishing basis.
- Trim to a complete, focused moment. Open with the subject or action, but preserve any qualification needed to understand it.
- Reframe vertically and add captions. Keep the speaker, gameplay detail, and essential on-screen text visible, then correct caption errors.
- Export, upload, and preview. Check YouTube’s current Shorts requirements and review the uploaded result for framing, readability, and sound.
For a closer editing walkthrough, use our guide to turning a YouTube video into a Short.
Common mistakes include leaving unnecessary lead-in before the useful moment and forgetting to identify the source channel. A working result opens clearly, plays cleanly, and gives interested viewers an accurate route to the original.
Limits, Rights and Context Risks to Check
A clip can reproduce someone’s words accurately and still mislead. Remove the question, qualification, or joking exchange, and viewers may understand the opposite of what the speaker meant.
Short doesn’t automatically mean fair, clear, or authorized. Review what the excerpt implies, not just whether its words appeared in the recording.
Clip limits and workarounds
| Limit | What It Means | Workaround |
|---|---|---|
| No custom end time on timestamp sharing | Viewers may hear past the intended moment | Cue what follows in your post, or edit authorized footage into a Short |
| Legacy Clips stay tied to the source | Playback connects viewers to the original watch page | Keep the clip faithful to the source title and context |
| Legacy Clips aren’t downloadable video files | The shared object isn’t a vertical upload asset | Edit the authorized original footage and export a separate file |
| Sharing doesn’t transfer rights | Republishing requires an appropriate basis to use the footage | Use your own content or obtain written permission |
| Access follows the source | A link doesn’t override underlying viewing restrictions | Check source visibility before sharing |
Credit and permission answer different questions
Naming the creator tells viewers where footage came from. It doesn’t, by itself, establish permission to download, edit, or republish that footage.
For third-party material, get written permission that covers your intended edits and destinations. Check separately for music, guest footage, or other material the source uploader may not control.
Before publishing: Confirm your rights, verify the source’s visibility, and watch the excerpt without its surrounding setup.
Don’t treat an accessible link as proof that material is intended for unrestricted redistribution. For a public sharing campaign, confirm that the intended audience can open the source without encountering a private or membership restriction.
Shorts Reach Versus Long-Form Context
Shorts can introduce viewers to a creator, while a full episode gives them room to understand the subject. Those are different outcomes, and a strong result in the feed doesn’t prove that people will continue watching the source.
A 2025 report cited by Net Influencer found that Shorts represented 57% of content uploaded by U.S. creators, but generated 88% of views and 85% of engagements year to date. Those figures describe the report’s creator group, not a promised result for an individual channel.
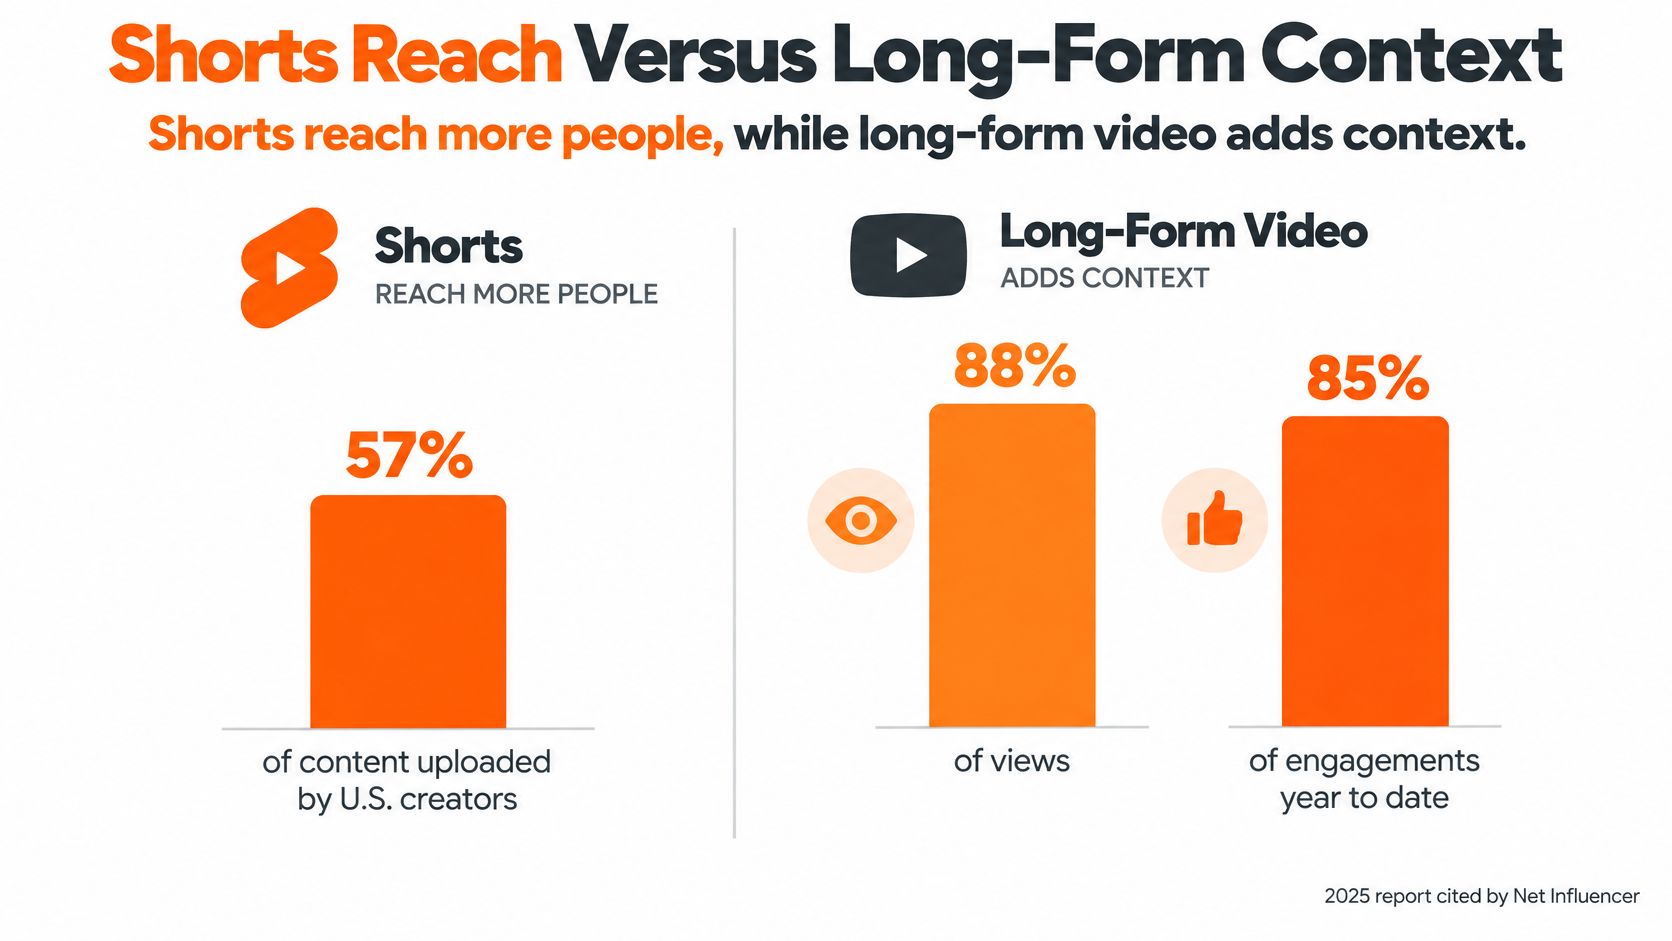
The figures above refer to Shorts, not long-form videos. They support testing short-form discovery, but they don’t establish that short-form views translate into long-form viewing.
Preserve the reason to continue
Consider an interview answer that starts with a surprising claim and ends with an important exception. Keeping only the claim might create a stronger hook, but it gives the viewer an incomplete account of the speaker’s position.
Keep enough setup to identify the subject and enough ending to preserve the meaning. The clip’s title and thumbnail can use different wording from the source, but they shouldn’t make a contradictory promise.
Measure discovery separately from continuation
- Shorts views help you assess exposure to the standalone edit.
- Source-video watch time helps you assess whether people are consuming the fuller material.
- Subscribers help you track audience commitment beyond a single moment.
- Returning viewers help you examine whether people come back for more.
These measures need interpretation together. If a Short attracts viewers but you can’t identify meaningful continuation into the source, treat it as standalone entertainment rather than declaring it a successful funnel.
When distributing the same material elsewhere, compare audience expectations and presentation using our YouTube Shorts versus TikTok guide. Treat clipping as a distribution experiment with an explicit objective, not an assumption that more short-form views will lift every part of the channel.
Who Uses Clips and How Creators Apply Them
Say a streamer finishes a long broadcast and marks several highlights. They share timestamp links to the moments that benefit from surrounding gameplay, then choose the strongest self-contained reaction for a vertical edit.
That division saves editorial effort for the moment that needs it. A tactical explanation may work best inside the original match, while a complete joke or clear demonstration can stand alone.
From a stream archive to a publishing routine
A 2026 CreatorDB census recorded 9,941 hashtagged clips from six major streamers across YouTube, TikTok, and Instagram during a 30-day period, posted by 1,820 distinct clipper accounts. That’s a count of a particular streamer sample, not a measure of all clipping activity or proof that those reposts were authorized.
For a gaming creator, the practical lesson is to organize the source before choosing outputs. Mark the action, the setup it requires, and whether the footage will remain legible after vertical cropping.
Different roles need different handoffs
Clippers should establish permission before building a reposting workflow. If their role is audience sharing rather than authorized editing, a timestamp link keeps the viewer inside the creator’s original publication.
Freelance editors and small agencies need a clearer brief: the intended audience, permitted footage, desired destination, and context that must survive the cut. Captions and pacing come after those decisions, not before them.
Brand social managers and publishers can use owned interviews, demonstrations, and archived events as source material. A guest’s caveat or a product limitation belongs in the highlight when removing it would change the message.
Our guide to repurposing video content can help organize those outputs without treating every destination as identical.
A useful handoff includes the source, the selected moment, the permission status, and the intended viewer action.
Across roles, keep the source identifiable, confirm visibility before publishing, and record which highlights lead viewers toward the fuller material. A simple publishing log makes those decisions easier to repeat.
Pick the Right Clip Workflow for Your Goal
Use this checklist before opening an editor or publishing a link. Resolve the publishing decision first, then spend time on polish.
- Confirm the rights. Establish whether you own the footage or have permission covering the intended edit and destination. Keep that confirmation with the project so another team member doesn’t have to guess.
- Check the source. For public sharing, verify that the original is public and that your intended audience can open it. Test the viewing experience outside your signed-in creator account.
- Plan the viewing boundary. If you’re sharing a timestamp, write the accompanying post with continued playback in mind. Don’t describe the link as though it stops automatically after your chosen moment.
- Choose a success measure. Use source-video watch time when continuation is the objective, or Shorts views when standalone reach is the objective. Record the choice before publishing so you don’t redefine success afterward.
- Prepare the vertical edit when needed. At clipoven, our AI agentic editor turns horizontal footage into vertical shorts. Describe the desired vibe to Eddie, then keep chatting to refine the result or open the full editor to adjust cuts, timing, captions, and effects; finished clips can be exported in 2K for TikTok and YouTube Shorts.
- Make a manageable test. Pick a single moment from your own footage this week, decide what viewers should receive, and publish it through the appropriate workflow. Check your chosen metric afterward and note what you’d change about the opening, context, or route to the source.
When your goal is a finished vertical video rather than a timestamped link, visit clipoven to turn your horizontal footage into a captioned short with Eddie. Bring a moment you own, describe the edit you want, and refine the result in chat or the full editor before exporting.