 clipoven
You shot a 30-minute interview shot horizontally, edited the strongest moments, and now need five vertical clips before morning. You choose 9:16, drag the crop toward the speaker, export, and discover that one clip cuts off the face, another loses the hand gesture, and a third leaves the guest talking from the edge of a giant empty frame.
That’s the part most guides skip when they explain how to resize videos. Selecting a preset is easy. Keeping the subject, action, captions, and visual context in the right places is the actual job.
Table of Contents
- What It Really Means to Resize a Video
- How Aspect Ratios Drive Every Resize Decision
- Three Paths to Resize From 16 by 9 to 9 by 16
- Resizing Step by Step With an AI Vertical Editor
- Framing the Subject Without Losing the Shot
- Export Settings That Decide Whether Your Clip Holds Up
- Your Quick Resize Checklist Before Export
What It Really Means to Resize a Video
Video resizing describes two different operations.
Scaling changes the pixel dimensions while preserving the same frame. A wide video stays wide, but the exported file may be smaller or larger. The software resamples the existing pixels, which can affect sharpness, file size, and playback compatibility.
Reframing changes the shape of the visible canvas. Moving from horizontal 16:9 to vertical 9:16 forces a decision about what stays visible. You can crop the sides, add padding, or move the viewing window as the subject changes position.
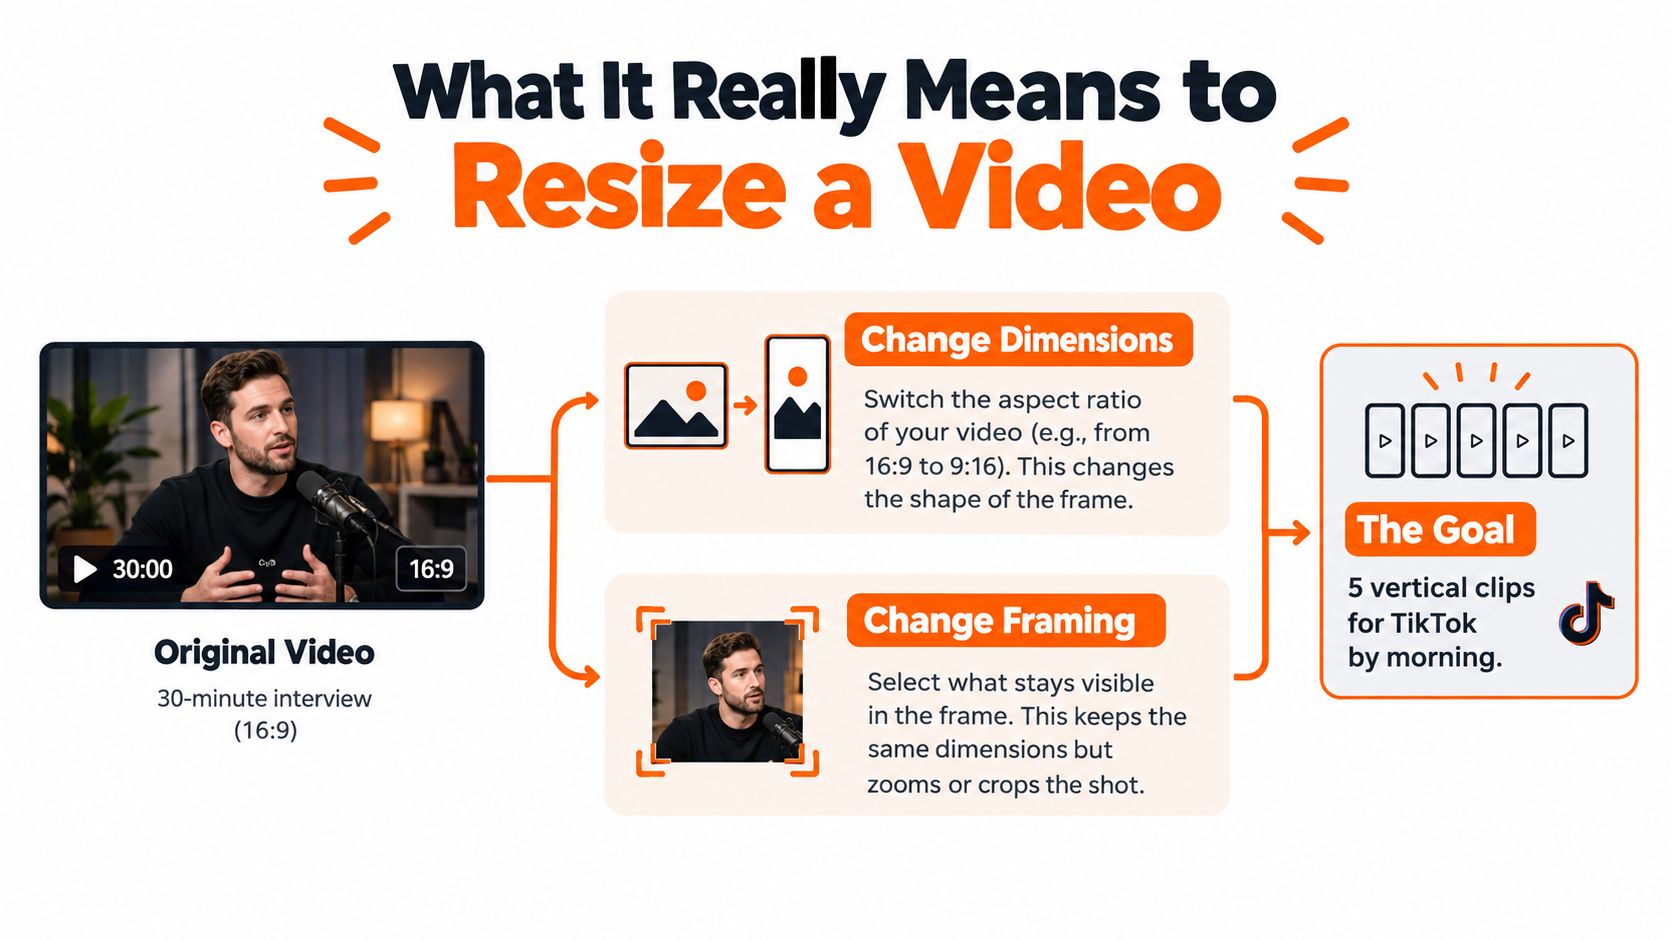
Creators often confuse these operations because editing apps put them beside each other. A “resize” button may change the canvas, scale the source to fill it, and apply a center crop in one action. If the app stretches the source instead, faces look distorted. If it preserves the full frame with bars, the vertical post can feel like a wide-format video trapped inside a portrait player.
The decision behind every export
Before touching a crop handle, decide whether the frame’s content matters more than its shape.
- Scale only when the destination accepts the original aspect ratio and you want to preserve the entire composition.
- Crop when the subject and action can fit inside the new frame without losing meaning.
- Pad when context matters more than a full-bleed look, such as a demonstration where cutting the edges would remove essential information.
- Track and recompose when the subject moves, speaks from different positions, or shares the frame with another person.
Bitrate and resolution are also part of resizing, but they come after composition. A technically crisp export still fails if the speaker disappears whenever they lean away from the center.
Practical rule: Treat resizing as a framing decision first and a pixel decision second.
The rest of the workflow focuses on reframing because that’s where vertical clips usually break. The export menu can produce the right dimensions in seconds. It can’t decide whether the viewer needs to see the speaker’s face, the product in their hand, or the screen area they’re describing.
How Aspect Ratios Drive Every Resize Decision
Aspect ratio is the relationship between a frame’s width and height. A 16:9 video at 1920×1080 suits widescreen viewing, while a 9:16 video at 1080×1920 is built for a phone held upright. Both formats contain the same total number of pixels, but those pixels are arranged in opposite directions, as described in this overview of aspect-ratio transitions.
The crop math shows why a center crop often fails. To create a 9:16 window from a 1920-pixel-wide 16:9 canvas while keeping the source height, the visible window is 608 pixels wide. The portrait composition therefore keeps only about 32% of the original horizontal width, removing roughly 68% of the wide-format content. The calculation is 1080 × 9 ÷ 16, producing 607.5 pixels, rounded to 608.
That narrow window suits a centered talking head. It breaks when a guest sits on the right third, a presenter crosses the frame, or the important object appears near an edge. A letterboxed version preserves the full image, but leaves the viewer with a small horizontal rectangle surrounded by unused space. In a fast-scrolling feed, that reduces visual presence and leaves less useful room for captions.
A worked interview crop
Take a wide interview shot with the guest’s face on the right third and soft bokeh across the left side. A center crop places its 608-pixel window around the middle of the source, potentially cutting through the face or leaving only part of the eye line visible.
Move the window farther right. Set its left edge just before the speaker’s shoulder and its right edge beyond the face, while preserving some space in the direction of the speaker’s gaze. The bokeh disappears, but that trade-off favors the expression, which carries more information than the background.
Start with the source ratio, then choose the target according to the publishing destination.
| Aspect Ratio | Pixel Dimensions | Primary Platforms |
|---|---|---|
| 16:9 | 1920×1080 | YouTube widescreen viewing |
| 1:1 | Custom square dimensions | Social feed posts |
| 4:5 | Custom portrait-feed dimensions | Instagram feed |
| 9:16 | 1080×1920 | TikTok, Instagram Reels, YouTube Shorts |
For platform-specific guidance on horizontal publishing, see this YouTube video size and ratio guide. Scaling changes how large the existing frame appears, while reframing changes which part of that frame the viewer sees. That distinction determines whether an automated crop is usable or needs manual adjustment.
Three Paths to Resize From 16 by 9 to 9 by 16
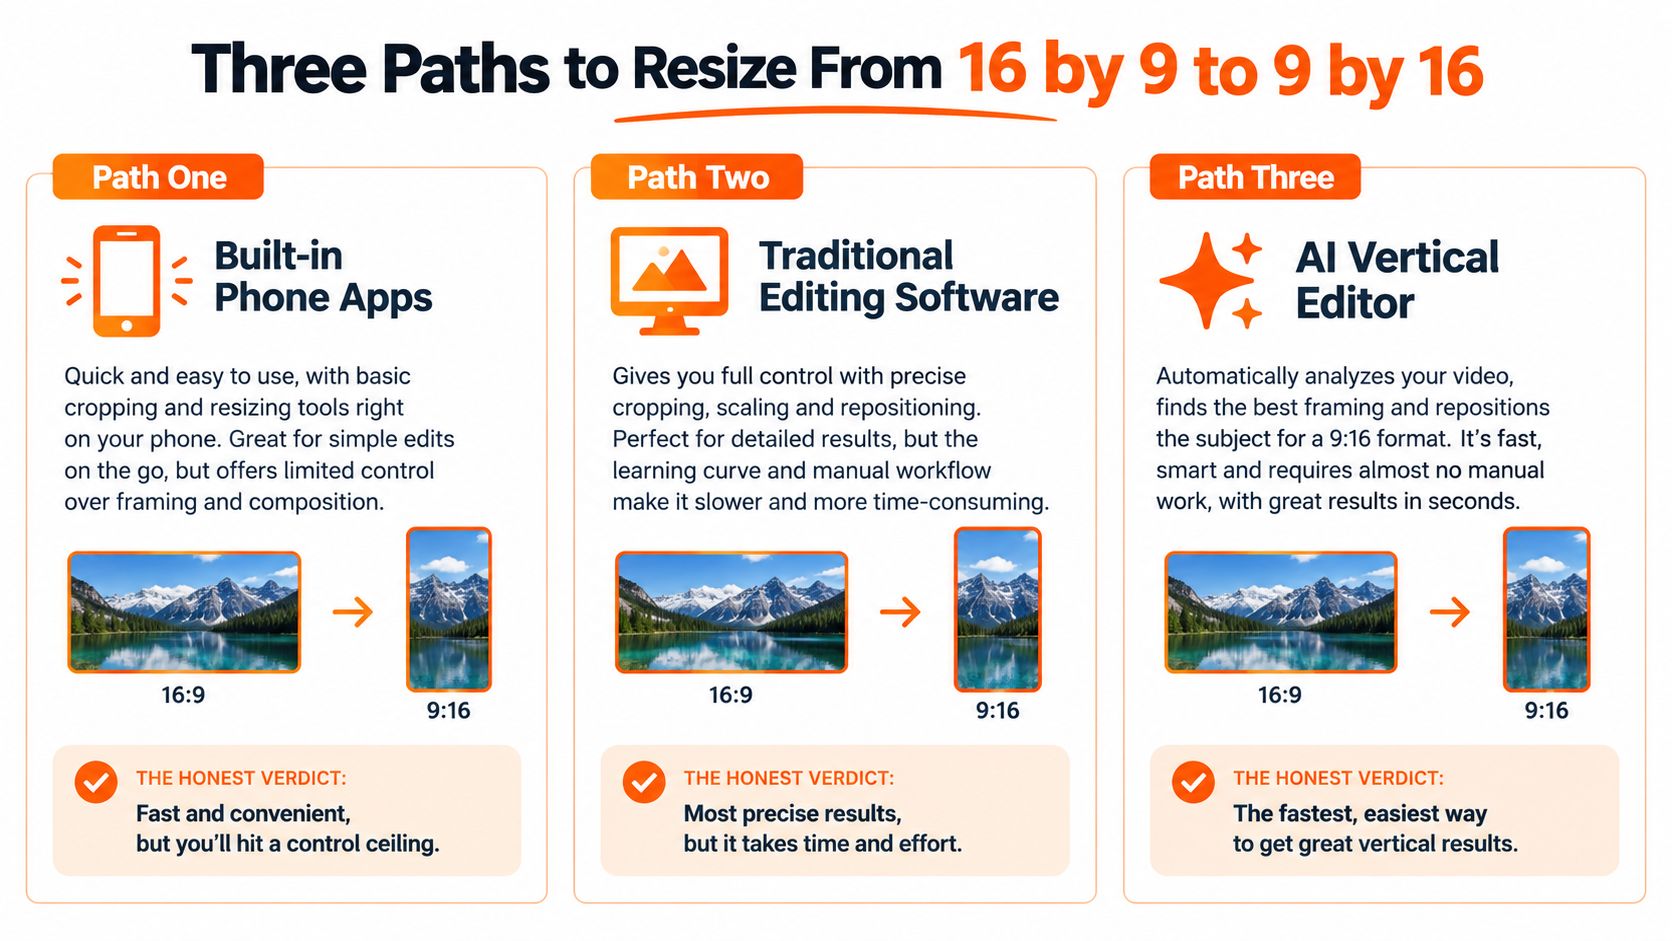
You’ve got three practical routes. They aren’t interchangeable, because each one trades speed against control.
Built-in phone apps
iMovie, CapCut mobile, and Samsung Editor are useful when you need one quick clip. Import the source, set a portrait canvas, pinch to zoom, and drag the frame until the subject sits correctly.
The weakness appears as soon as the subject moves. You’ll need to add manual pan-and-zoom adjustments, and phone workflows rarely keep eyes framed accurately through a long speaking segment. They’re fast for a single cut, but repetitive for a batch.
Verdict: Use a phone app for a one-off clip or a simple, mostly static shot.
Desktop editing software
Premiere Pro, DaVinci Resolve, and Final Cut give you precise control. You can create a portrait sequence, scale the source, and keyframe the horizontal and vertical position as the speaker or action moves. You can also inspect individual frames, adjust easing, and preserve deliberate cinematic composition.
That control has a cost. A solo editor clipping a long podcast may spend more time animating the crop than selecting the actual moments worth publishing. Desktop software earns its place when framing is part of the creative language, not just a production task.
If the crop itself tells the story, keyframe it manually. If you’re processing many conversational clips, manual positioning becomes the bottleneck.
AI vertical editors
An AI service can detect a face or primary subject, move the crop as the shot changes, and produce a first-pass portrait composition. ClipOven’s vertical editor is one example of this workflow, combining automatic reframing with an editable result rather than treating the first crop as final.
Automatic tracking handles single-speaker footage cleanly, but it isn’t a substitute for review. Fast motion, group shots, obstructed faces, game overlays, and screen recordings can all produce a technically valid crop that misses the editorial point.
Verdict: Choose an AI workflow for long-form content you’re turning into many vertical clips. Let automation handle the repetitive movement, then correct the exceptions manually.
Resizing Step by Step With an AI Vertical Editor
Start with the cleanest horizontal master you have. A 1920×1080 source gives the editor enough visible width to choose a useful portrait crop without starting from a compressed social download.
Upload the file and let the editor identify natural clip boundaries. Good detection looks for edits, pauses, changes in visual activity, and moments where the speaker completes a thought. Don’t accept every suggested segment automatically. A clean technical boundary can still produce a weak clip if the sentence begins without context.
Set the target canvas to 9:16 at 1080×1920. This is the widely used vertical format for TikTok, Reels, and Shorts, and it gives the reframing system a clear destination rather than asking it to improvise from the source ratio. For another workflow focused on automated clipping, see this AI video clipper guide.

Let the first pass do the repetitive work
Trigger auto-reframe and watch how the tracker maps the selected speaker onto the portrait canvas. Review the crop at the beginning, middle, and end of every clip. A tracker can look perfect on the opening frame and drift after the subject turns, leans, or shares the shot with another person.
If it selects the wrong face, drag the selection box onto the intended subject. Freeze that position with a keyframe, then check the surrounding frames. The editor should inherit the adjustment smoothly, but you still need to inspect the transition for a jump or sudden zoom.
Add captions after the composition is stable. Text placement depends on the crop, and captions added too early can cover a face or force you to rebuild the layout. Choose the safe-area preset that matches the destination, then keep the hook and subtitles away from the zones occupied by platform controls.
The embedded walkthrough below shows the kind of responsive video workflow editors can review while working:
Review before batching
Export a single clip before queueing the rest. Check the face, captions, audio, transitions, and sharpness on a phone, not only inside the desktop preview. Once the crop behaves correctly, apply the same setup to related clips, but still review each result because subject position can change from shot to shot.
Choose H.264 when you need broad platform compatibility, and use a destination-appropriate bitrate rather than blindly preserving an oversized source encode. The right workflow is automatic first pass, human correction, then batch processing, not automatic publishing.
Framing the Subject Without Losing the Shot
A talking head is the friendly test case. One face, limited movement, and a stable background give the tracker a clear target. Keep the tracking box tight around the eyes and upper face rather than including a large area of background. The crop should follow the person’s head without constantly zooming in and out.
Watch for the failure mode: the subject turns toward someone off camera, and the crop follows the head so aggressively that the face crowds the edge. Leave visual space in the direction of the eye line. A centered face isn’t always the strongest composition.
Fast gaming footage
Gaming footage creates a different problem. Motion blur, rapid camera pans, flashes, and mini-map overlays can confuse a detector that expects a stable subject. If the tool keeps jumping between the player character, interface elements, and bright action, tracking may create more distraction than it removes.
Lock a fixed crop instead. Place the portrait window on the gameplay area that carries the action, then accept that the shot is being zoomed rather than actively followed. For a facecam layout, choose whether the gameplay or the facecam is the editorial priority. Trying to keep both equally large can make both unreadable.
The failure mode is a crop that reacts to every visual change. If the frame bounces during combat or rapid movement, viewers notice the editing instead of the play.
Screen recordings
Screen recordings are often the hardest input because there may be no human subject at all. An AI system may follow the cursor, an active window, or a high-contrast panel, but that doesn’t mean it understands which interface element your narration describes.
Disable tracking and pre-position the crop on the relevant UI region. Re-run the adjustment only when the screen content changes substantially. If the narration moves from a settings panel to a browser preview, create a deliberate crop change at that editorial moment.
The failure mode is semantic drift. The crop remains technically active but shows the wrong part of the screen while the voice explains something elsewhere. Treat screen recordings like designed layouts, not camera footage.
For a broader workflow around turning existing footage into social assets, use this guide to repurpose video content. The same principle applies across every scenario: the tracker can move the window, but you decide what deserves attention.
Export Settings That Decide Whether Your Clip Holds Up
A vertical clip can have accurate framing and still fail on a phone. Soft captions, crushed detail, or a washed-out image make viewers work to follow the action. Check the export after the crop, because encoding can expose weaknesses that were easy to miss in the editor.
Set 1080×1920 as the destination resolution for TikTok, Instagram Reels, and YouTube Shorts. Keep that canvas size when the source already supports it, and avoid enlarging a smaller video solely to fill the frame. Upscaling changes the dimensions without restoring lost detail.
Crop, padding, and safe areas
Use a full-bleed crop when it keeps the subject and action readable. Padding retains more of the original frame, but blurred or empty bars reduce visual impact. Choose it when removing the edges would cut away context that the viewer needs.
Captions must stay clear of interface areas. TikTok, Reels, and Shorts place controls and account information near the edges, so text that looks safe in the editor can be covered after upload. Check each platform’s preview before turning the layout into a reusable template.
| Platform | Resolution | Codec | Bitrate | Safe-area top/bottom |
|---|---|---|---|---|
| TikTok | 1080×1920 | H.264 | 10–12 Mbps | Keep text clear of interface zones |
| Instagram Reels | 1080×1920 | H.264 | 10–12 Mbps | Keep captions away from interface zones |
| YouTube Shorts | 1080×1920 | H.264 | 10–12 Mbps | Preserve space for channel and control overlays |
Use H.264 for dependable compatibility. H.265 can reduce file size when the destination accepts it, but compatibility usually matters more than compression efficiency. Export a short test, inspect fast motion and small text on a phone, then apply the verified preset to the rest of the batch. If the subject looks soft or the crop reveals compression blocks, fix the source or framing before exporting the full set.
Your Quick Resize Checklist Before Export
Run this pass about ten minutes before uploading. Start with framing, not the export menu. Scrub through the entire clip and confirm that the subject’s eyes remain in a comfortable upper-third position, not just on the opening frame.
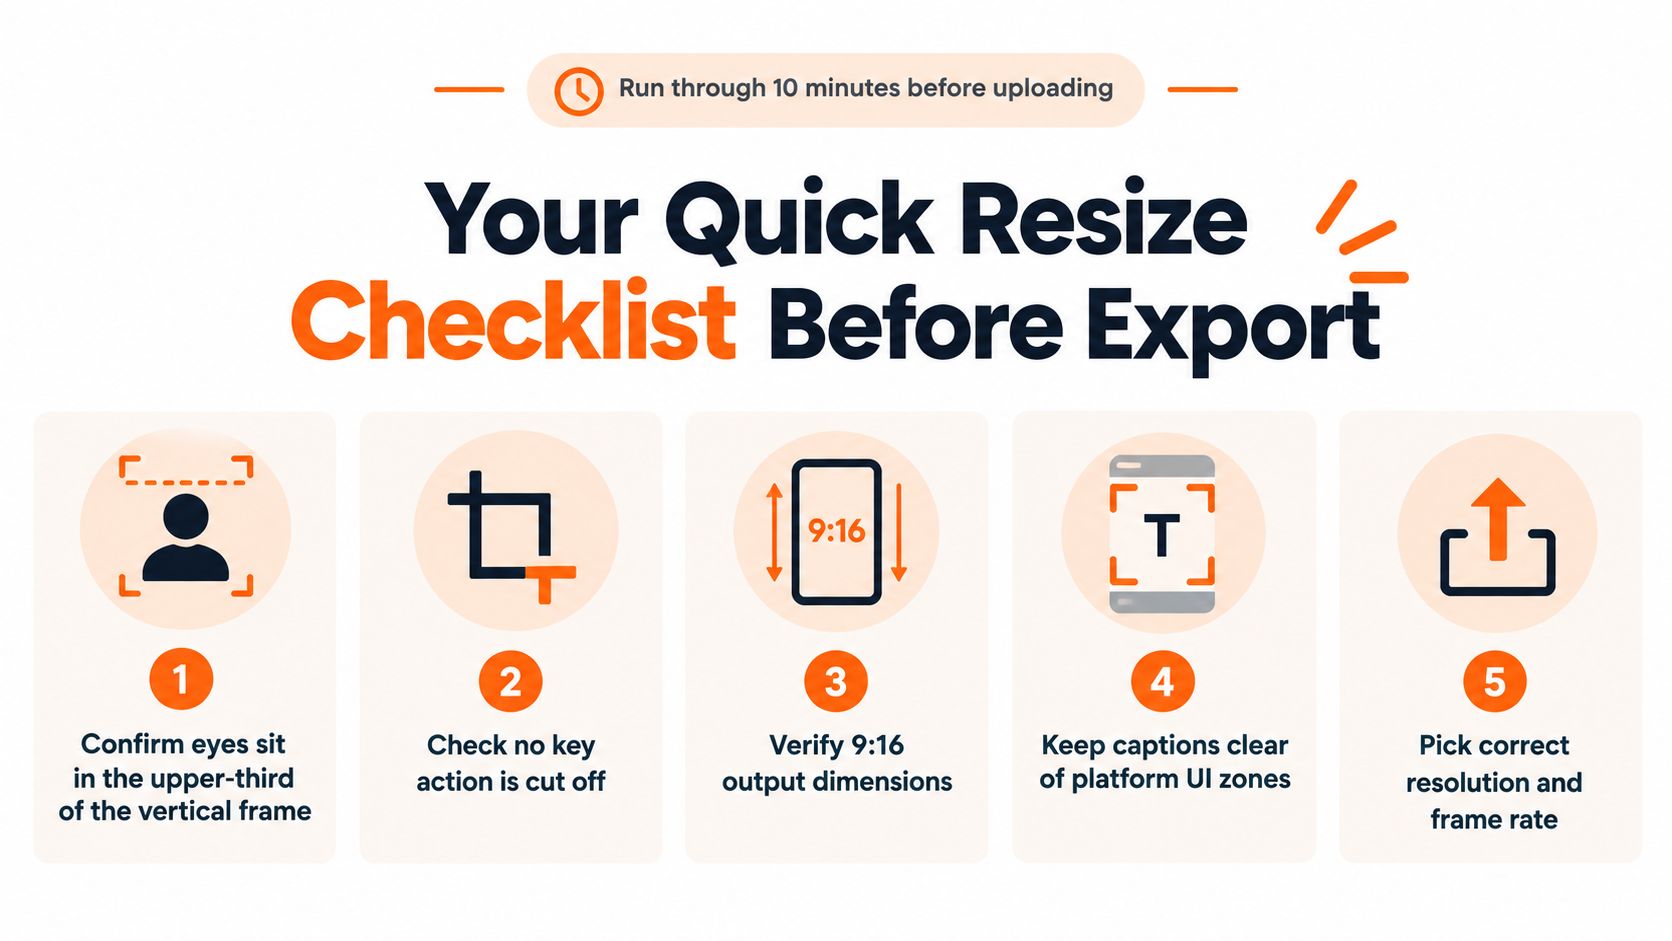
Use this sequence:
- Confirm the subject: Check faces, hands, products, and action through the whole clip.
- Inspect the crop: Make sure the crop doesn’t cut off a meaningful gesture, object, or change in direction.
- Verify the canvas: Confirm the project uses 9:16 and the intended vertical dimensions.
- Read the captions: Check contrast, timing, spelling, and placement outside platform interface zones.
- Review the encode: Choose the destination resolution, compatible codec, and enough bitrate for motion-heavy footage.
- Listen once: Check that dialogue remains clear and consistent, and normalize loudness around -14 LUFS when your workflow targets cross-platform consistency.
- Scrub quickly: Watch at 1.5x speed to catch tracker drift, abrupt crop jumps, hard cuts, and dead frames.
Ship it when the subject stays clear, captions remain readable, and the export looks sharp on a phone. Fix it when the crop follows the wrong target, text collides with interface elements, or the viewer needs context that the frame removed. Re-export when the source looks soft, audio feels uneven, or the first upload preview exposes a layout problem.
Resizing well means making the portrait frame feel intentional. Once the clip passes this checklist, publish it. If it doesn’t, correct the composition before spending time on decorative effects.
ClipOven turns horizontal footage into vertical shorts with automatic subject-focused reframing, captions, and an editable timeline for manual corrections. If you’re converting interviews, streams, or long recordings into platform-ready clips, visit clipoven and test the workflow on your next batch.