 clipoven

You exported the clip, hit play on your phone, and the joke sits under a fan that never quits. The face is sharp. The captions are timed. The voice is still fighting a hiss that makes the punchline feel cheaper than the gameplay. You need to remove background noise from video without sanding the person down to a robot.
Silence is not the finish line. A voice people can follow, with the consonants still there and a little of the room left in the pauses, is. Pick the fix that matches the noise, stop when the words start to warp, and re-record when no filter can separate what matters.
Table of Contents
- Match the Fix to Your Noise Type
- Built-In and Third-Party Tools Compared
- How to Remove Steady Noise With a Noise Profile
- Quick Fixes for Short-Form Clips
- When AI Denoising Cannot Save the Clip
- Check the Cleaned Audio Before You Publish
Match the Fix to Your Noise Type
The wrong first tool costs more time than the noise does. A steady fan is a short job with a noise profile. The same slider on a talked-over punchline just makes the mess smoother. Match what you hear to the first method, and know when a new take wins.
| Noise type | First method to try | Re-record when |
|---|---|---|
| Steady hum, fan or air conditioning | Noise profile with spectral reduction | Never needed if the speech is otherwise clear |
| Wind gusts on the microphone | High-pass filter around 80 to 120 Hz, then light reduction | Gusts hit the words themselves |
| Keyboard or mouse clicks | Click removal or gentle reduction | Clicks land on consonants or key words |
| Crowd chatter or background music | Voice isolation only if speech clearly dominates | Important lines are talked over |
| Overlapping second speaker | Careful reduction and audition of each cut | Both voices are needed for meaning |
| Room echo | Reverb reduction, or a closer microphone on the next take | Echo is strong across the whole clip |
Steady hum from a PC fan or air conditioner barely moves. A noise profile can learn that spectrum and pull it down while the words stay put.
Wind hits the capsule as low rumble. A high-pass around 80 to 120 Hz takes that rumble off before any reduction runs. Reduction alone chases each gust and thins the voice with it.
Clicks are short spikes. A click remover, or a light pass, clears a tick that sits between words. If the click lands on a consonant or a game callout, cut that line and say it again.
Crowd, music, and a second speaker live in the same band as the voice you want. Isolation is worth a try only when your speaker is clearly louder. When an important line is buried, record it again.
Room echo is not hiss. It is the room bouncing back. Mild wash can take reverb reduction. A strong echo across the whole clip wants a closer microphone next time, not a harder denoise.
By fall 2023, 52% of surveyed video creators reported using AI in their creative process, including tasks such as cleaning background noise and auto-editing, according to Artlist’s 2024 Trend Report, which surveyed more than 7,000 creators. AI cleanup is ordinary practice. Adoption does not mean every pass is safe.
Practical rule: Duplicate the dialogue and leave that copy muted. Every later pass needs an untouched track you can A/B against.
Built-In and Third-Party Tools Compared
The category matters more than the brand name on the button. Pick by how many clips you clean, and by whether the noise is a light hum or something you have to sample by hand.
| Tool type | Typical examples | Best for | Main limit |
|---|---|---|---|
| Phone video editor | Built-in audio tools in the stock video editor | Quick trims and light hum on one clip | Few controls and no manual noise profile |
| Desktop video editor | DaVinci Resolve Fairlight, Adobe Premiere Pro dialogue tools | Steady noise plus several cuts that must match | Learning curve and hardware needs |
| Standalone audio editor | Audacity noise reduction | Precise manual profiles on one important file | Every file is processed by hand |
| Browser-based AI denoiser | Online voice isolation tools | Fast results on one speech-heavy clip | Can over-process and limits export options |
Where each category earns its place
Phone editors are fine for one talking-head clip with a mild hum. You get a single strength control and almost no way to show the filter what the room sounds like. A fan that changes pitch, or room tone you need to sample, will fight that slider.
Desktop editors are the right bench when several cuts must match. Fairlight’s noise reduction and Premiere’s dialogue repair sit on the timeline, so you can treat a run of clips with the same settings and hear them against the picture. The cost is setup time and a machine that can play the timeline while the effect is on. If you are still choosing a host app, a practical comparison of video editing software is a better starting point than downloading three denoisers.
Audacity gives you a real noise profile for nothing. That suits one sponsor read or one rant you cannot reshoot. It is a poor daily queue, because every file is exported, profiled, rendered, and brought back by hand.
Browser AI tools are the fastest path on a single speech-heavy clip. They also over-smooth fast, and some of them cap format, length, or sample rate. Do not publish from the preview. Download the file and run the same listening test you would use on a desktop render.
Two habits that survive every tool
Export the cleaned audio at the highest quality the tool allows before you encode the video. Keep that cleaned file separate from the picture, so a later music pass does not force you to denoise the whole clip again.
How to Remove Steady Noise With a Noise Profile
A noise profile only works on noise that barely changes: air conditioning, a computer fan, a steady room hiss. You are teaching the filter the spectrum of the empty room, then asking it to subtract that shape from the dialogue.
The capture itself is the part people rush. A profile built on half a breath will treat that breath as hiss.
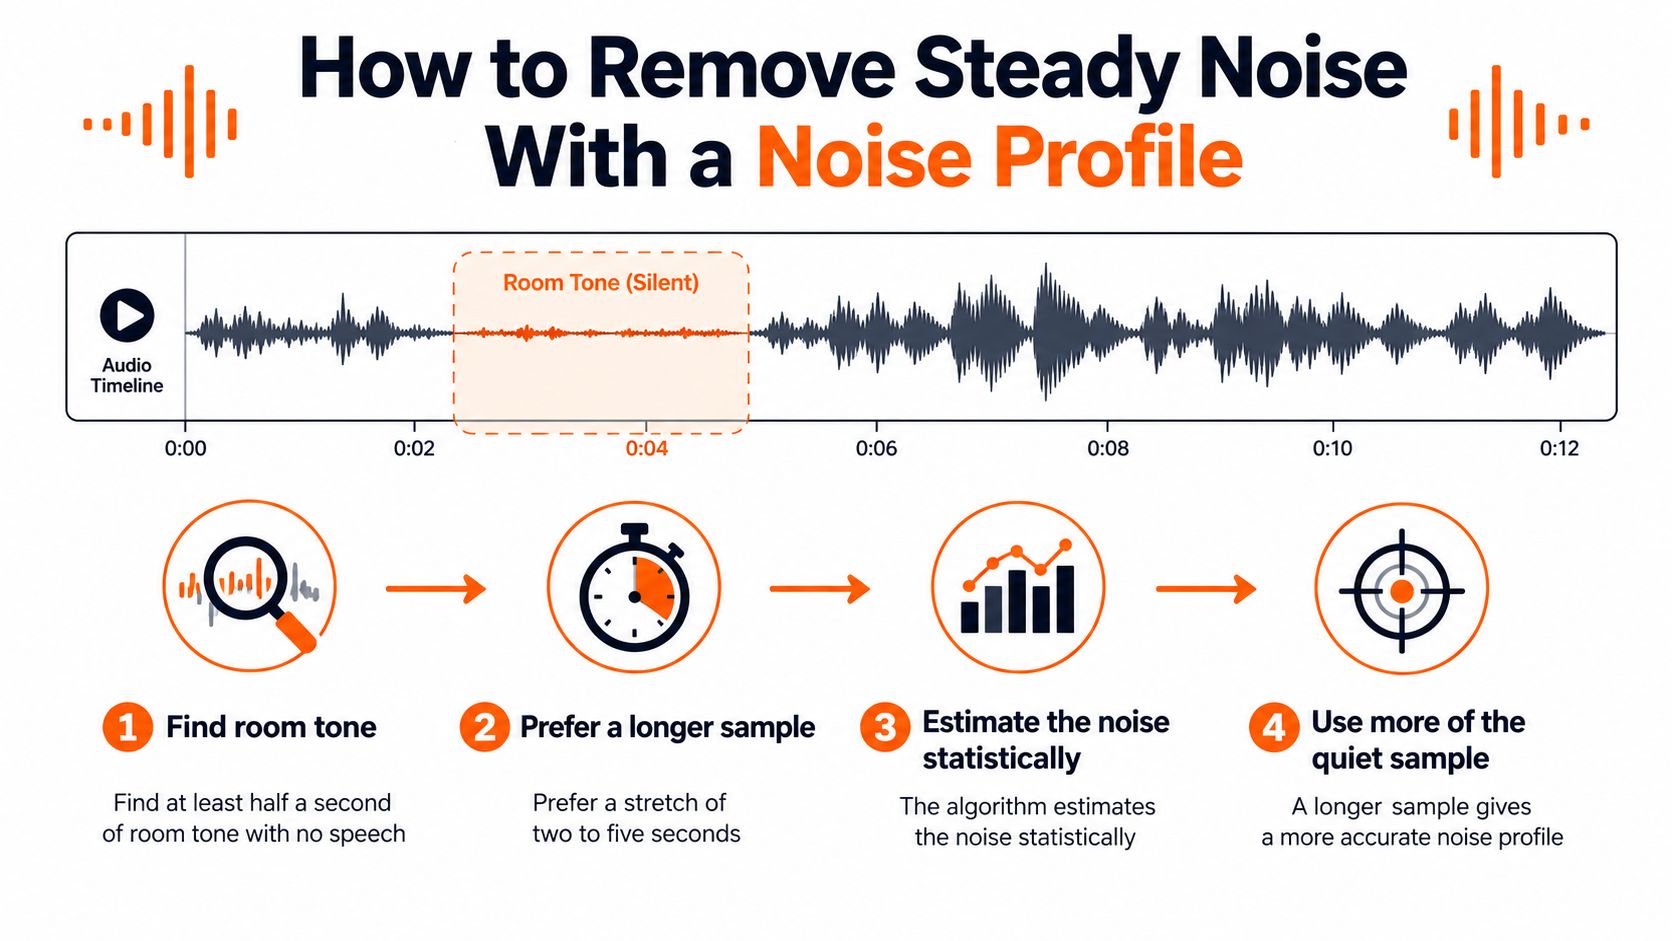
Capture a profile the filter can trust
-
Find room tone with no speech. Isolate at least 0.5 seconds that contain noise and nothing else, which is the floor Adobe’s Audition guidance sets for a noise print. Prefer two to five seconds. The filter estimates the noise spectrum statistically, so a longer, representative sample beats a lucky blip. The common mistake is grabbing the first quiet gap, which is often a pause with a lip smack in it.
-
Capture that segment as the noise profile. Play it solo first. If you hear a breath, a click, or the tail of a word, move the selection. A click inside the print teaches the filter to hunt clicks inside speech. More snapshots of clean room tone give the reduction a better model to work from, and aggressive settings will pull parts of the original voice out along with the noise.
-
Apply spectral reduction to the full dialogue track. Open with a moderate decay setting and move in small steps, listening after each one. Push it too low and the speech picks up a bubbly, watery residue. Leave it too high and the hiss barely drops. The mistake is maxing the slider because the fan is still faintly there on headphones.
-
Audition speech-only and ambience-only sections separately. A full-mix playback hides damage. Solo a sentence with fast speech, then solo a pause. You want the hiss down and the s and t sounds still crisp.
-
Render a new audio stream, then replace the video audio with it. Do this before loudness matching, captions, and vertical export. Later gain will amplify whatever the filter left behind, including the artifacts. Keep the cleaned file as the dialogue track in the mix, with the original muted underneath so you can flip back and compare.
What a healthy pass sounds like
Steady room tone should drop while consonants, breaths, and fast speech still read as a person. The pass succeeds when the words stay intelligible and natural, and a faint remnant of the room is acceptable if the sentence lands. A swirling, musical residue means the profile was a bad match, or the decay was pushed too low.
Keyboard clicks, crowd chatter, music, or a second speaker are not stationary hiss. One profile will not model those events, and the result is often a musical or underwater smear. Reach for a click tool on isolated spikes. When the noise sits under the words at the same level, re-recording the line is faster and cleaner than stacking another pass on a take the filter cannot separate.
If you want to see the selection and the reduction amount in a timeline, this walkthrough shows the same order on a dialogue clip.
Quick Fixes for Short-Form Clips
A 20-second short does not need a full restoration session. Use the smallest fix that matches the noise, then stop and listen before you stack another one. A short-form video editor is enough for these passes when the clip is already cut for a vertical feed.
-
Wind, before anything else. If the mic thumps on gusts, set a high-pass around 80 to 120 Hz first. Check that the rumble drops and the voice does not turn thin. Only then add a light reduction. Skipping the high-pass makes the denoiser chase each blast and chew the words.
-
Clicks, one spike at a time. Run click removal on the transient, then play the words on either side. A tick in a pause can go. A tick on a consonant or a key callout cannot. Cut that take and re-record the line.
-
Steady hum on a single clip. If the phone editor has one reduction control, leave it moderate and listen on the phone speaker, not studio headphones. You are checking whether the sentence survives a tiny speaker, not whether the fan is gone in a treated room.
-
Speech that already wins the mix. Use voice isolation only when the speaker is clearly louder than the room. Back the effect off until the tone sounds like the person, not a phone call. If the background is music or a crowd at the same level, skip this step.
-
Trim the worst seconds first. Cut dead air and the noisiest moment before you process. The filter then works on fewer seconds, and you have less audio to audition. This also keeps a gust or a chair scrape from training your ear to accept a harsher setting.
Run one A/B per fix, original against the new pass, at the same speaking level. If the words get worse, undo that pass and try the next row, or book the re-record.
When AI Denoising Cannot Save the Clip
AI denoise sells the idea that any background can be peeled off the voice. Overlapping speech sits in much of the same frequency range as the person you want, so the improvement stays modest. Recapo’s cleanup guide is direct about the practical consequence: for important dialogue, re-recording remains the dependable option. Music and crowd chatter behave like changing noise, not hiss, and a single profile leaves a musical or watery residue.
| Symptom | Likely cause | Fix |
|---|---|---|
| Underwater or watery voice | Reduction too aggressive | Lower the reduction amount and blend back some of the original |
| Bubbly or musical noise | Decay value set too low | Raise the decay out of the too-low zone |
| Consonants or breaths clipped | Over-suppression of speech frequencies | Lower the reduction and audition speech-only sections |
| Hiss still audible after a pass | Noise profile too short or not representative | Capture a longer, cleaner sample of room tone |
| Second voice ghosting through | Overlapping speech in the same range | Re-record, or crop to the dominant speaker |
| Name or game sound effect distorted | Processing damaged sibilants or effects | Separate the dialogue track and re-mix effects |
Picture can help, it cannot invent a clean take
Audio-visual enhancement uses mouth movement and scene context to pick the visible speaker instead of trusting the waveform alone. On a vertical crop, that is a framing choice you can use today. Keep the speaking person large in frame so viewers lock onto the right mouth when a second voice leaks through. That crop does not recover a line that was talked over. If both voices carry the joke, you need both performances clean, which means another take.
Removing a bystander’s voice is not the same as proving the words that remain are accurate.
Generative enhancement can swap a consonant or leave a vocal texture that sounds fabricated. That is an editorial problem on a stream clip, where a name, a score, or a callout is the point. If a heavy pass changes what the speaker appears to have said, disclose the restoration. Route the clip with the same split you used at the start: ordinary denoise for steady hum, voice isolation when speech dominates, dialogue replacement when the line matters, and a reframe only when the right person is already on screen.
Check the Cleaned Audio Before You Publish
A quieter file is not a better file. Louder speech always feels cleaner, so a boosted aggressive pass will win a sloppy A/B even when it ate the consonants. Level the original, a gentle reduction, and an aggressive reduction to the same speech loudness before you decide.
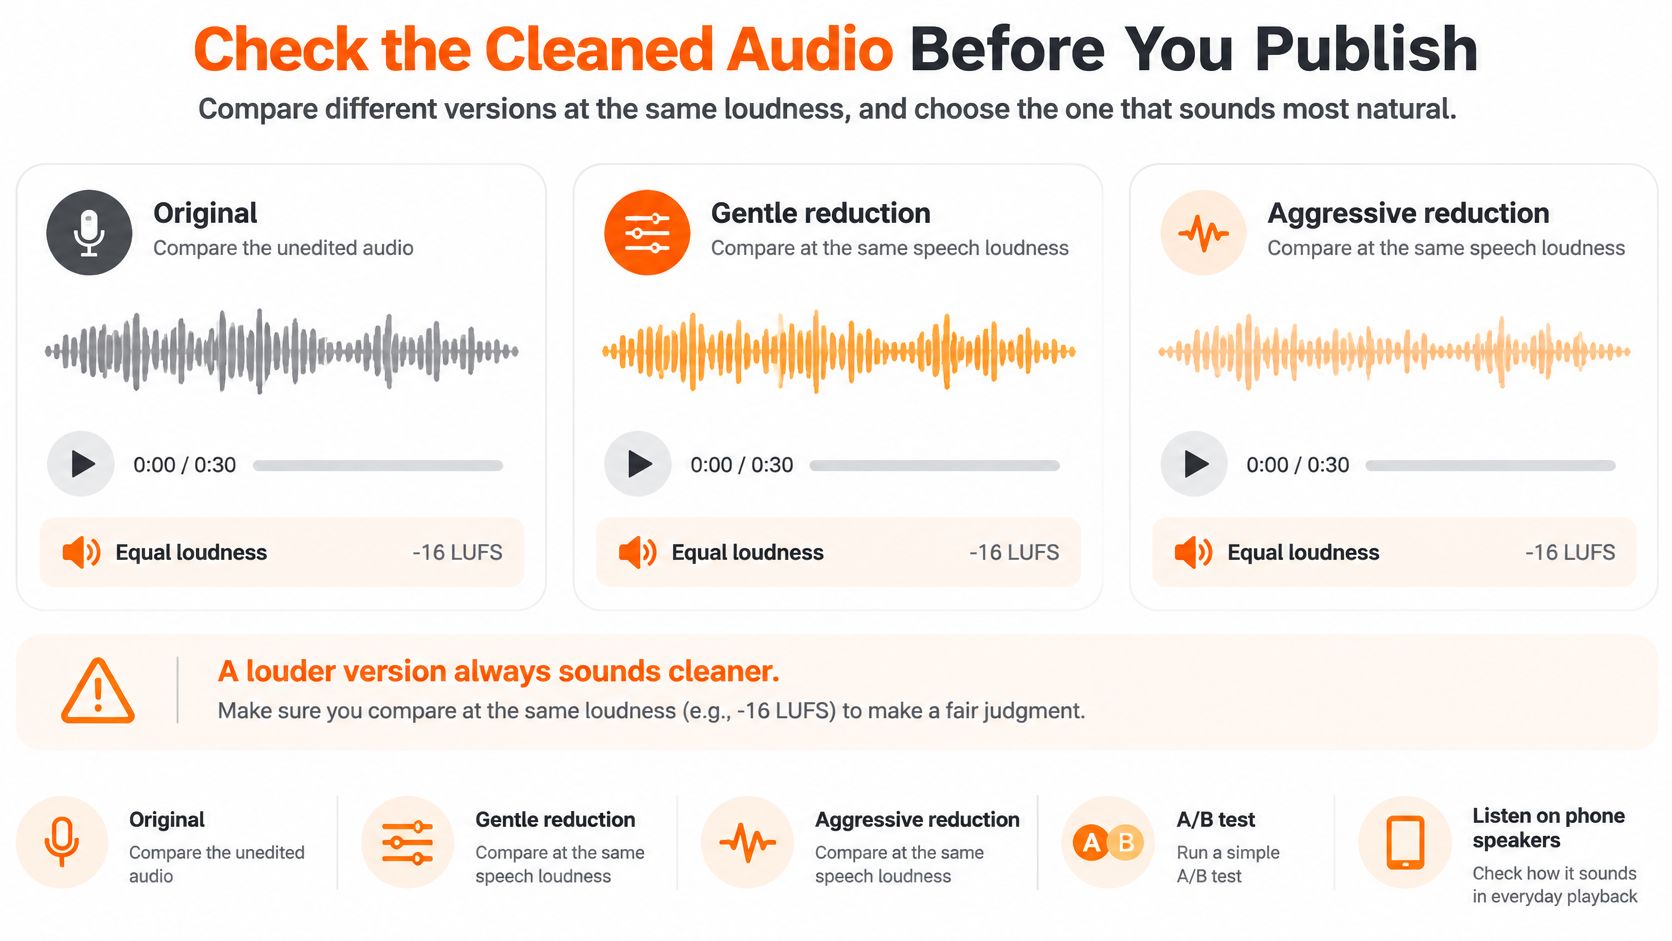
Judge words, not the absence of hiss
Play all three on headphones and on a phone speaker. Score consonants, names, pauses, and whether you can repeat the sentence accurately. A speech study found that a 6 dB reduction in background noise yielded only a small improvement in understanding, which is a useful brake on the urge to keep suppressing, as summarized in this intelligibility paper. Accept some room tone when the stronger pass sounds robotic or watery. A slightly noisy natural voice is usually the one to publish.
Objective scores exist if you want a number beside your ears. A visual-guided enhancement paper describes PESQ from 0 to 4.5, STOI from 0 to 1, and SI-SDR in decibels, with higher values generally meaning better reconstructed speech. One reported system on DNS 2020 and UrbanSound8K conditions reached PESQ 3.48, STOI 0.93, and 16.8 dB SNR improvement. Those figures are benchmark-specific, not a promise for your room. Reject any version that improves a noise score while damaging names, sibilants, or game sound effects.
Export checks before the file leaves the timeline
- Lip sync: After you render the new audio stream, spot a hard consonant against the mouth. A replaced track that is even a frame late reads as a dub.
- Balance: Cleaned dialogue should not sit under music or effects. If you had to crush the voice to hide hiss, the mix is hiding a bad denoise.
- Phone speaker: Play the exported file at phone volume. If the callout disappears, the pass was too polite in the studio and too thin in the feed.
- One dialogue track: The cleaned file should be the only dialogue in the export. A muted original that gets unmuted by accident doubles the voice.
Captions will not repair a swallowed name. If you are adding text after the mix, run them on the version you chose, and use an auto subtitle generator only after the consonants survive the phone test. After Eddie edits a clip, you can keep chatting with Eddie to refine it or open the full editor to adjust cuts, timing, captions, and effects. Final vertical clips can be exported in 2K, ready for TikTok and YouTube Shorts. Keep the version with the most natural speech, then finish the vertical cut.
ClipOven turns horizontal footage into vertical shorts, and a clean, intelligible voice is what makes those cuts worth posting. Bring the dialogue you already checked, tell Eddie the vibe, and shape the captions and timing around speech that still sounds like you. Start with your next noisy clip at clipoven.