 clipoven
You’ve got a long stream recording, a few moments that made chat explode, and a deadline that’s closer than you’d like. The raw footage is horizontal, the best reaction happened off-center, and the first version of the clip still opens with a greeting nobody needs to hear. By the time you’ve cropped the frame, corrected the captions, and watched the export on your phone, the evening is gone.
YouTube Shorts editing works better as a repeatable production pipeline than as a final polish step. Start with a long recording, identify several self-contained moments, build each one for a vertical feed, publish, and use retention feedback to shape the next batch. The editor’s job isn’t just to make a smaller video. It’s to rebuild the source around a faster opening, a clearer visual hierarchy, readable captions, and a payoff that survives the swipe.
Table of Contents
- What Makes YouTube Shorts Editing Different
- Setting Up the Source and Selecting the Moment
- Cutting for Pacing and Retention
- Vertical Reframing and Subject Composition
- Building Captions That Earn Their Space
- Export Settings and Pre-Upload QA
- Closing the Loop with Retention Data
What Makes YouTube Shorts Editing Different
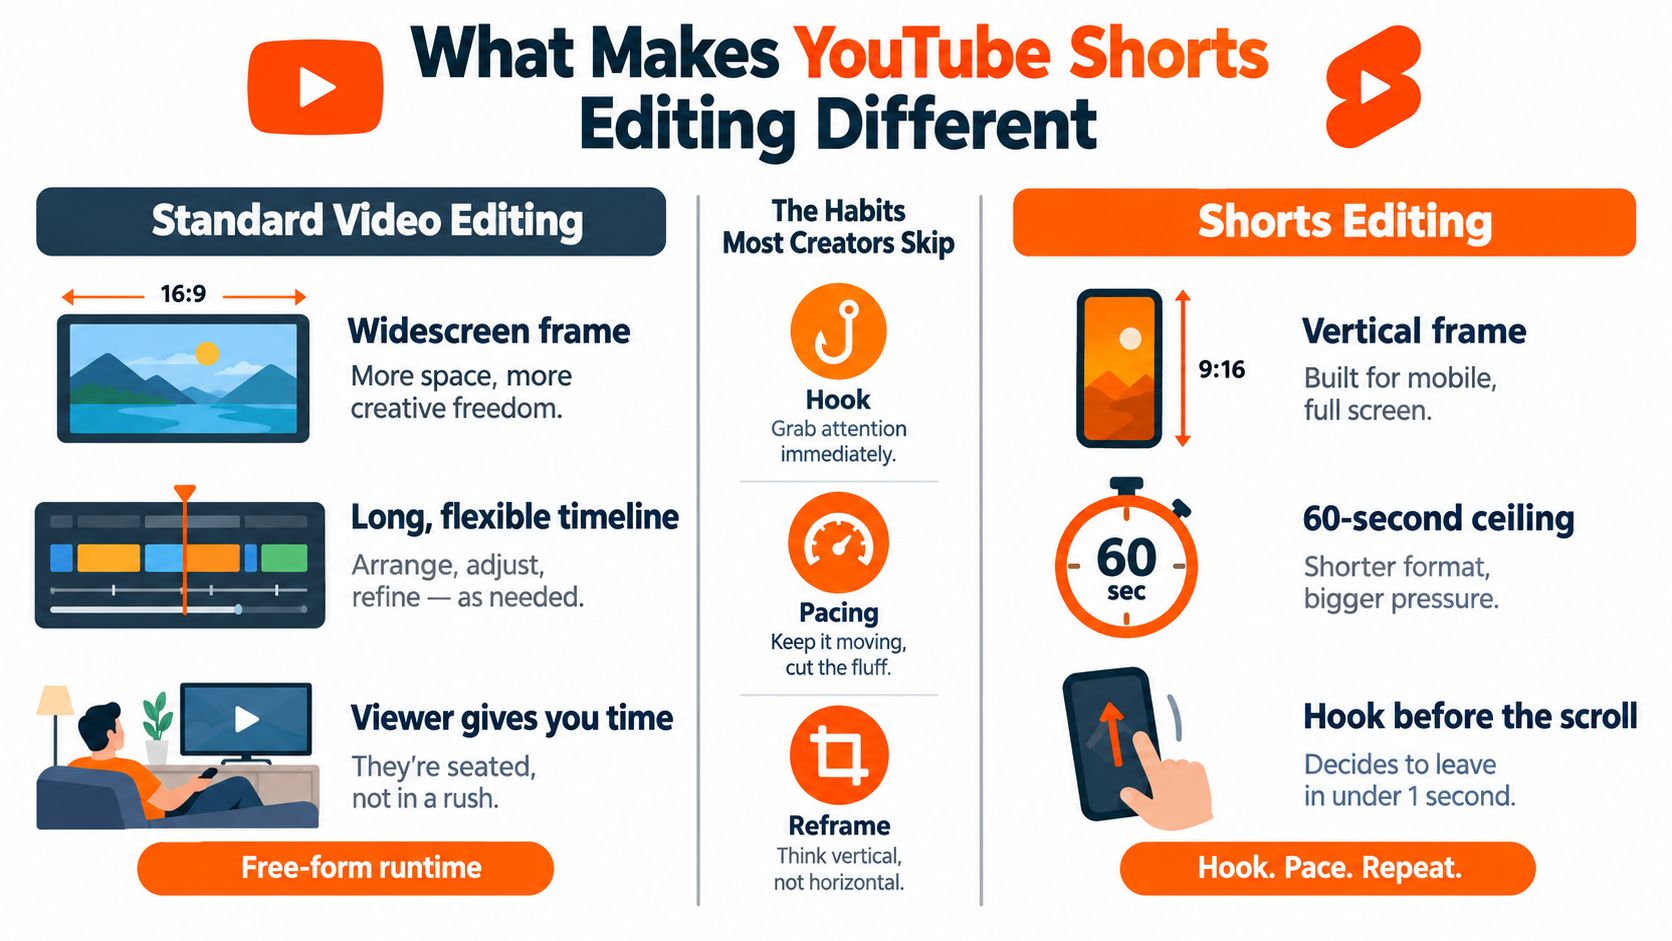
YouTube introduced Shorts on September 14, 2020, as a mobile-first short-form experience initially designed for clips of 15 seconds or less. The format first launched in beta in India, expanded to the United States in March 2021, and became more broadly available during 2021, establishing the habits that still define the workflow: vertical or square framing, immediate engagement, concise pacing, and smartphone-first viewing. YouTube later expanded the maximum length to three minutes for square or vertical videos, so editors now have more room for context without losing the pressure of a swipe-based feed. You can review the rollout background in YouTube’s overview of Shorts.
The source frame rarely matches the delivery frame
A horizontal recording gives you a wide composition. A Short gives you a narrow one. If the streamer sits to one side, the gameplay occupies most of the useful area, or two people speak from opposite edges, a simple crop may remove the subject or make the action unreadable.
That changes the edit before you make the first cut. You need to choose the moment, decide who or what deserves visual priority, and rebuild the opening around what can fit in a vertical frame. A clip from a podcast may need a tighter face crop. A gaming clip may need gameplay to remain visible while the facecam becomes secondary. An interview may need a single speaker to carry the frame instead of alternating between two wide shots.
The format also changes the role of pacing. A long-form viewer may tolerate a setup before the useful point arrives. A Shorts viewer needs a reason to stay almost immediately. Begin with the strongest available image and make the premise understandable before adding background context.
Practical rule: Treat every Short as a new edit with a source recording, not as a resized export of an existing video.
For technical guidance on choosing the right aspect ratio, use this guide to YouTube video size and ratio. It’s useful at the project setup stage, but the creative decision still comes first: identify the subject, the promise, and the visual beat that should occupy the screen when the clip begins.
Setting Up the Source and Selecting the Moment
The fastest way to create rework is to open a long recording and start cutting without a selection system. Create a dedicated Shorts bin or project folder first. Separate the full recording, audio, overlays, logos, gameplay captures, and any supporting footage so you’re not searching through the same clutter every time you build a new asset.
If the source is demanding your computer, generate proxy media before reviewing it. This matters especially with long livestreams or high-resolution recordings, where scrubbing and reframing can make an otherwise simple cut feel sluggish. A responsive timeline helps you judge timing instead of waiting for playback to catch up.
Review for energy, then review for friction
Use one fast review to mark moments with obvious energy: laughter, a sudden reaction, a surprising answer, a strong gameplay turn, a useful callout, or a visual change. Then review the selected areas at normal speed and mark friction: greetings, repeated phrases, long breaths, awkward gaps, unclear references, and moments that need missing B-roll.
This two-pass method separates why the moment is interesting from what makes it difficult to watch. A clip can have a strong payoff and still fail because the viewer needs too much context before understanding it. Conversely, a calm explanation may work if the first line states a clear result and the visual composition supports it.
Choose a moment that stands on its own. It should contain enough context to make sense without the entire stream, interview, or podcast around it. If the clip only becomes interesting after several minutes of setup, look for a sharper entry point or rewrite the opening with a concise on-screen promise.
Before cutting, check three practical conditions:
- Subject visibility: The main face, player, product, or action should remain available for most of the chosen passage.
- Audio entry: Leave a clean breath or natural start before the first spoken line so the opening doesn’t feel chopped.
- Asset sufficiency: Don’t select a moment that depends on footage, screenshots, or graphics you haven’t got.
For streamers, also check whether game audio and speech compete. A brilliant reaction can become unusable if the important sentence is buried under an effect or if overlapping voices make caption correction uncertain. Fixing that at the source-selection stage is easier than trying to rescue it after reframing and caption styling.
Cutting for Pacing and Retention
A viewer should understand the reason to stay before the opening has time to drag. Build the cut around a two-second promise, then remove greetings, throat-clearing, and dead air. The working sequence is hook, escalating information or action, payoff. If the recording contains a second useful beat, bring it closer to the first rather than letting the initial idea lose momentum.
YouTube’s own audience-retention documentation recommends reviewing the retention curve after publishing and matching each sharp drop to the edit. Use that feedback as part of the cutting pipeline: make the first version, publish it, identify where attention falls, then change the next cut based on what happened. The retention editing guide describes this workflow and its caveats. It also discusses directional benchmarks such as 70% average-view retention and keeping the first three seconds above 80%. Treat those figures as reference points, not universal platform standards.
Build the cut around the spoken thought
Suppose a streamer says, “I thought the run was over,” pauses, then reveals an unexpected recovery. The pause may be part of the payoff. If it is empty latency, tighten it. If the expression and silence create anticipation, keep enough space for the reveal to register.
Cut on action, emphasis, or a hard consonant. Avoid cutting into an inhale unless the interruption is intentional. A J-cut can start the next line before the visual changes, giving a reframe or punch-in a clear reason. An L-cut keeps the previous thought running over the next shot or gameplay moment.
Use the waveform to locate gaps, then listen to the shortened version at normal playback speed. A pause that looks small on the timeline can feel long when the voice stops and the screen does nothing. Remove pauses for a reason, not by rule. Technical explanations need comprehension time, reactions need room to register, and jokes often depend on a beat before the punchline.
Run the pacing pass in this order:
- Open on the strongest available frame. Skip the logo, greeting, and wide establishing shot unless one of them is the hook.
- State the question or promise immediately. The viewer should know what they will learn, see, or feel.
- Change the visual when delivery stalls. Reframe, punch in, show the relevant gameplay, or add supporting footage.
- Keep the sentence intact. A rapid cut that makes the thought hard to follow costs more than a slightly slower edit.
- End on the payoff. Do not let an end card replace the moment that earned the viewer’s attention.
The opening usually deserves more editing time than a decorative end screen. If the first line lacks a clear reason to continue, caption animation will not recover that initial loss. After reviewing the curve, log the drop, the cut that preceded it, and the next change to test. One long recording can then produce several platform-ready vertical assets, each informed by the previous version’s retention rather than edited in isolation.
Vertical Reframing and Subject Composition
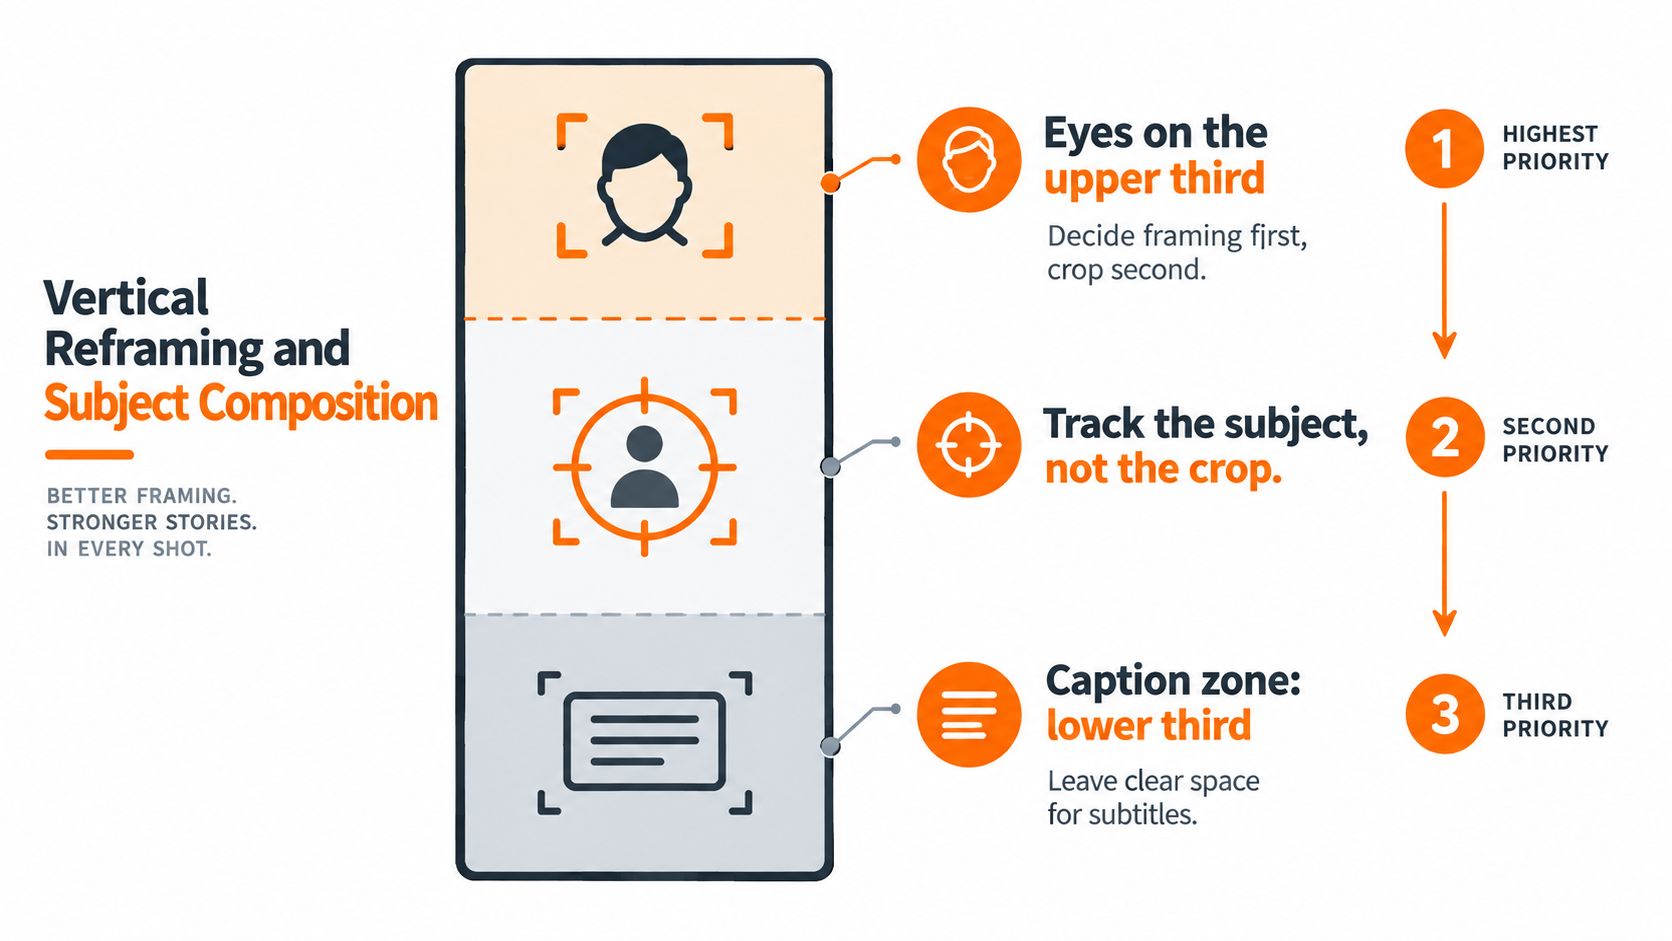
Reframing begins with composition, not with dragging a crop window until the subject is vaguely centered. Set the project to a vertical 9:16 frame, identify the visual priority, and decide what must remain visible throughout the moment. For a talking head, that may be the eyes and hands. For gameplay, it may be the character, the decisive action, or the interface element that explains the reaction.
Keep the face toward the upper portion of the frame and reserve the lower area for captions. This prevents subtitles from covering the mouth, hands, controls, or the visual evidence that makes the clip understandable. The crop should feel intentional at every point, not like the editor is chasing a subject after the fact.
Track the subject instead of the empty space
For a moving speaker, use motion tracking or keyframes to keep the subject in a stable region. Leave enough scale margin for hand gestures and body movement. If you zoom too tightly, the frame will feel cramped whenever the speaker leans forward or raises an arm. If you zoom too far out, the face loses impact on a small screen.
Two-shots require a choice. Pick the person carrying the sentence and keep them dominant. The second speaker can remain near the edge if their reaction matters, but repeated hard cuts between opposite sides of a wide frame can make the Short feel discontinuous. When the exchange itself is the hook, alternate deliberately at the moment of response rather than switching only because the other person moved.
Keep essential faces, captions, and interface details away from the edges. Shorts controls can cover parts of the image, and a composition that looks balanced on a large monitor may feel cramped on a phone. Preview a small version before export. If the clip only works when enlarged on your editing display, the crop needs another pass.
For a workflow focused on converting horizontal footage into a vertical composition, see this horizontal-to-vertical video converter guide. The tool can handle the mechanical transformation, but you still need to decide which subject deserves attention and where the caption layer will sit.
Building Captions That Earn Their Space
Captions are a timed information layer, not a transcript pasted over the video. Start by transcribing the speech, then correct names, numbers, game terminology, usernames, punctuation, and any line that automatic recognition misunderstood. A technically accurate caption can still be hard to read if it breaks in the middle of an idea or changes too quickly for the viewer to process.
Split text into short semantic units that follow the spoken rhythm. Keep the block within a central lower-third safe area rather than at the extreme bottom, where interface controls may cover it. Test the result on a small phone at normal brightness, because desktop readability can hide cramped spacing, thin type, and low contrast.
Caption guidance recommends immediate appearance, short lines, strong contrast, and restrained animation. It also warns that excessive word-by-word movement can compete with gameplay, facial expressions, or instructional visuals. Sound-off viewing is a major reason to caption. One 2025 estimate places sound-off short-video viewing near 80%, although the figure varies by source and market. The same short-form captioning analysis discusses directional findings including approximately 12% higher average view time in one Facebook study and roughly 32% higher completion in another short-form dataset. Those figures aren’t guaranteed causal lifts, so use them as reasons to test caption quality, not as promises.
Match the caption treatment to the content
More motion isn’t automatically more accessible or more engaging. A viewer with dyslexia, a viewer reading on a small screen, or someone following rapid dialogue may need stability more than visual spectacle. For gaming clips, captions should clarify speech without hiding the action. For a joke, a static line can protect the pause that makes the punchline work.
| Caption Style | Best For | Avoid When |
|---|---|---|
| Clean hard-cut captions | Tutorials, interviews, explanations, and dialogue that needs quick scanning | The clip depends on a gradual emotional build |
| Selective emphasis | A key term, reveal, warning, or punchline that benefits from visual priority | Every word is treated as a visual event |
| Light kinetic captions | Narrative clips with clear beats and enough empty visual space | Gameplay, fast demonstrations, or scenes where movement already carries the meaning |
| Speaker-labelled captions | Interviews, group conversations, streams, and overlapping voices | A single speaker remains visually and audibly obvious |
A reliable production sequence is transcribe, align, correct, style, preview muted, export, and inspect after upload. Keep the layout consistent across a channel, but don’t turn branding into a wall of animated text. An auto subtitle generator can speed up the first pass, yet manual correction remains necessary for terms that matter to the clip’s meaning.
If captions are essential to comprehension, consider keeping a clean caption file as a fallback where the platform supports it. Burned-in captions should still be inspected after upload, since scaling and interface placement can change the available room for the viewer.
Export Settings and Pre-Upload QA
Export settings should preserve the edit decisions and keep the clip consistent from timeline to upload. Set the project to vertical 9:16, export at the source frame rate, and use the widely compatible H.264 format with AAC audio. A constant bitrate helps rapid flash cuts retain a consistent picture instead of showing obvious quality shifts within the same clip.
Consistency matters more than chasing a special preset. Keep the source, timeline, and delivery settings aligned. Convert the frame rate only when the project requires it, and do not raise the resolution to hide a soft crop. Listen to dialogue and music together. A mix that sounds balanced on studio headphones may still bury speech on a phone.
The three-pass phone check
Review the export in the same environment where viewers will watch it:
- Muted pass: Watch on a phone with captions enabled. Confirm that the opening communicates the subject, action, or promise without depending on spoken audio.
- Caption-off pass: Disable captions and check whether the visual sequence still makes sense. Some viewers may encounter the clip without captions, and dense text can become difficult to follow even when it is accurate.
- Speed pass: Watch at 1.5×. Look for dead frames, repeated frames, loose transitions, and captions that lag behind speech. The retention editing guidance supports this pacing review while preserving pauses that carry emotion or clarify a technical point.
Listen separately to the start and end of every audio layer. A clipped consonant, sudden music jump, or missing reaction sound can make a clean edit feel unfinished. Check the first frame for black video and the final frame for an abrupt cutoff. Keep small visual and audio handles in the master project if you may need to re-import or accommodate platform processing. Do not bake unnecessary padding into the public-facing story.
The uploaded file is the final QA target, not just the exported master. Watch it once after processing and check caption sharpness, audio balance, and the perceived crop. Interface scaling can change how much room the viewer has left. Fix failures before scheduling. Publishing immediately after export turns preventable mistakes into a public test and leaves no clean feedback for the next cut.
Closing the Loop with Retention Data
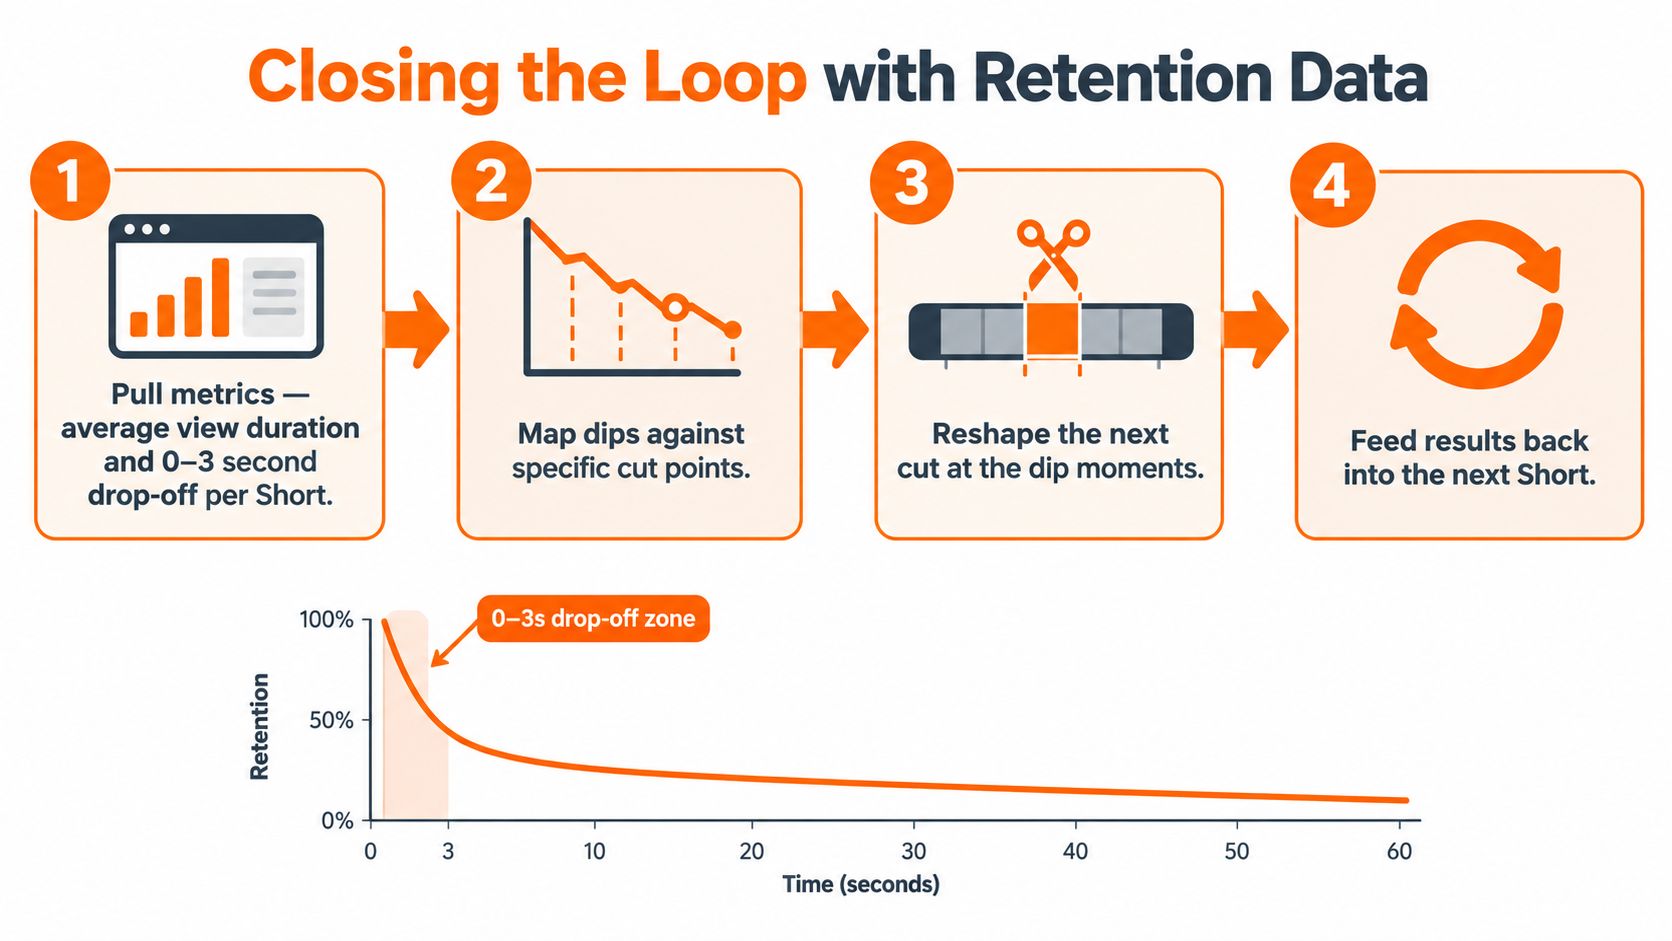
Analytics becomes useful when it changes the next timeline. Pull the average view duration and the early drop-off for each Short, then map visible dips against the exact moment in the edit. A drop may line up with a delayed hook, a caption that appears late, a reframing mistake, an unexplained cut, or a stretch where the speaker continues but the image offers no new information.
The practical question isn’t “Did this Short perform?” It’s “What happened at this timestamp?” If viewers leave around the opening, inspect the promise and first frame. If they leave after a caption-heavy section, check reading speed, contrast, and whether the text covers the action. If a later dip follows a visual change, decide whether the reframe clarified the idea or interrupted it.
Turn each upload into an editing note
Keep a short note beside every exported clip. Write what the graph and the edit suggest, not a vague verdict:
- “Opening held, middle slowed.” Test an earlier visual change or remove repetition.
- “Caption lag near the reveal.” Correct timing before changing the style.
- “Drop after the reframe.” Compare the crop with the prior shot and check whether the new subject position is confusing.
- “Strong completion, weak opening.” Preserve the payoff while rebuilding the first beat.
Review these notes together on a regular production day. Select a small number of adjustments for the next batch, such as tightening openings, reducing caption motion, or changing how gameplay and facecam share the vertical frame. Don’t change every variable at once. If the hook, crop, caption treatment, music, and pacing all change together, you won’t know which decision affected the curve.
Shorts editing improves through this loop: select, cut, reframe, caption, export, publish, inspect, and revise. The long recording supplies the raw material, but the retention curve tells you which editorial decisions deserve another test. That turns clipping from a one-off scramble into a production system that gets more precise with every batch.
If you’re turning streams, interviews, or other horizontal recordings into Shorts, clipoven can propose cuts, captions, effects, and vertical reframing through its AI editing workflow, then let you refine the result on a full timeline. Use it to build a first batch faster, review each clip against the retention loop above, and keep the final creative decisions in your hands.