 clipoven
You’ve finished the slides, checked the charts, and sent the deck for approval. Now someone wants a video they can watch without opening PowerPoint, and the presentation that worked with you talking beside it suddenly needs to explain itself.
Learning how to convert a PowerPoint presentation to video is mostly about controlling what happens over time. The export button creates the file, but your narration, slide durations, animation cues, and accessibility checks determine whether someone can follow it without you in the room.
Table of Contents
- Pick the Right Resolution and File Format
- Export a Slide Deck as MP4 in PowerPoint
- Export on a Mac Without Missing the Video Options
- Fix Blank Slides, Timing Drift and Failed Exports
- Add Captions and Descriptions for Every Viewer
- Decide Whether Your Deck Video Needs a Vertical Edit
Pick the Right Resolution and File Format
Start with Full HD, then change it only when the viewing destination gives you a reason. Microsoft recommends Full HD for computers and high-definition screens; its PowerPoint video-export guide lists the pixel dimensions and intended uses below, and specifies Windows 10 or later for the documented Ultra HD workflow.
PowerPoint video resolutions and where each fits
| Resolution | Pixels | Best for | Trade-off |
|---|---|---|---|
| Ultra HD (4K) | 3840 × 2160 | Large displays and archive masters | Largest file; Windows 10 or later |
| Full HD | 1920 × 1080 | Computers and HD screens | Balanced file size and detail |
| HD | 1280 × 720 | Internet upload and DVD | Smaller files, less fine detail |
| Standard | 852 × 480 | Portable devices and quick previews | Small text becomes hard to read |
Treat the “best for” column as a starting point, not permission to ignore the content. A portable device might play a low-resolution file perfectly while leaving the audience unable to read a spreadsheet screenshot. Conversely, a presentation made of large headings and simple illustrations may not benefit much from the largest export.
Higher resolution preserves fine chart lines, labels, and small text, but it also increases storage and transfer requirements. For a long training presentation, that trade-off matters when colleagues need to upload, download, or replace the file.
Separate sharpness from layout
Resolution controls detail; aspect ratio controls shape. Increasing export quality won’t fix a slide layout that doesn’t suit its destination. Check the YouTube video size and aspect ratio guide if the presentation will become a channel upload and you’re deciding how the frame should look.
Choose MPEG-4 Video (.mp4) for delivery unless a legacy system specifically requires WMV. In the standard Create a Video workflow, you’re choosing the resolution and file container, not working through a separate professional encoding panel. Don’t spend time hunting for codec controls that aren’t part of that dialog.
Practical rule: Test the densest slide, not the prettiest title slide.
Render a short sample containing a detailed chart, a screenshot, and ordinary body text. Watch it at the size your audience will use, rather than enlarging it until everything becomes readable.
If labels disappear, increase the resolution and compare again. If they remain difficult to read, simplify the slide or enlarge the labels. More pixels can preserve text, but they can’t repair an overcrowded layout.
Export a Slide Deck as MP4 in PowerPoint
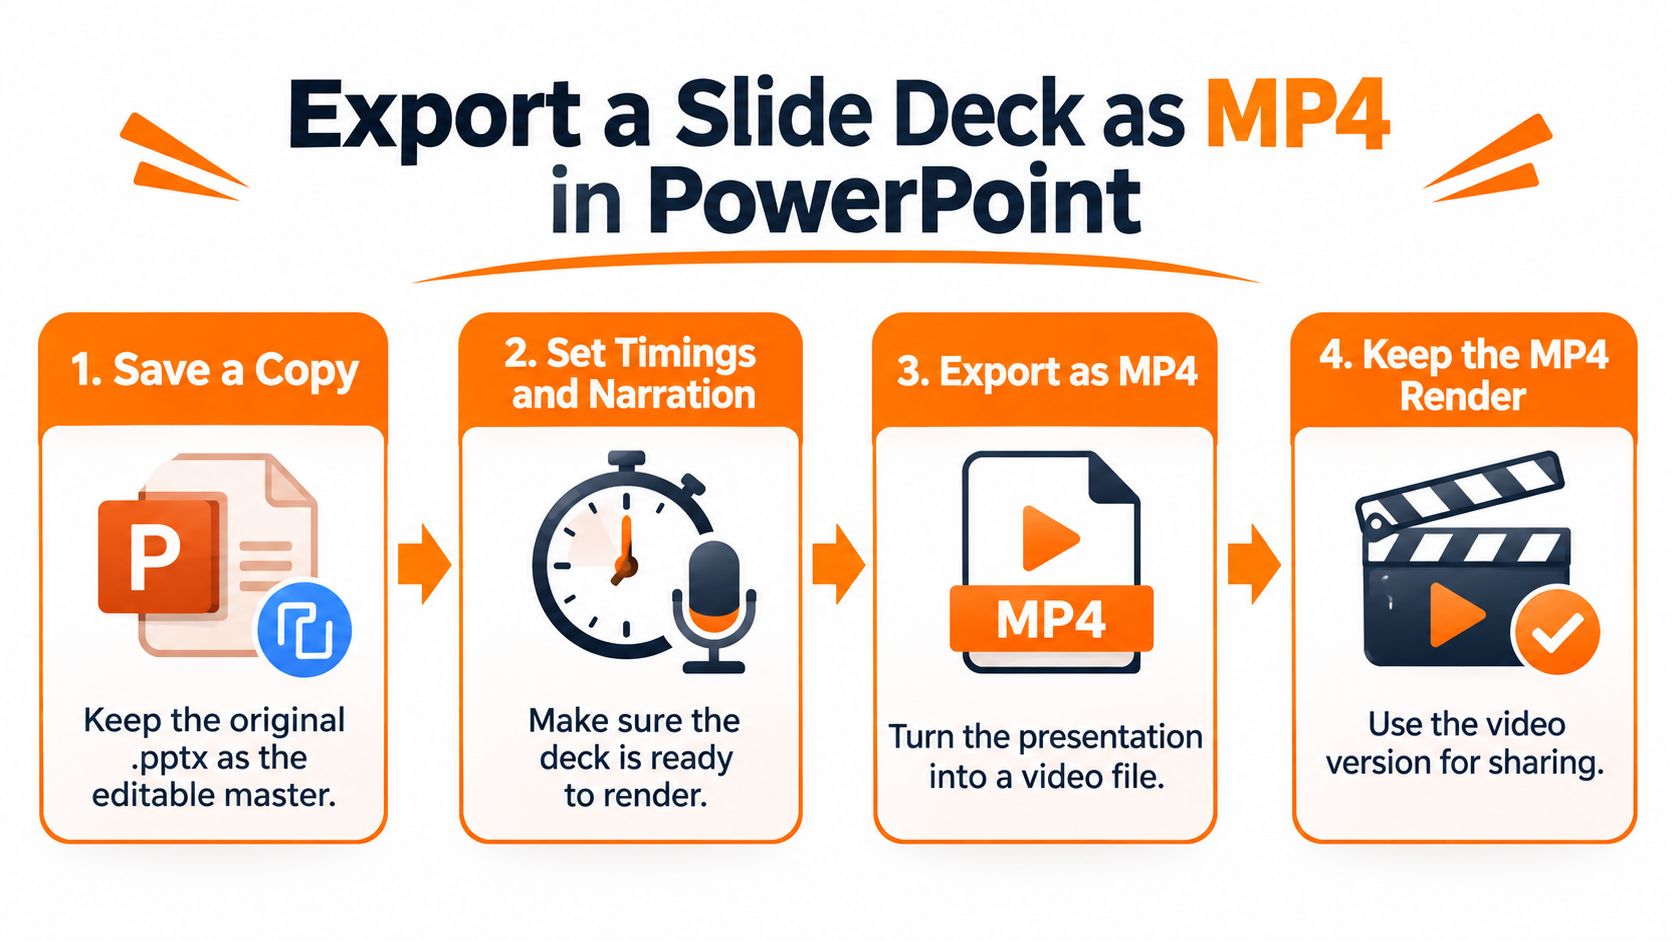
A deck becomes an MP4 in a few clicks once its narration and timing are ready. Keep the original presentation as the editable master: changing a chart or correcting a sentence belongs in the PPTX, not in the rendered video.
Microsoft’s instructions for turning a presentation into a video confirm that export can include recorded narration, timings, animations, transitions, and laser-pointer movements. That makes the native export useful when you want the presentation’s planned playback, rather than a recording of your desktop.
Use this workflow to move from the editable deck to the sharing file.
Prepare the playback before rendering
-
Save a working copy as .pptx. Run the entire deck in Slide Show mode. Check slide order, hidden material, media playback, and whether the audience can understand the sequence without a live question-and-answer session. Remove presenter reminders that don’t belong in a recording.
-
Record narration and slide timings. Open Slide Show > Record Slide Show, or the corresponding recording controls in your version. Record in short, complete segments so you can replace an explanation without rebuilding the whole delivery. Advance animations deliberately, and re-record any slide that moves on accidentally.
-
Set intentional durations for silent slides. In Transitions, use the Advance Slide > After control where appropriate. Give viewers enough time to read the content and understand its purpose. Preview the transition as well as the slide itself, because movement between slides affects the perceived pace.
-
Open File > Export > Create a Video. Select the quality you’ve tested. Avoid changing the resolution merely because a higher setting is available; use the setting that preserves the information your audience needs.
-
Enable Use Recorded Timings and Narrations. This is the handoff between your rehearsed presentation and the exported file. Without it, a carefully recorded explanation may not govern playback as intended.
-
Click Create Video and select MPEG-4 Video (.mp4). Save to a local drive first, then copy the completed file to shared storage. This keeps the render separate from cloud synchronization and makes it easier to distinguish an export problem from a transfer problem.
Check the actual duration
PowerPoint doesn’t infer how long someone needs to understand a slide. Microsoft’s save-as-video training guide gives a default of 5 seconds per slide when custom timings aren’t present, so a 20-slide deck would run for approximately 100 seconds before additional transitions or edits.
That default is unsuitable for a deck mixing brief dividers with detailed explanations. A title might linger awkwardly while a process diagram disappears before the viewer has followed its arrows.
Make a short test deck containing a title, a complicated animation, and a narrated chart. Export it with the intended settings before committing to the full presentation.
Then watch the finished MP4 from beginning to end, without clicking ahead. Check that each build finishes before the narration changes subject, that sentences aren’t clipped, and that the closing instruction remains visible long enough to act on. Successful rendering isn’t the same as successful playback.
Export on a Mac Without Missing the Video Options
On a Mac, use File > Export, not Save As. Microsoft’s PowerPoint for Mac movie-export instructions specifically distinguish these paths: Export exposes MP4 and MOV, video quality, and Use Recorded Timings and Narrations.
Use the Export menu to find the video controls.
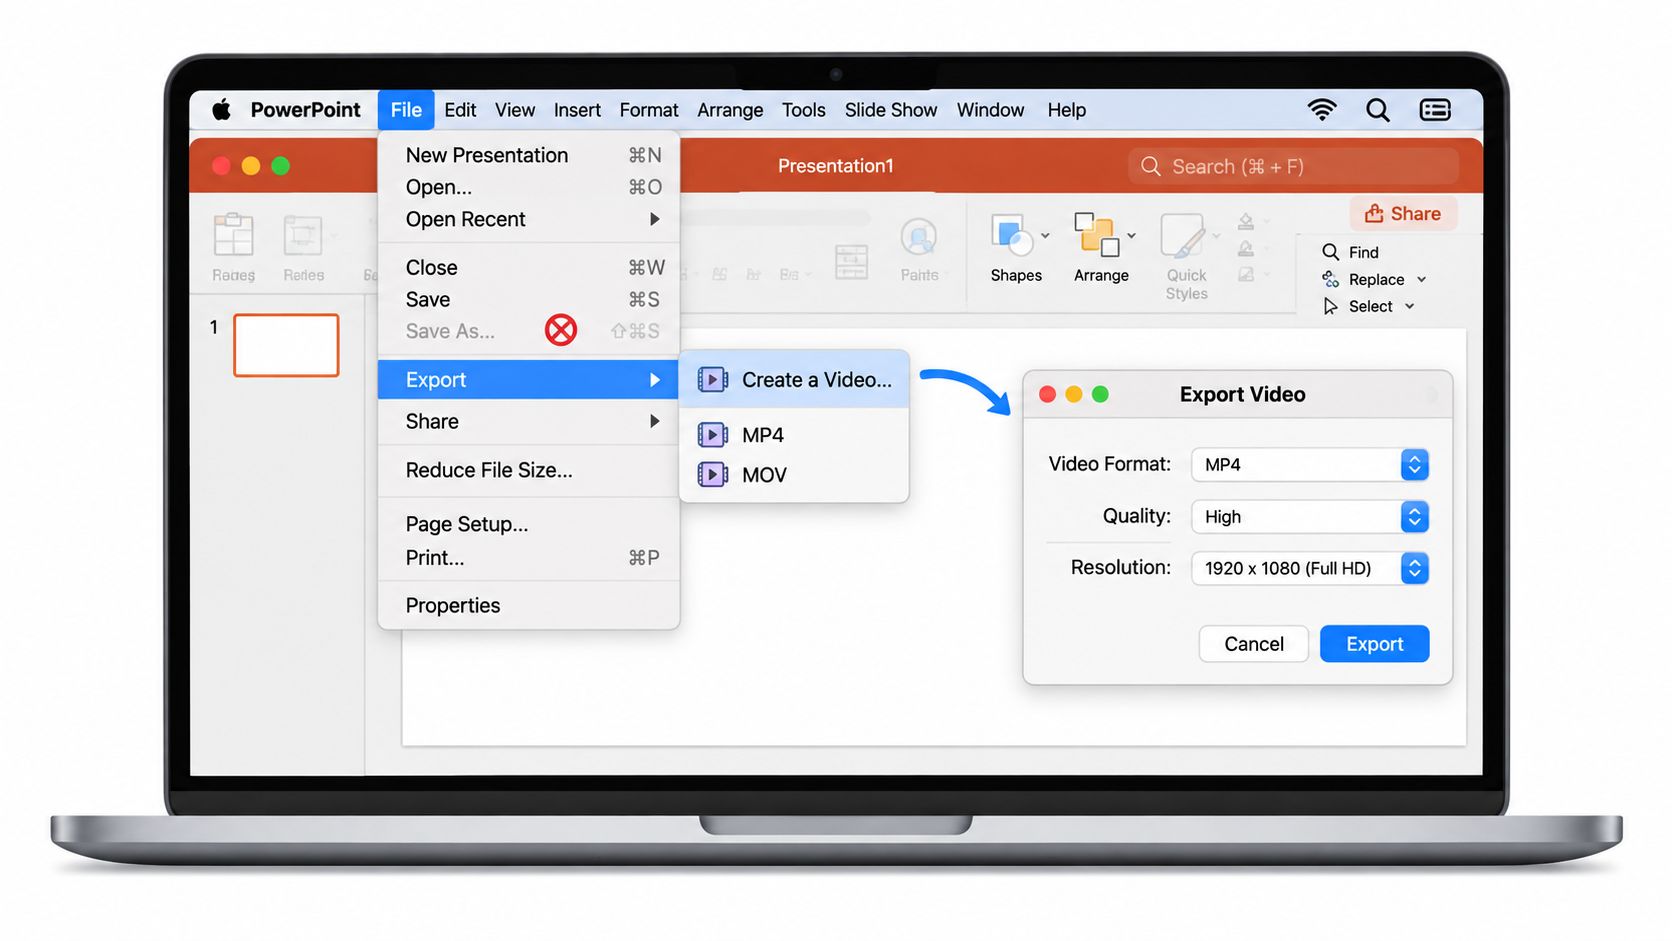
Choose MP4 for ordinary distribution. MOV is an alternative when an editing handoff specifically calls for it, but there’s no reason to change containers because you’re using a Mac.
Run a Mac-specific preflight
- Save the current presentation. Confirm that your latest slide edits and recordings are in the working PPTX before starting the export.
- Listen at slide boundaries. Rehearse and save timings, checking that narration starts cleanly and finishes before the next explanation begins.
- Inspect the timing option. Leave Use Recorded Timings and Narrations selected when the recording should control playback. For unrecorded slides, choose a deliberate duration.
- Check the rendering machine. Make sure it has the fonts and media your presentation uses. Don’t assume a deck prepared on another computer will look identical.
- Verify the delivered file elsewhere. Open the MP4 in another media player or on another device, rather than relying exclusively on PowerPoint’s preview.
For a visual walkthrough, compare the menu sequence with the controls available in your installed version.
Be particularly careful with animation-heavy decks exchanged between Mac and Windows. Inspect the actual result instead of assuming every effect behaves identically across versions.
Finally, view the export under realistic display conditions. Dense labels that look acceptable close to a laptop may be difficult to follow when projected across a meeting room. Check both the intended screen size and the audience’s viewing distance.
Fix Blank Slides, Timing Drift and Failed Exports
Start with a small test, not another full render. Create a temporary copy containing the troublesome slide and its neighbors, so you can see both the failure and the transition into it. Change one thing at a time; otherwise, you won’t know which repair worked.
Check the source presentation first, the timings second, and the export destination third. If an object is already broken in Slide Show, changing the video format won’t repair it. If Slide Show works but the render doesn’t, isolate the affected font, media object, or animation.
Export symptoms, causes and fixes
| Symptom | Likely cause | Fix |
|---|---|---|
| Blank or missing elements | Missing fonts or unsupported media | Install the font or replace the media, then re-export the test section |
| Slides stay too long or cut off | Missing or unsuitable timings; fallback duration used | Re-record narration or set per-slide durations, then select Use Recorded Timings and Narrations |
| Narration runs ahead of animations | Animation builds aren’t finished before the slide advances | Adjust timing in the Animation Pane and preview in Slide Show |
| Export stalls or fails | Cloud synchronization interference or oversized images | Export locally and compress oversized images in the PPTX |
Repair the smallest possible component
For a narration problem, replace the affected slide’s recording rather than recording the whole presentation again. In Animations > Animation Pane, inspect start conditions and delays: an effect waiting for a click may not match the sequence you thought you recorded.
For missing visuals, confirm the font is installed on the computer performing the export. Replace an unreliable media object with a supported version, and test that replacement before changing other slides. For image-heavy decks, compress oversized pictures in a working copy so you retain the originals.
A lower-resolution export can help isolate a rendering problem, but it isn’t a fix for missing content.
After each repair, render the small test again. Only return to the full deck when the symptom is gone, and keep a note of the setting or object you changed so another editor can reproduce the result.
Add Captions and Descriptions for Every Viewer
An MP4 that plays isn’t necessarily accessible. A viewer who can’t hear the narration needs its meaning in text; a viewer who can’t see the chart needs its meaning in audio. Neither requirement disappears because the original slides looked clear.
Microsoft’s PowerPoint accessibility guidance calls for closed captions or subtitles for video dialogue and audio description where important visual information needs explanation. Treat those as publishing tasks, not optional polish.
Complete the post-export accessibility check
-
Compare captions with the finished recording. Review names, technical terms, punctuation, and synchronization. Correct captions against what the speaker says, not an earlier script. An automatic subtitle workflow can produce a draft, but you still need to inspect the result.
-
Turn speaker notes into a usable transcript. Remove private reminders and update any passages you changed while recording. Supply the transcript alongside the video where viewers can find it, rather than leaving it inside a presentation they won’t receive.
-
Describe meaningful visuals aloud. State a chart’s takeaway, the relationship in a diagram, and the change revealed by an animated build. Saying “as you can see” doesn’t explain anything to someone who can’t see the slide. Integrate the description into the narration where possible.
-
Check contrast and text at phone size. Look especially at axis labels, footnotes, and caption backgrounds. Captions shouldn’t obscure the diagram they explain, and color alone shouldn’t identify which line or category matters.
-
Watch without sound, then listen without looking. The silent version should communicate the key message through text and visuals. The audio-only version should explain the reasoning rather than depend on unexplained pointing or movement.
If you crop the video for a vertical feed, regenerate and reposition captions for that composition. Review visual descriptions too: a reference to a chart on the left becomes confusing if the chart is no longer visible.
Accessibility is a test of whether the explanation stands on its own, not just whether captions are present.
Publish only when someone can follow the argument without hearing the narration or seeing the slides. That test also exposes vague explanations and missing context for everyone else.
Decide Whether Your Deck Video Needs a Vertical Edit
Keep the slide-based export for training, internal updates, and lectures when viewers need the complete layout. A process map, detailed comparison, or annotated screenshot may require the whole frame. Cropping it just to fill a phone screen can remove the evidence behind your explanation.
A social-feed version serves a different purpose. For TikTok, YouTube Shorts, or Instagram Reels, choose a self-contained takeaway rather than squeezing the entire presentation into a narrow frame. Use a horizontal-to-vertical editing workflow when the content benefits from reframing, tighter cuts, and captions composed for the destination.
Choose between a full explanation and a focused excerpt
- Keep the full presentation when viewers must follow a sequence, inspect supporting detail, or refer back to a complete lesson.
- Make a separate vertical edit when a single answer, demonstration, or conclusion can stand independently.
- Rebuild a visual when necessary. If cropping removes chart labels or supporting context, simplify that graphic instead of accepting an unreadable result.
For that second edit, clipoven is an AI agentic clip editor that automatically turns horizontal footage into vertical shorts. Bring the exported footage and describe the desired vibe to Eddie, who assembles cuts, captions, and effects; refine the result on the full timeline. Eddie reframes footage to 9:16 with the subject in focus and captions that fit the feed, and final clips can be exported in 2K, ready for TikTok and YouTube Shorts.
Export a test MP4, complete the accessibility checks, then choose the version your audience needs. Keep the PPTX as your editable master and treat any social clip as a separate editorial deliverable.
Turn your PowerPoint export into a focused vertical short with clipoven, using Eddie to assemble cuts, captions, and effects from your instructions. Bring your checked MP4, describe the takeaway you want to share, and refine the result in the timeline before publishing.