 clipoven
Cut faster. Match every beat. Remove every pause. That advice can make a montage feel busy without making it understandable. If viewers are still reading the setup when you reveal the payoff, you haven’t tightened the edit. You’ve removed their chance to follow it.
Making video montages is about controlling attention, not maximizing cuts. A strong montage gives each image, spoken phrase, and caption enough time to do its job, then moves on. Start with the destination, build a clear sequence, and use music and effects to support meaning rather than compete with it.
Table of Contents
- Montage Length and Export Targets
- How to Build a Montage from Selects
- Pace the Cuts for Comprehension
- Time Captions Like Another Edit Track
- Transitions, Music and Final Checks
- Reusable Templates and Example Workflows
- Revise the Montage from Retention
Montage Length and Export Targets
Use 21–30 seconds as an initial short-form planning window, not a platform requirement. In HubSpot’s survey of more than 500 video marketers, 83% reported using short-form video in 2024, and 42% identified 21–30 seconds as the optimal length for that format, according to the HubSpot video marketing report. That’s a useful starting point, but it doesn’t establish the ideal duration for your particular audience or story.
Before selecting footage, decide what file you’re making. A vertical gaming clip needs different framing from a horizontal highlight embedded on a website. Changing the destination after editing can force you to rebuild crops, captions, and shot order.
Choose a Working Delivery Preset
The table below contains example editing presets, not official platform limits or guaranteed performance settings. Treat the durations as budgets you can adjust when the material needs more context.
Montage length and export targets by destination
| Destination | Aspect | Aim length | Frame size | Frame rate | Keep visible |
|---|---|---|---|---|---|
| TikTok | 9:16 | 21–30 seconds | 1080 × 1920 | Match source footage | Subject and caption clear of bottom UI |
| YouTube Shorts | 9:16 | 21–30 seconds | 1080 × 1920 | Match source footage | Face or gameplay target inside the crop |
| Instagram Reels | 9:16 | 15–30 seconds | 1080 × 1920 | 30 fps working preset when source matches | Text off edges and stickers |
| YouTube highlight embed | 16:9 | Story-led, with room for setup | 1920 × 1080 | Match source footage | Wider context, fewer whip cuts |
For TikTok, prioritize the subject and the interface space around it. For Shorts, inspect whether a moving gameplay target stays visible throughout the vertical crop. For Reels, account for any stickers or text you’ll add during publication.
Choose the horizontal row when surrounding action matters. A teammate entering from the side, an opponent’s position, or a wide reaction shot may explain something that a narrow crop would remove.
Lock the File Before the Timeline
Set the canvas and frame rate in your editor before assembling the sequence. Match the source frame rate unless you have a deliberate conversion or slow-motion reason; increasing the export frame rate won’t recover motion detail you didn’t record.
For delivery, use H.264 when the destination accepts it, and create the upload file directly from the project rather than recompressing a previous upload. Use the YouTube Shorts export settings guide to work through the export controls separately from creative decisions.
Say you’re building a roughly 24-second gaming montage. That’s an example budget, not a rule: it gives you a concrete limit against which to judge every selected moment. If the sequence runs long, remove a weak beat before speeding up speech or flashing captions more quickly.
How to Build a Montage from Selects
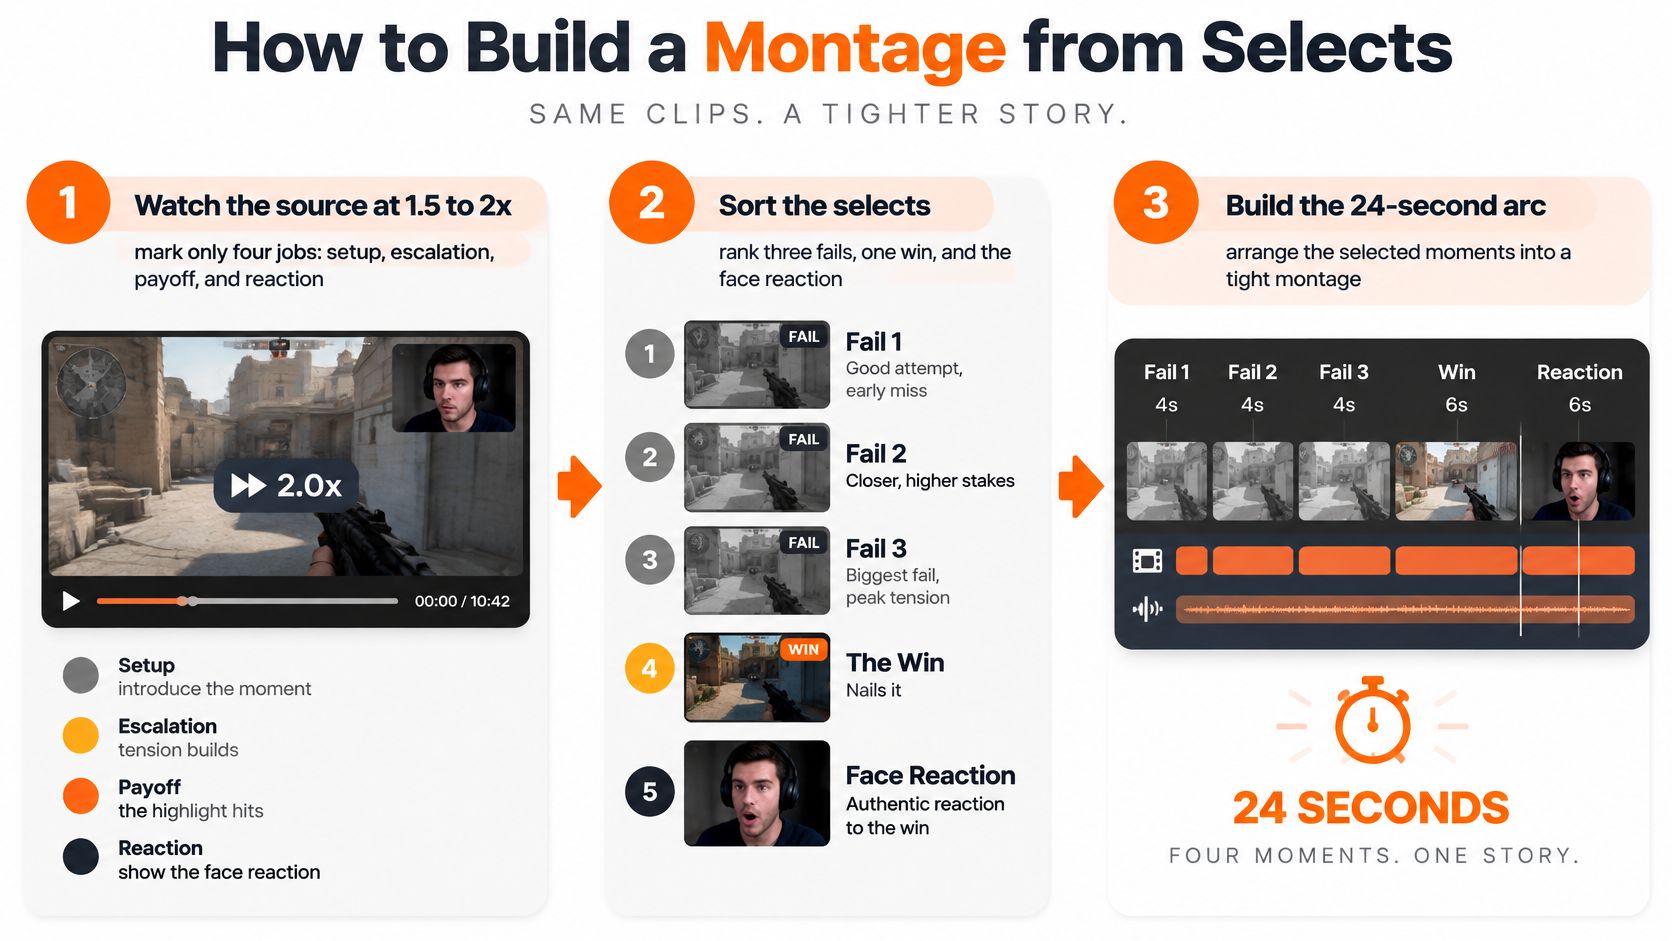
Start with a hypothetical gaming stream containing three ranked fails, a win, and a face reaction. The montage should explain why the win feels satisfying, not merely prove that several exciting things happened.
Selects are the useful spans you pull from the source before building the final sequence. Keep them separate from the full recording so you can compare moments without repeatedly searching the stream.
The infographic summarizes the review, selection, and assembly stages.
Build the Sequence in Eight Passes
-
Watch for narrative jobs.
During the first review, mark setup, escalation, payoff, and reaction. You can skim uneventful stretches faster, but return to normal playback when dialogue or precise action matters. The common mistake is marking everything impressive, even when several moments do the same job. -
Pull short spans with handles.
Keep a little extra footage before and after each useful moment. Editors call that extra material handles: it lets you restore an intake of breath, finish a movement, or shift the cut later. Pull the meaningful exchange, not the entire match. -
Order the shots so viewers understand the reaction.
Rank the fails by how clearly they increase frustration or expectation, then place the win before the face reaction. If the reaction appears before its cause, viewers may read it as anger about a fail rather than relief after the win. Shot order changes interpretation. -
Remove repetition without deleting the explanation.
Cut loading screens, repeated positioning, and pauses that add nothing. Keep the callout or visual cue that explains the difficult play. If viewers need to know that the player has almost no health, preserve a readable glimpse of the health indicator rather than assuming they’ll infer the stakes. -
Compare the assembly with your duration budget.
If the example sequence runs beyond its planned length, remove the least useful fail first. Don’t automatically shorten every clip equally. A brief miss may need little context, while the winning move needs enough uninterrupted action to remain believable. -
Reframe each selected shot.
In a vertical sequence, follow the relevant subject rather than leaving every crop centered. Check the target, the player’s face, and any interface information that explains the result. A face cut in half or an opponent leaving the frame is a composition failure, not an acceptable cost of vertical video. -
Add music after the picture order works.
Play the sequence without a soundtrack and explain its arc in a sentence. If you can’t, revise the selection before scoring it. Once the sequence makes sense, use musical accents where they strengthen an existing turn rather than rearranging the story around every beat. -
Add captions and inspect an export.
Complete the caption pass, then watch the encoded file on a phone with sound and without it. Look for missing context, awkward crops, and a reaction that ends before viewers register it. The timeline preview alone won’t show every problem in the delivered file.
Selection rule: Keep a moment because it changes what the viewer understands or feels, not because it was difficult to capture.
Your first assembly doesn’t need elaborate transitions. It needs a setup viewers can recognize, escalating attempts they can distinguish, and a payoff they can see.
Know When Picture Order Is Stable
A picture-locked sequence has an agreed selection and order of shots. Small timing adjustments may still follow, especially around captions, but you’re no longer swapping in unrelated highlights.
Save that version before adding decorative effects. It gives you a clean reference if later zooms, shakes, or sound effects make the montage harder to follow.
Pace the Cuts for Comprehension
Beat-matched speed shouldn’t be your default. A viewer can enjoy rapid images while missing the sentence that explains them. Speech, captions, and action all demand attention, so accelerating them together can turn an understandable moment into a confusing one.
In a 2025 accessibility study involving 20 participants, all participants used captions to understand speech, regain context after distraction, and maintain attention. That finding supports treating caption reading time as part of the edit, not as leftover space between cuts.
Use Different Pacing for Different Jobs
The following table gives hypothetical starting presets for editing practice, not measured audience thresholds. Test them against the actual words, visual detail, and familiarity your viewers bring.
Shot length and caption pace by montage type
| Montage type | Typical shot | Spoken pace | Caption rule |
|---|---|---|---|
| Visual highlight reel | For example, 0.4–1.2 seconds | Music-led, little speech | Short label held at least 1 second in this preset |
| Commentary or clutch story | For example, 2–4 seconds | Preserve natural, intelligible phrasing | One complete phrase per card |
| Tutorial or explainer | For example, 3–5 seconds | Leave room to process unfamiliar terms | One idea, readable with sound off |
A visual reel can move quickly because the image does most of the work. A short label can remain visible across several cuts, so the caption doesn’t have to restart whenever the picture changes.
A commentary montage works differently. If the player explains why an apparently easy move was risky, that explanation needs a complete phrase and a visual that supports it. Cutting to unrelated action halfway through the sentence adds another task for the viewer.
This comparison illustrates the difference between energetic imagery and a readable information pace.
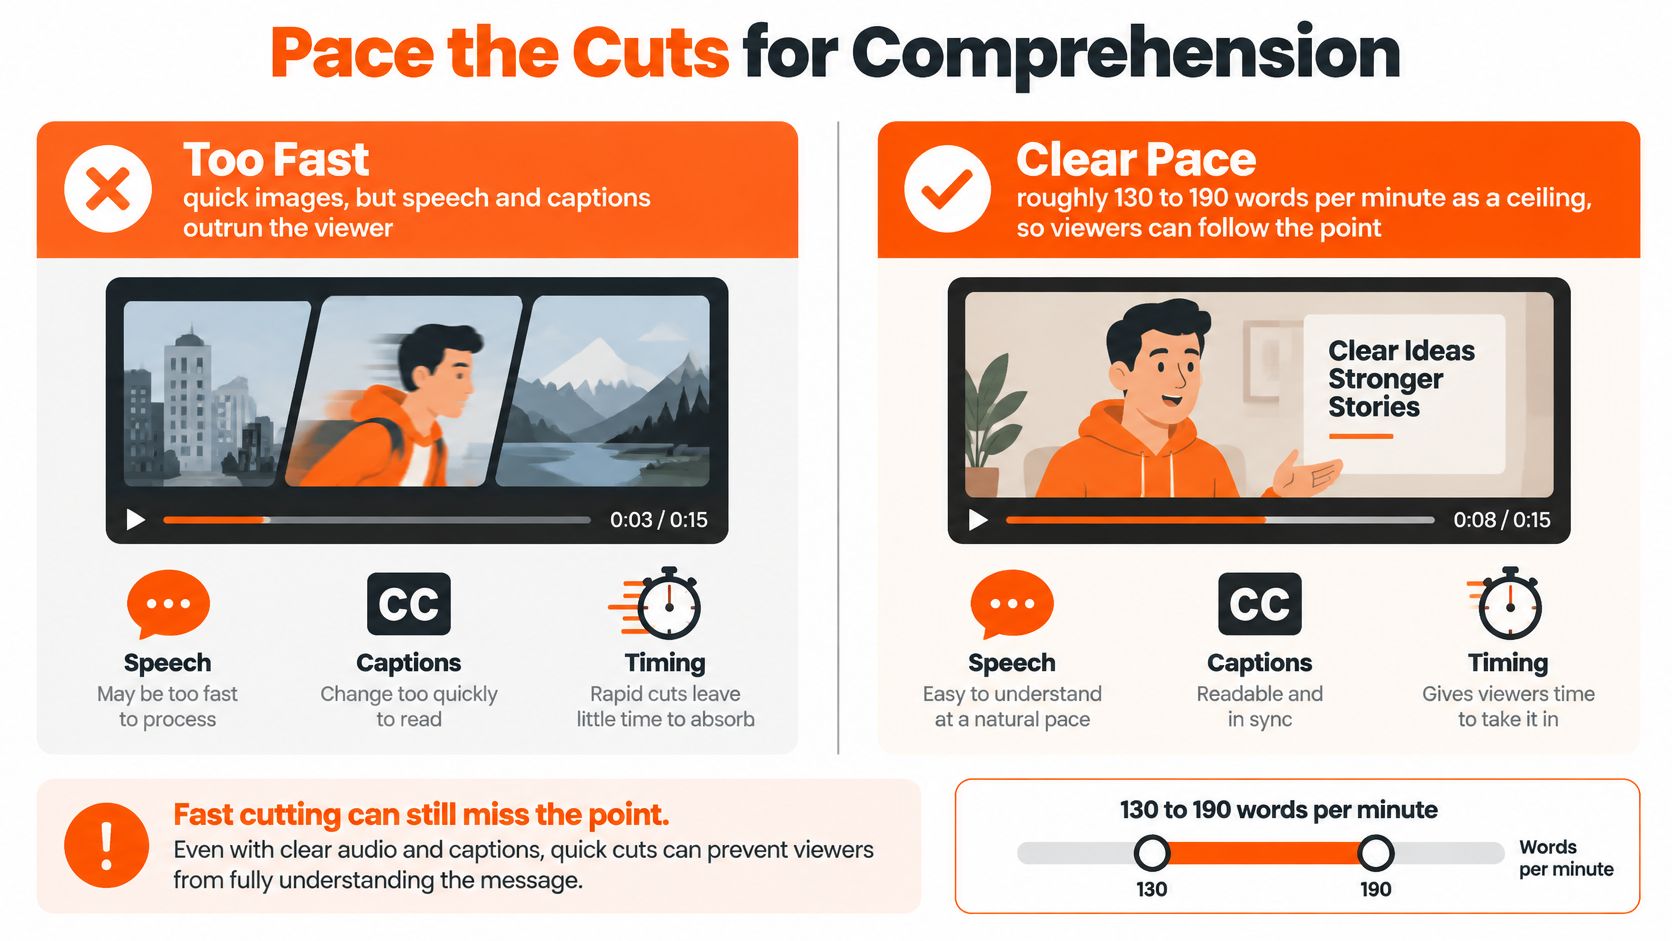
Don’t treat a spoken-word rate as a universal caption limit. Reading unfamiliar game terminology while tracking a moving target isn’t the same task as listening to familiar conversation over a static image. Judge the combination, not just the speech track.
Test the Caption Against the Picture
Count the words in a dense caption block and read it once at ordinary speed while watching the action. If you have to ignore the picture to finish reading, simplify the visual moment, extend the caption, or restore space around the sentence.
Use these checks when choosing between an energy reel and an explainer:
- New information: Give unfamiliar names, mechanics, and instructions more room than familiar reactions.
- Competing movement: Avoid introducing a fresh caption at the exact moment viewers must locate a small target.
- Complete meaning: Keep the part of the sentence that explains cause, contrast, or consequence.
A cut is too fast when viewers can see that something happened but can’t tell you why it mattered.
For a muted review, ask someone to describe the outcome without coaching them. If they misunderstand the win, don’t add another effect. Find the missing cue or the caption they couldn’t finish.
Time Captions Like Another Edit Track
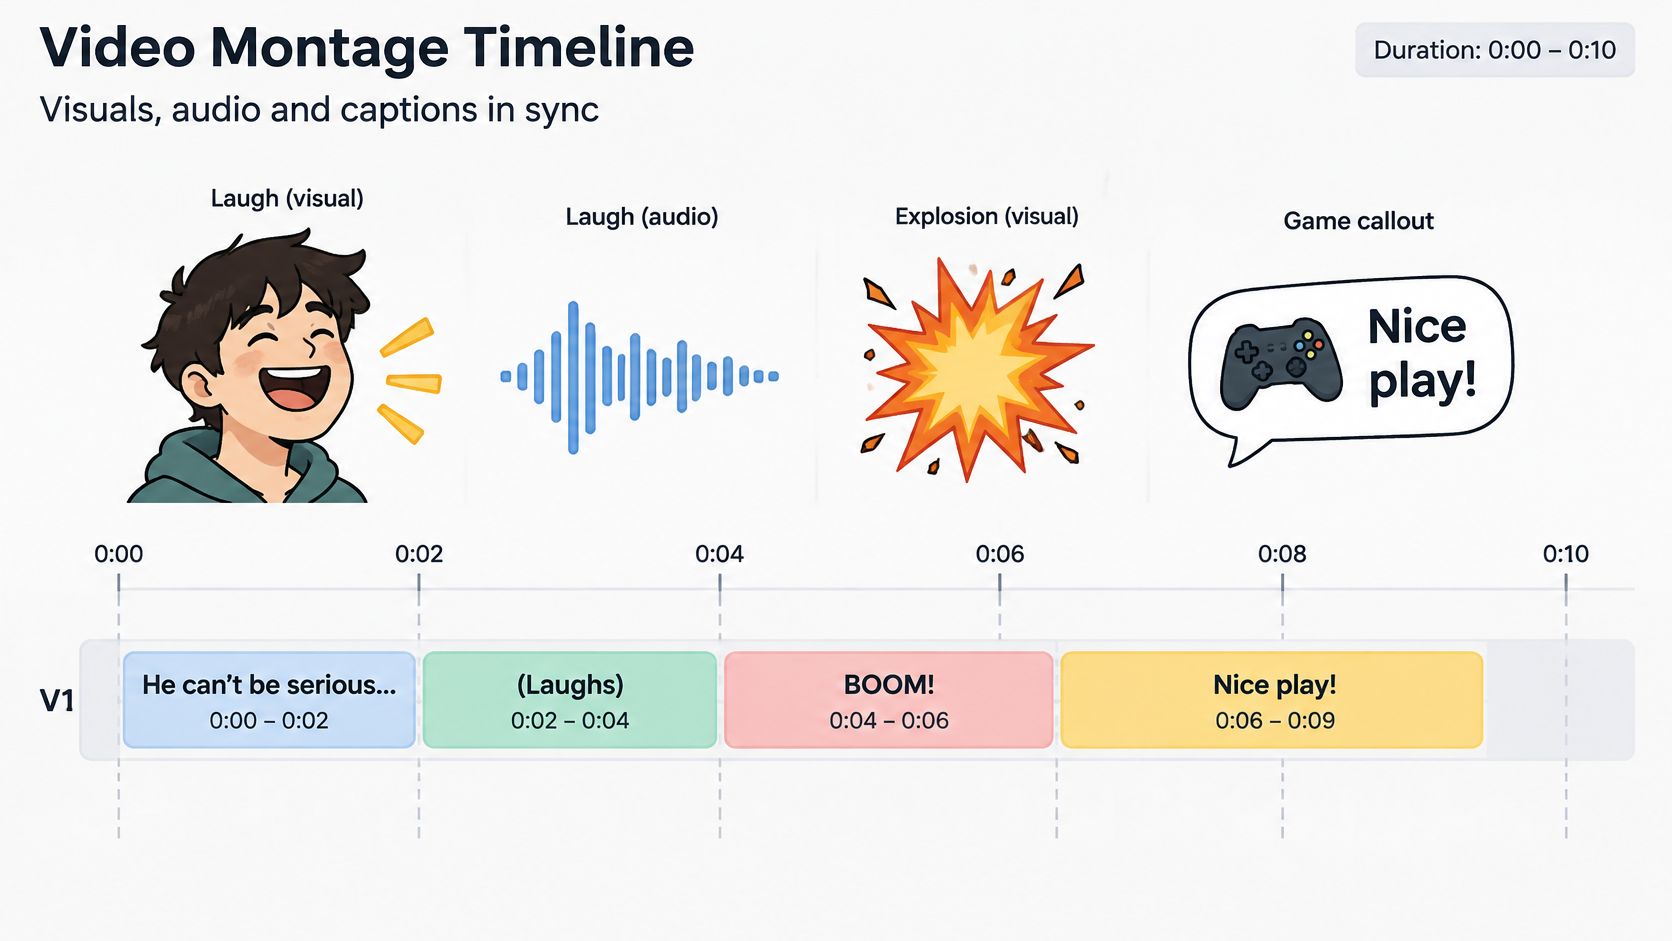
Captions need in points, out points, and composition decisions, just like footage. They shouldn’t appear whenever a convenient picture cut happens to occur.
The W3C accessibility working draft describes caption concerns including accuracy, synchronization, speaker context, and placement that doesn’t conceal necessary visual information. Its layout guidance includes keeping caption edges at least about one-twelfth of the screen height above the bottom edge. Treat that as a reference point, not a guarantee that every platform overlay will leave your text clear.
The timeline view below shows why captions need their own timing track.
Make Five Caption Moves
-
Transcribe the meaningful audio.
Start with dialogue, then include sound information that changes the meaning. In a gameplay frame, an offscreen explosion or a teammate’s warning may explain why the player turns away from the visible target. Don’t label every incidental sound. -
Divide the transcript into readable blocks.
Keep natural phrases together rather than splitting according to a fixed word count. Stay verbatim where possible, and don’t remove a hesitation if it carries the joke or changes the speaker’s meaning. Short lines are useful only when the breaks still make sense. -
Set timing against the audio.
Listen for the beginning and end of each phrase. A caption can remain across a picture cut when the same speaker continues, but it shouldn’t reveal the punchline before the speaker delivers it. Automatic timing is a starting point you still need to inspect. -
Place the block around the action.
Establish a consistent lower-safe position, then move it when the HUD, face, or target occupies that space. Keep the crosshair, score change, or object that explains the play visible. Stability helps, but rigid placement can hide the evidence viewers need. -
Review the rendered result.
Check spelling, synchronization, speaker identification, contrast, and occlusion in the exported file. Bright gameplay can swallow thin white letters, so use a sufficiently opaque background plate or another clear contrast treatment. Confirm that the text stays legible as the background changes.
Handle Overlapping Voices Deliberately
When teammates talk over each other, add a brief speaker identifier where needed. If secondary chatter contributes nothing, simplify the audio mix rather than presenting a wall of simultaneous text.
For styling beyond dialogue captions, use the on-screen text guide to distinguish explanatory labels from subtitles. A label can summarize a stage of the montage; captions should represent the audio viewers need to understand.
Use the embedded video as another opportunity to examine how text timing relates to speech and picture changes.
The caption pass is complete when viewers can identify who’s speaking, follow the necessary audio, and still see the action that explains the result.
Transitions, Music and Final Checks
Start with hard cuts. Use a dissolve, speed ramp, zoom, shake, or grayscale change when it communicates a story turn, not just because the editor offers it.
A brief change in treatment might separate failed attempts from the successful run. Applying the same effect between every equal shot removes that distinction and gives viewers movement to process without additional meaning.
Score the Story You Already Have
Choose a music bed after the sequence works without it, then mark useful accents. Place a strong movement or payoff on an accent when that alignment doesn’t force you to sacrifice context.
Keep dialogue clearly above the music during setup. Let the track become fuller during a visual passage, then lower it before the next important line begins. Don’t wait until a word is already obscured to bring the music down.
- Keep a consistent treatment: Use a coherent caption font, placement rule, and color treatment across source clips.
- Give effects a reason: Use a zoom to direct attention toward something viewers might miss, not to make every shot appear active.
- Check joins in motion: Watch the outgoing and incoming movements together before deciding a transition is necessary.
The guide to making transitions can help you choose a treatment when a plain cut doesn’t communicate the intended change.
Diagnose the Symptom Before Adding Polish
The W3C captioning guidance emphasizes synchronized captions, readable presentation, and placement that doesn’t hide necessary visual information. Those are practical acceptance criteria, not decorative preferences.
Montage problems and the fix
| What you see | Likely cause | Fix |
|---|---|---|
| Energy feels flat | Every shot is the same length | Vary duration by setup, escalation, payoff, and reaction |
| Story is hard to follow | Speech cut mid-idea | Restore the full clause and slow that card |
| Action is hidden | Caption sits on face, HUD, or target | Move the block into clear space, preserving the lower-safe margin |
| Audio is muddy | Music competes with dialogue | Lower music under speech and raise it only on visual beats |
| Cuts feel harsh | Join inside a move or mismatched direction | Cut on completed action or matched motion |
| Export looks soft | File encoded more than once | Export directly from the timeline master |
A harsh join doesn’t always need a dissolve. Try shifting the cut to where the hand finishes moving or matching the direction of action between shots. Likewise, louder sound effects won’t repair a payoff whose target is outside the crop.
Final acceptance check: Pass the file only when the opening establishes context, necessary speech is captioned and synchronized, essential action remains visible, and you’ve watched the encoded export on a phone.
Review with sound on and off, and account for the destination’s overlays. Fix the failed item in the project, then create a fresh export from that source.
Reusable Templates and Example Workflows
A useful template stores editing decisions, not just a font and a transition pack. Save the delivery preset, pacing approach, caption behavior, music treatment, and export settings together.
Don’t freeze every duration. A template should reduce repeated setup while leaving you free to hold a complicated action or remove an unnecessary beat.
Store Rules You Can Apply
- Destination: Save the canvas, frame rate rule, and intended upload format.
- Pacing: Identify whether the sequence is image-led, story-led, or instructional.
- Captions: Store the type treatment, safe placement, and speaker-label style.
- Audio and delivery: Save a music starting level and an export preset, then check both against each new source.
Use these hypothetical workflow budgets as starting examples rather than fixed prescriptions.
Example workflows by montage type
| Workflow | Target length | Shot length | Caption rule | Export row |
|---|---|---|---|---|
| Gaming clutch story | About 24 seconds in this example | 2–4 seconds as a starting band | One complete phrase per card | 9:16 at 1080 × 1920 |
| Brand recap | Up to 45 seconds in this example | Hold until the new fact is clear | Verbatim lines, one new fact per shot | 9:16 at 1080 × 1920 |
| Tutorial or explainer | 21–30 seconds as a planning budget | 3–5 seconds as a starting band | One idea readable with sound off | 9:16 at 1080 × 1920 |
| Visual highlight reel | 21–30 seconds as a planning budget | Brief action-led shots | Short label held at least 1 second in this preset | 9:16 at 1080 × 1920 |
Adapt the Template to the Source
For the gaming story, keep the ranked attempts and reaction distinct, with speaker hints where voices overlap. For the brand recap, reject attractive footage that adds no new fact about the event, product, or outcome.
For an explainer, choose images that demonstrate the instruction rather than merely filling the frame. Save platform variants from the same source project instead of building them from compressed delivery files.
Promote a project to a reusable template only after it passes review and proves useful in publication. Preserve what worked, but leave the failed element open for revision.
Revise the Montage from Retention
Publishing is the start of another editing decision, not proof that the montage is finished. In Metricool’s 2025 short-form video analysis, covering more than 5 million videos and 582,000 accounts worldwide, the company found signs of saturation on Instagram and YouTube, while YouTube interactions declined nearly 50% year over year despite increased Shorts volume. Posting more isn’t a substitute for diagnosing the clip.
Separate distribution from retention. Low views alone don’t tell you whether people rejected the montage or whether relatively few people encountered it.
Match the Revision to the Drop-Off
Compare the earliest departure with what happens after viewers have had time to understand the opening. Use the first second and the first five seconds as inspection points, not universal pass-or-fail thresholds.
- Immediate departure: Test a clearer opening promise or a more intelligible first shot before changing the grade.
- Departure during explanation: Inspect missing context, dense captions, and visual changes that compete with speech.
- Viewers stay but respond little: Examine whether the payoff delivers the promise, while recognizing that quiet comments alone don’t prove confusion.
- Limited distribution with steady viewing: Don’t assume a faster cut will solve the problem. Gather more comparable results before rebuilding the edit.
Change One Major Element at a Time
Keep the core moment and target duration comparable. Test an alternate opening line, a longer caption hold, or a different narrative promise, but don’t change all of them in the same variant.
Log the change, the retention pattern, and comments that reveal misunderstanding. A viewer asking what happened is different from a viewer debating the play; the former suggests an explanation problem, while the latter may indicate that the action was clear.
In our workflow, users describe the desired vibe to Eddie, who assembles cuts, captions, and effects. After that edit, users can continue chatting with Eddie or open the full editor to adjust timing and other details themselves. Make revision requests specific: preserve the setup line, hold the payoff longer, or move the caption away from the target.
Your next edit should answer a question you can name. That’s more useful than asking for a generally faster, louder, or more viral version.
Bring your footage to clipoven and tell Eddie the story you want viewers to follow, including which setup, payoff, and reaction must remain clear. Refine the cuts and captions through chat or in the full editor, then export your finished vertical clip in 2K for TikTok and YouTube Shorts.