 clipoven
A horizontal clip that played well on a monitor can die on a phone. The subject is too small, the opening takes too long, and the captions sit under the interface. Social video editing fixes those problems before you post, by treating framing, pacing, text and ending as separate decisions you can test.
Table of Contents
- What Social Video Editing Actually Involves
- Platform Specs Across TikTok, Shorts and Reels
- How to Reframe Horizontal Footage for Vertical Feeds
- Pacing, Hooks and Cuts That Hold Attention
- Captions and On-Screen Text for Sound-Off Viewing
- Choosing an Editing Workflow and Tool Type
- Measuring Edits and Choosing Your Next Test
What Social Video Editing Actually Involves
YouTube reported that Shorts surpassed 2 billion logged-in monthly users in July 2023, up from 1.5 billion one year earlier, and generated about 70 billion daily views in 2024, compared with 30 billion in 2021, according to Revid’s short-form video statistics summary. That scale changed the job. You’re no longer making a smaller export of a wide video. You’re cutting for a feed where a viewer on a phone decides within seconds whether to stay or scroll.
Long-form editing is like a full dinner, where courses can build slowly. Social editing is a tasting menu. Every bite has to earn the next one, because there’s no captive audience and no room for a warm-up.
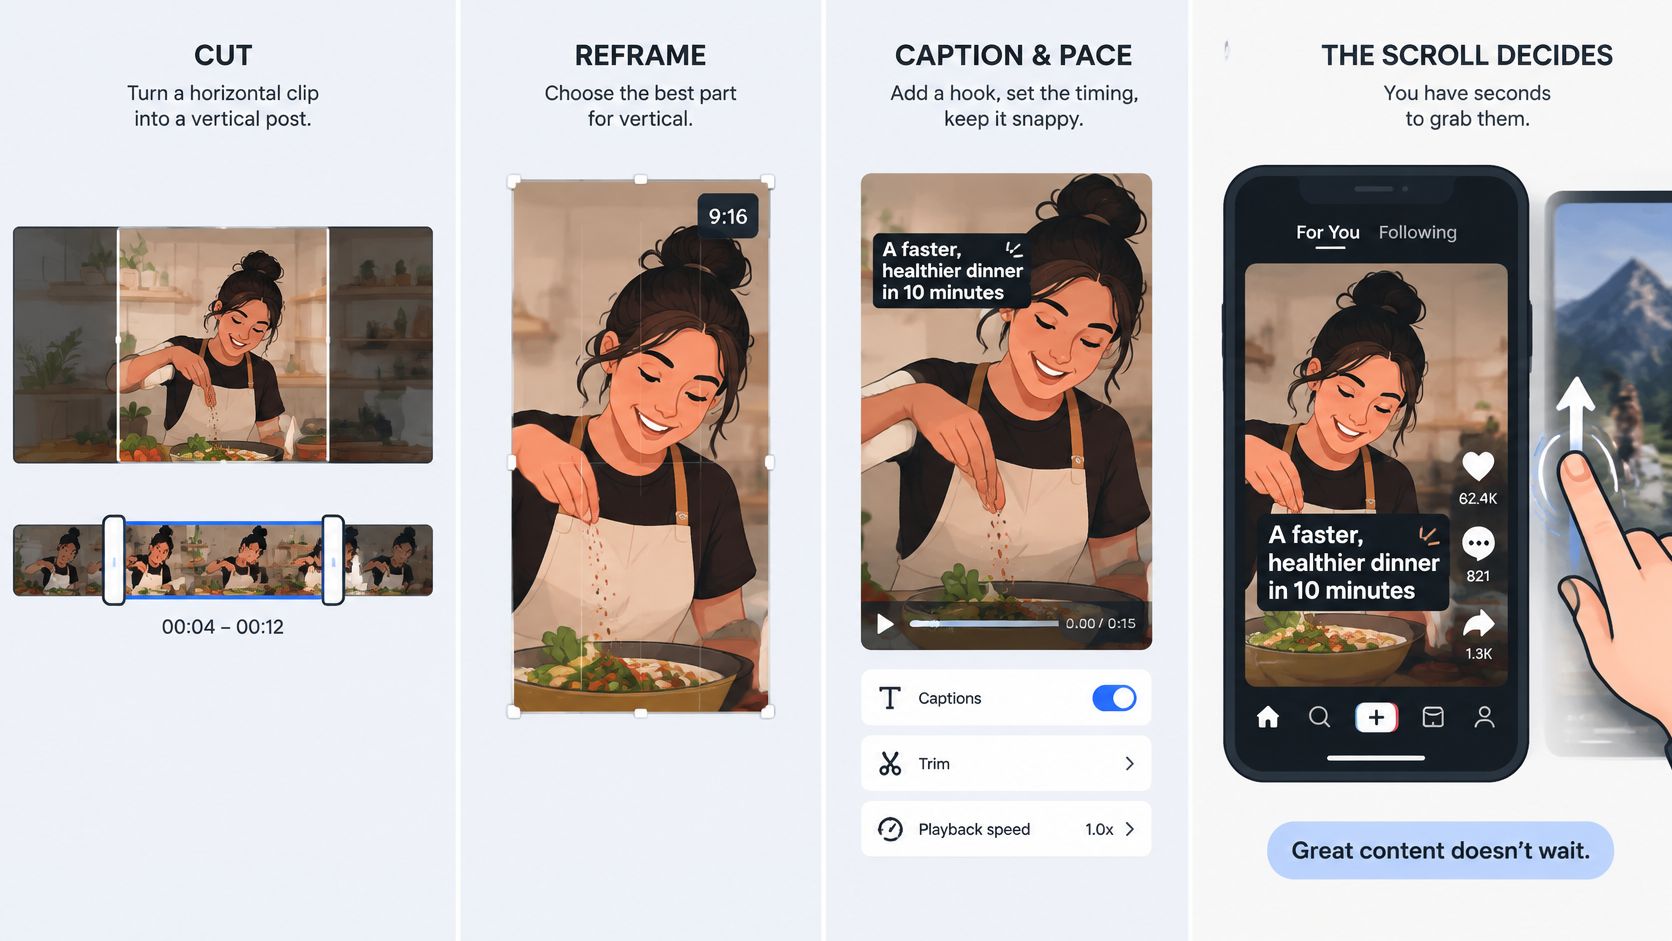
What a Horizontal Source Needs First
Most source material starts wide. Livestream highlights, podcast answers, gameplay rounds and interviews all arrive in 16:9, often with one long recording that could become five separate clips. Before any of them is postable, four things have to happen.
- Find the moment: Pick one compelling beat per clip, not a topic. A clip built around a single reaction, answer or play is easier to follow than one that tries to summarize ten minutes.
- Remove pauses: Cut dead air, false starts and setup that only made sense in context. What felt natural live reads as slow in a feed.
- Keep the subject in frame: The speaker, player character or product has to survive the move to 9:16. If the crop loses the face or the hands, the clip loses its point.
- Carry meaning in captions: Viewers who watch without sound still need the full argument or joke. Text isn’t decoration here, it’s the backup audio track.
Working definition: Social video editing is cutting, reframing, captioning and pacing footage so it makes sense, at phone size, to someone who didn’t choose to watch it.
Every edit makes three decisions, whether you make them deliberately or not. Where it starts determines whether anyone stays. What stays determines whether the middle holds. How it ends determines whether the viewer replays, shares or follows. I would write those three decisions down before opening the timeline, because they’re cheaper to change on paper than after export.
Platform Specs Across TikTok, Shorts and Reels
All three major platforms use the same vertical frame, which simplifies your master settings. You lock a 9:16 sequence, deliver at 1080×1920, and derive platform files from one master instead of rebuilding the edit three times.
| Platform | Aspect ratio and resolution | Codec and audio | Length to test first |
|---|---|---|---|
| TikTok | 9:16, 1080×1920 | H.264 video, AAC audio | 15-60 seconds |
| YouTube Shorts | 9:16, 1080×1920 | H.264 video, AAC audio | 30-60 seconds |
| Instagram Reels | 9:16, 1080×1920 | H.264 video, AAC audio | 15-30 seconds |
Reading the Columns in Export Order
The resolution column is your delivery size, not necessarily your working size. A 1440×2560 vertical master gives you room for downscaling and small reframing adjustments, but check it against each platform’s upload limits and re-encoding behavior before you rely on it. Higher resolution doesn’t rescue poor framing.
The codec column is the safe default. Export H.264 video with AAC audio, use a constant frame rate that matches your source where possible, and keep color Rec.709-compatible so skin tones and game UI don’t shift after upload. If you’re tuning Shorts specifically, our guide to the best export settings for YouTube Shorts covers the settings to lock before you render.
Treat the length column as a starting range to test, not a hard limit. Platform limits change, and the right length is the shortest cut that still delivers the payoff. Verify current limits on the day you post rather than trusting an old preset.
Where the Audience Time Goes
A 2026 industry summary drawing on the Digital 2026 Global Overview reported that short-form video accounted for 58% of total time spent on social media worldwide, with short-form video producing a 52% engagement likelihood on Instagram and YouTube, 48% on Facebook, 47% on Bluesky, 37% on X and 27% on LinkedIn, per Vidico’s short-form video statistics roundup. Those figures measure audience behavior, not editing quality, but they tell you where a vertical asset earns its keep first.
My default is to prioritize Instagram and YouTube for the first version, then test the same master elsewhere with platform-specific openings. The practical workflow stays simple. Build one high-quality vertical master, export a 1080×1920 derivative per platform, and change only what the platform forces you to change, such as caption placement, length and the opening line. That keeps your comparisons honest, because you’re testing one variable at a time instead of three unrelated edits.
How to Reframe Horizontal Footage for Vertical Feeds
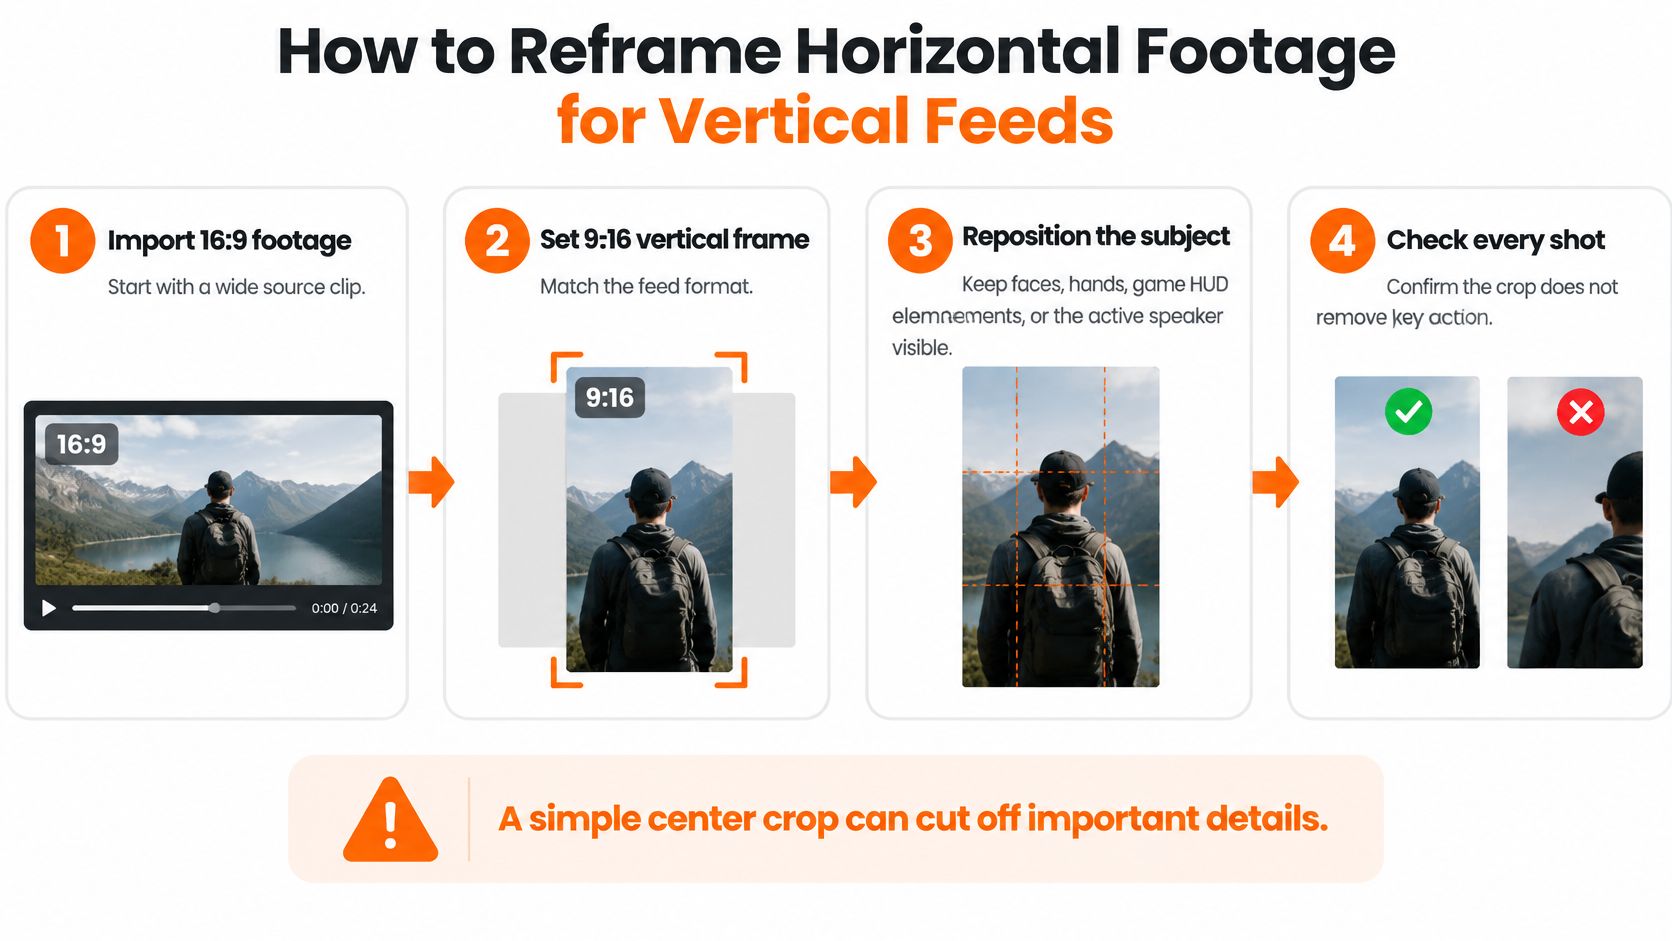
A center crop is the fastest way to ruin good footage. In a 16:9 source the frame height is 56.25% of its width; in a 9:16 output the height runs about 178% of the width. Scaling and cropping to vertical discards nearly all of your horizontal information, and the sliver that survives is whatever sat in the middle. Without subject tracking, that sliver is often the wrong one. Faces slide toward the edge, hands leave the frame, game HUD elements vanish, and the active speaker drops out of a two-shot.
The fix is deciding what each shot is about before anything gets resized.
The Reframing Routine
- Set the sequence first: Import the master and set the timeline to 9:16 at 1080×1920, or your chosen vertical master size, so every later decision is made within the correct frame.
- Name the subject per shot: Decide whether the speaker, the player’s character, the product, or the on-screen HUD carries the shot, because the crop follows that choice.
- Track, then verify: Apply subject tracking or auto-reframe, then scrub the whole shot to confirm the tracked subject stays inside the frame during movement. Check cuts and the widest point of a pan, where drift shows up first.
- Set headroom: Place eyes near the upper third so the face reads immediately and captions have room below without covering the mouth.
- Protect the edges: Reserve the top and bottom bands for captions and platform interface overlays, since buttons and progress bars will cover anything you put there.
- Move only when needed: Add controlled camera motion when the subject changes position. Constant drifting makes viewers work to follow a static conversation.
- Preview at phone scale: Shrink the preview to phone size and check that faces, HUD values, and text are readable without zooming.
- Inspect after export: Watch fast motion for compression blocks or ringing, because clean preview playback doesn’t guarantee a clean compressed file.
Batch work rewards consistency. A dedicated horizontal to vertical video converter applies the same crop logic, headroom and safe-area rules to every clip instead of restarting the judgment call each time.
Two Slips That Show Up Constantly
A wide two-person interview shot doesn’t fit a vertical frame, and squeezing it makes both people tiny. Use a split frame with one speaker stacked over the other, or cut to whoever is talking. Cutting on speaker changes also adds visual rhythm you’d otherwise have to manufacture.
Gameplay fails differently. The HUD often sits at the edges, exactly where a center crop cuts. Health bars, minimaps and ammo counters disappear, and viewers can’t read the play. Reframe around the action, then reposition or scale the HUD region into the safe area if your editor allows it, and sacrifice background scenery first.
Check the crop on the worst frame, not the best one. If the subject survives the widest movement in the shot, the rest of the clip is safe.
Subject retention, readable captions and clean motion at phone size matter more than the resolution figure on the export dialog. A vertical file that keeps the subject intact beats a sharper one where the speaker’s hands are cut off at the wrist.
Pacing, Hooks and Cuts That Hold Attention
The first second decides retention. Your hook is the first frame plus the first sentence, and together they should show the payoff or raise a question the viewer wants answered. A logo, a greeting or a wide establishing shot spends that second on nothing.
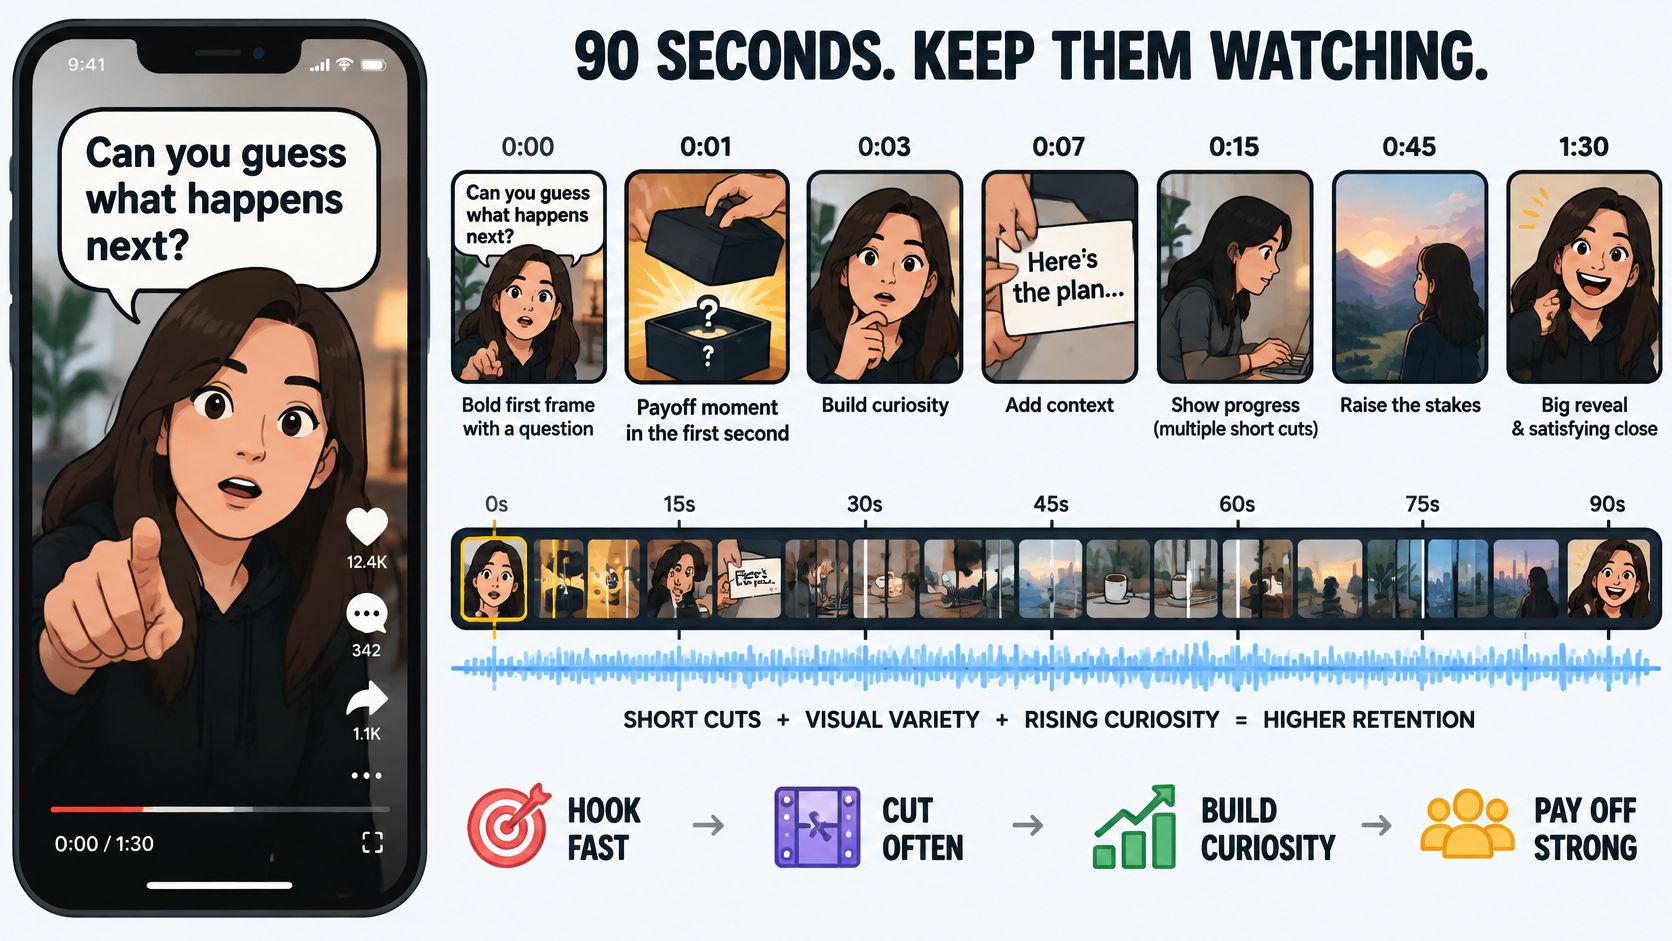
Say a podcast answer runs 90 seconds. The social cut might land near 35 seconds. You’d trim the intro where the guest repeats the question, keep the punchline and the one supporting example, and move the strongest line to the front as the hook. The clip then opens on the claim and spends its remaining time proving it, instead of building toward a reveal most viewers never reach.
Cutting Rules That Tighten Without Rushing
Remove breaths and dead air so pauses shorten to a beat. A half-second of silence between sentences reads as a stall on a phone, even though it felt natural in the room. Use jump cuts to tighten speech, and change shot scale or add a small punch-in zoom on emphasized words to refresh attention without new footage.
Sound design is a pacing tool, not decoration. One sound effect on a punchline or a short shake on a reveal underlines the moment. The same effect on every cut becomes noise, and viewers start hearing the editing instead of the content.
The example below shows how opening frames and cut points change what a viewer understands in the first moments of a clip.
Endings and Platform Variants
End on the payoff, or make the last frame lead back into the first so the clip loops cleanly. A trailing sentence after the best moment costs you rewatches.
Don’t post one identical cut everywhere. Test a different opening per platform from the same master. For TikTok, put the strongest moment in the first frame and keep cuts tight from the start. For Shorts, add a short context line early and place the payoff near the end. For Reels, keep the subject centered, captions clear of the bottom band, and aim for the shorter cut when the source allows. Record which opening each platform rewarded, so the next batch starts from evidence rather than habit.
Captions and On-Screen Text for Sound-Off Viewing
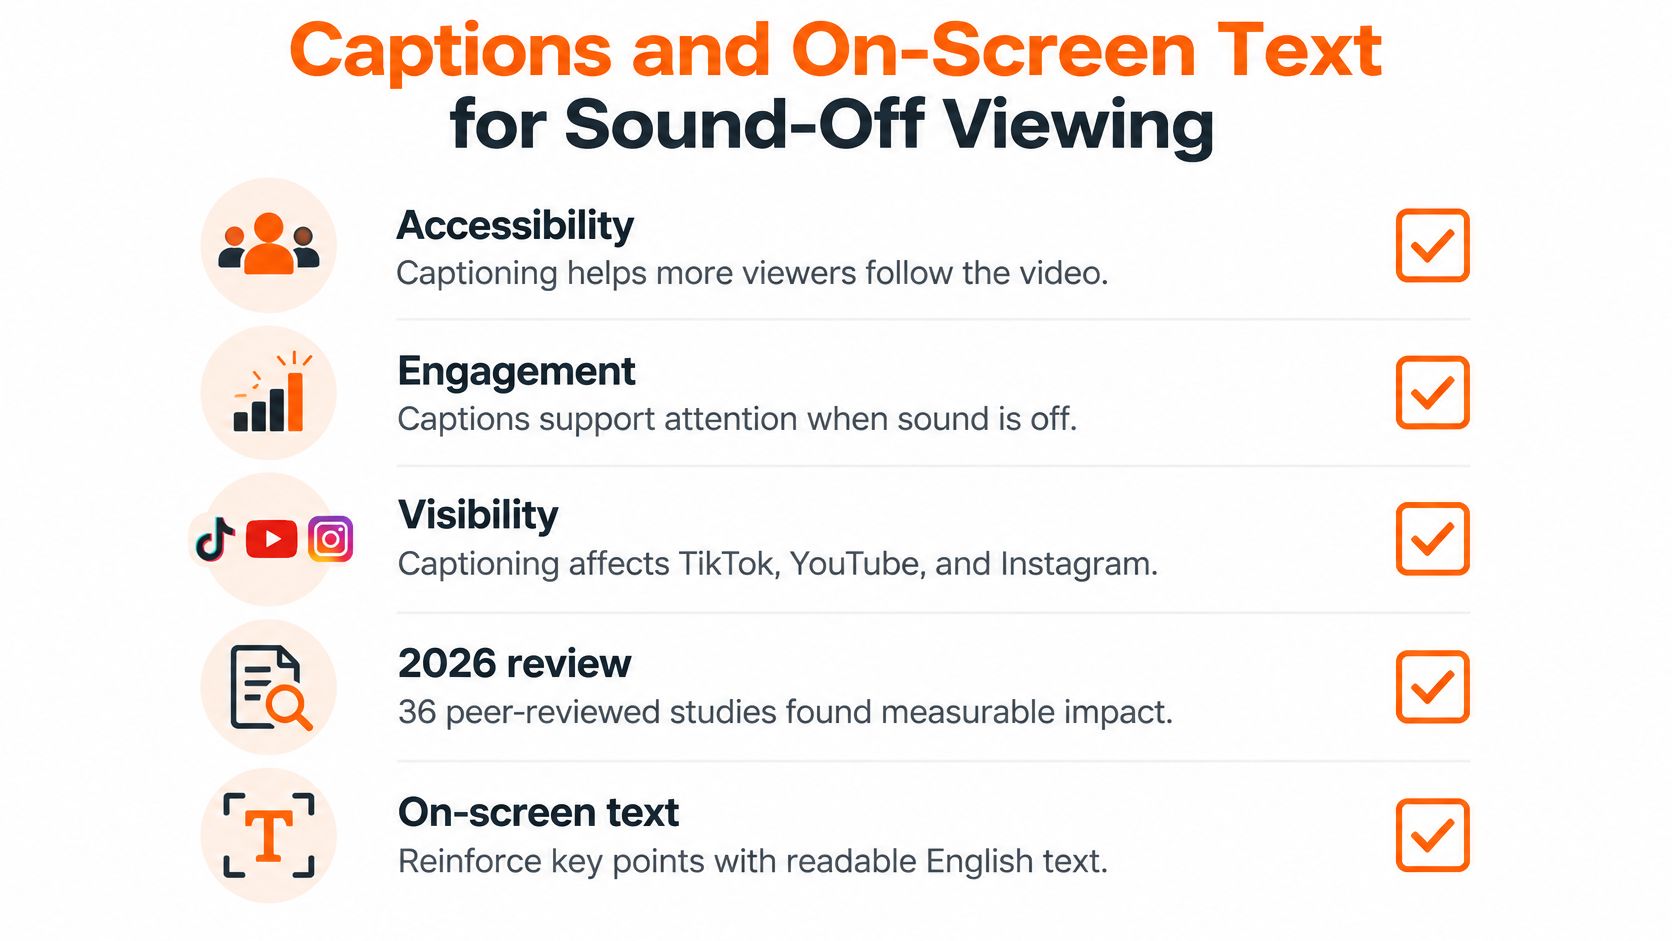
Captions aren’t an accessibility extra you add if time allows. A 2026 review of 36 peer-reviewed studies found that captioning affects accessibility, engagement and visibility across TikTok, YouTube and Instagram, and the review cites estimates that approximately 85% of Facebook videos are watched without sound and viewers were 80% more likely to watch an entire video when captions were present, according to the 2026 ACM review of captioning research. Separately, Wistia’s 2025 State of Video Report found that use of captions in videos increased by 572% from 2021 to 2024, based on analysis of more than 14 million videos and over 100,000 businesses. If your captions are wrong or late, a large share of your audience gets a broken version of the clip.
Production Order
Generate captions during rough assembly, not after the final cut. The transcript helps you find high-information dialogue and spot pauses worth cutting, so captions shape the edit instead of trailing it.
Correct the automatic transcript before you style anything. Names, gaming terminology, slang, profanity handling and code-switching are where speech recognition fails, and a wrong name on screen undermines the whole clip. Then retime after the final cut, because every trim shifts sync, and text that lags behind speech is harder to read than no animation at all. Our guide to on-screen text goes deeper on placement choices that survive platform overlays.
Design Rules for Readability
- Sync tight: Use word-level or phrase-level timing so text appears as it’s spoken, not in blocks that force viewers to wait.
- Show less: Keep two lines at most, with roughly three to five words visible at a time, so the eye isn’t racing.
- Force contrast: Use high-contrast type with an outline or background box, because captions sit over unpredictable footage.
- Respect the interface: Keep text clear of the bottom band where platform controls, captions and progress bars live.
- Animate sparingly: Emphasize semantically important words only. Animating every token competes with the speaker’s face and the action.
Sound-off test: Watch the exported clip muted, on a phone, at arm’s length. If you can’t follow every line in time, your audience can’t either.
Run that pass on every export. Check that captions don’t cover a face, a product or a HUD element, that no line appears early enough to spoil a punchline, and that styling stays consistent across a batch so returning viewers recognize your clips before they read a word.
Choosing an Editing Workflow and Tool Type
Pick by volume, control and team size, not by brand ranking. The tool that suits a streamer clipping several sessions a week will frustrate a freelancer billing for frame-accurate work.
| Tool type | Best for | Main trade-off |
|---|---|---|
| Mobile editing apps | Quick vertical cuts, native captions and sound | Limited control over fine timing and multi-track work |
| Desktop NLE (Premiere Pro, DaVinci Resolve) | Multi-track control, brand templates and long projects | Slower for high-volume clip output |
| AI clip editors | Turning long recordings into many vertical shorts quickly | Cuts and captions still need human review |
| Browser template editors | Team-friendly branded templates and shared assets | Fewer advanced effects and finishing tools |
| Standalone caption tools | Accurate transcripts and subtitle files | Still need a picture editor for the cut |
Matching the Row to Your Week
Count your clips before you compare features. If you’re producing a batch from every stream, speed of the first pass matters most, because the bottleneck is finding and framing moments, not finishing them. If you’re on a brand team, templates, shared brand kits and review links matter more than effects. If clients pay you for precise pacing, you need a full timeline with multi-track control, even if it’s slower per clip.
Most productive setups combine two rows. An automated first pass cuts, reframes and captions. A manual timeline pass fixes pacing, caption errors and endings. Then you export once.
With an AI clip editor like ours, you describe the desired vibe to Eddie, who puts the cuts, captions and effects together and keeps refining the clip with you. After Eddie edits a clip, you can keep chatting to refine it or open the full editor to adjust cuts, timing, captions and effects yourself. That chat-to-timeline handoff is the point. Automation handles assembly, and you spend your time on judgment calls a tool can’t make, such as whether a joke needs its setup.
Avoid tool hopping. Every export and re-import round adds rework, risks quality loss and breaks caption sync. I would rather see you master one imperfect toolchain than rent four tools that each do one step well and hand off badly. Choose the combination you’ll still be using in three months, because consistency in your process is what makes your test results comparable.
Measuring Edits and Choosing Your Next Test
Posting more doesn’t guarantee more reach. Metricool’s 2025 analysis found YouTube Shorts publishing increased 60.8% and the number of accounts posting increased 36.7%, yet interactions fell 46.5% and engagement dropped 36% year over year. A weak result can come from the edit, the platform or simple saturation, and each cause needs a different fix.
| Metric | What it signals | Edit to test |
|---|---|---|
| Viewers still watching at 3 seconds | Strength of the hook | Opening line, first frame or on-screen question |
| Average percentage viewed | Pacing and dead air | Trim pauses and cut earlier |
| Rewatches and loops | Payoff and ending quality | Tighter ending or a loop-friendly final frame |
| Shares and saves | Value worth passing on | Clear takeaway in the caption or on-screen text |
| Comments and follows | Relevance to the audience | Stronger context line or a specific call to action |
| Engagement rate against a control clip | Whether the platform or the edit is the cause | Same source, two versions, one changed variable |
Use the table as a diagnostic map, not a report card. Make two versions of the same source that differ in one variable, such as the opening line, pacing or caption layout. Post them on the same platform at similar times, record the editorial reason for each version, and compare against your earlier baseline.
Repeat per platform before you scale volume. For anyone producing many clips, the goal shifts from output count to learning which edit decisions work where. Choose one variable for the next batch, write down your hypothesis before posting, and let the result decide your next template change.
Turn one long recording into testable vertical clips without rebuilding every cut by hand. Describe the vibe, review the assembled cuts, captions and effects, then refine the beats that need your judgment in the full editor before exporting a platform-ready short. Start your next batch at clipoven and test a different opening on each platform this week.